
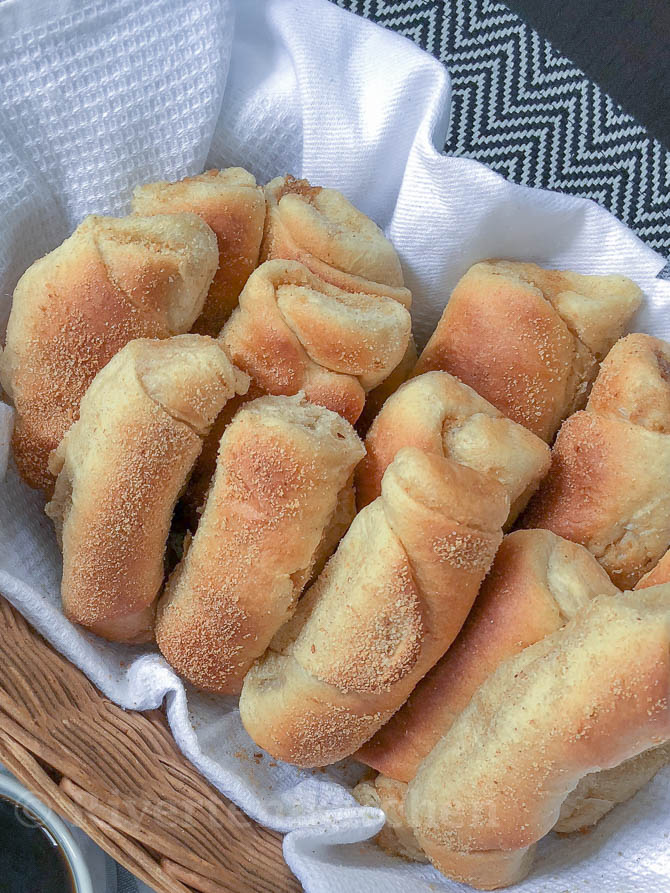
Soft Spanish Bread
Soft, fluffy Spanish Bread filled with butter and sugar then laid in breadcrumbs. A bread like no other and definitely every Filipino’s favorite merienda.
Spanish bread was the bread of my childhood in the Philippines. My siblings and I call it ‘potpot’ bread.
Every afternoon, we await the loud horn sound of the bread vendor. He goes around the neighborhood carrying a huge basket of warm and freshly baked Spanish bread at the back of his bicycle. It was so good! I still wish I had a chance to ask for his secret recipe. Alas, I was busy with play and friends back then. I just eat and never cared to cook or bake. Hahaha…
The recipe we’re making today is not from the bread vendor. It is, however, the Spanish bread recipe I’ve been using for years. I’ve worked on this for a long time and I’m finally excited to share it with all of you bread lovers out there!
Filipino Spanish Bread Ingredients
- Bread flour and All-purpose flour: Mixing these two kinds of flour allows us to control the protein content of the bread. Which just means that it will give the bread a soft and delicately chewy texture.
- Egg yolks: No egg whites. This is the secret to a really soft and fluffy dough.
- Pure unsalted butter: I love using butter when making bread. It makes my kitchen smell so good!
- Sugar: We Filipinos love our buns sweet. We need this for the dough and for the butter filling.
- Milk and Water: These will serve as the base liquid for the dough. The water is combined with the yeast to activate.
- Active Dry Yeast or Instant Dry Yeast: Both can be used interchangeably. Activate in lukewarm water until foamy.
- Bread crumbs: You can use Plain bread crumbs or Panko. If you are using the former, place it in a thick plastic bag and pound it to make it finer.
How to Make It
And here’s how to make the best Filipino Spanish bread:
Part 1: Make the Dough
A few bread-making tips:
- Make sure the water is lukewarm before putting in the yeast. If it’s too hot the yeast will die. If it’s cold, it will not activate. To make sure that the water is at the right temperature, use a kitchen thermometer. The water should be between 30c/86f to 40c/104f.
- Add a teaspoon of sugar to the water before stirring in the yeast. This will help easily activate it.
- Activate the yeast in a bowl even if it’s instant yeast. This ensures that the yeast is fresh and alive.
- Do not let the dough rise for too long if proofing in a warm place. The maximum should be at least 1 hour. Otherwise, the bread will end up having a yeasty taste. The trick (according to professional bakers) is to let it rise until it doubles in size and volume.
- Knead dough until smooth and elastic, it should spring back when poked. Add more flour only when the dough is too wet and clings heavily to the sides of the bowl.
Part 2: Divide the Dough
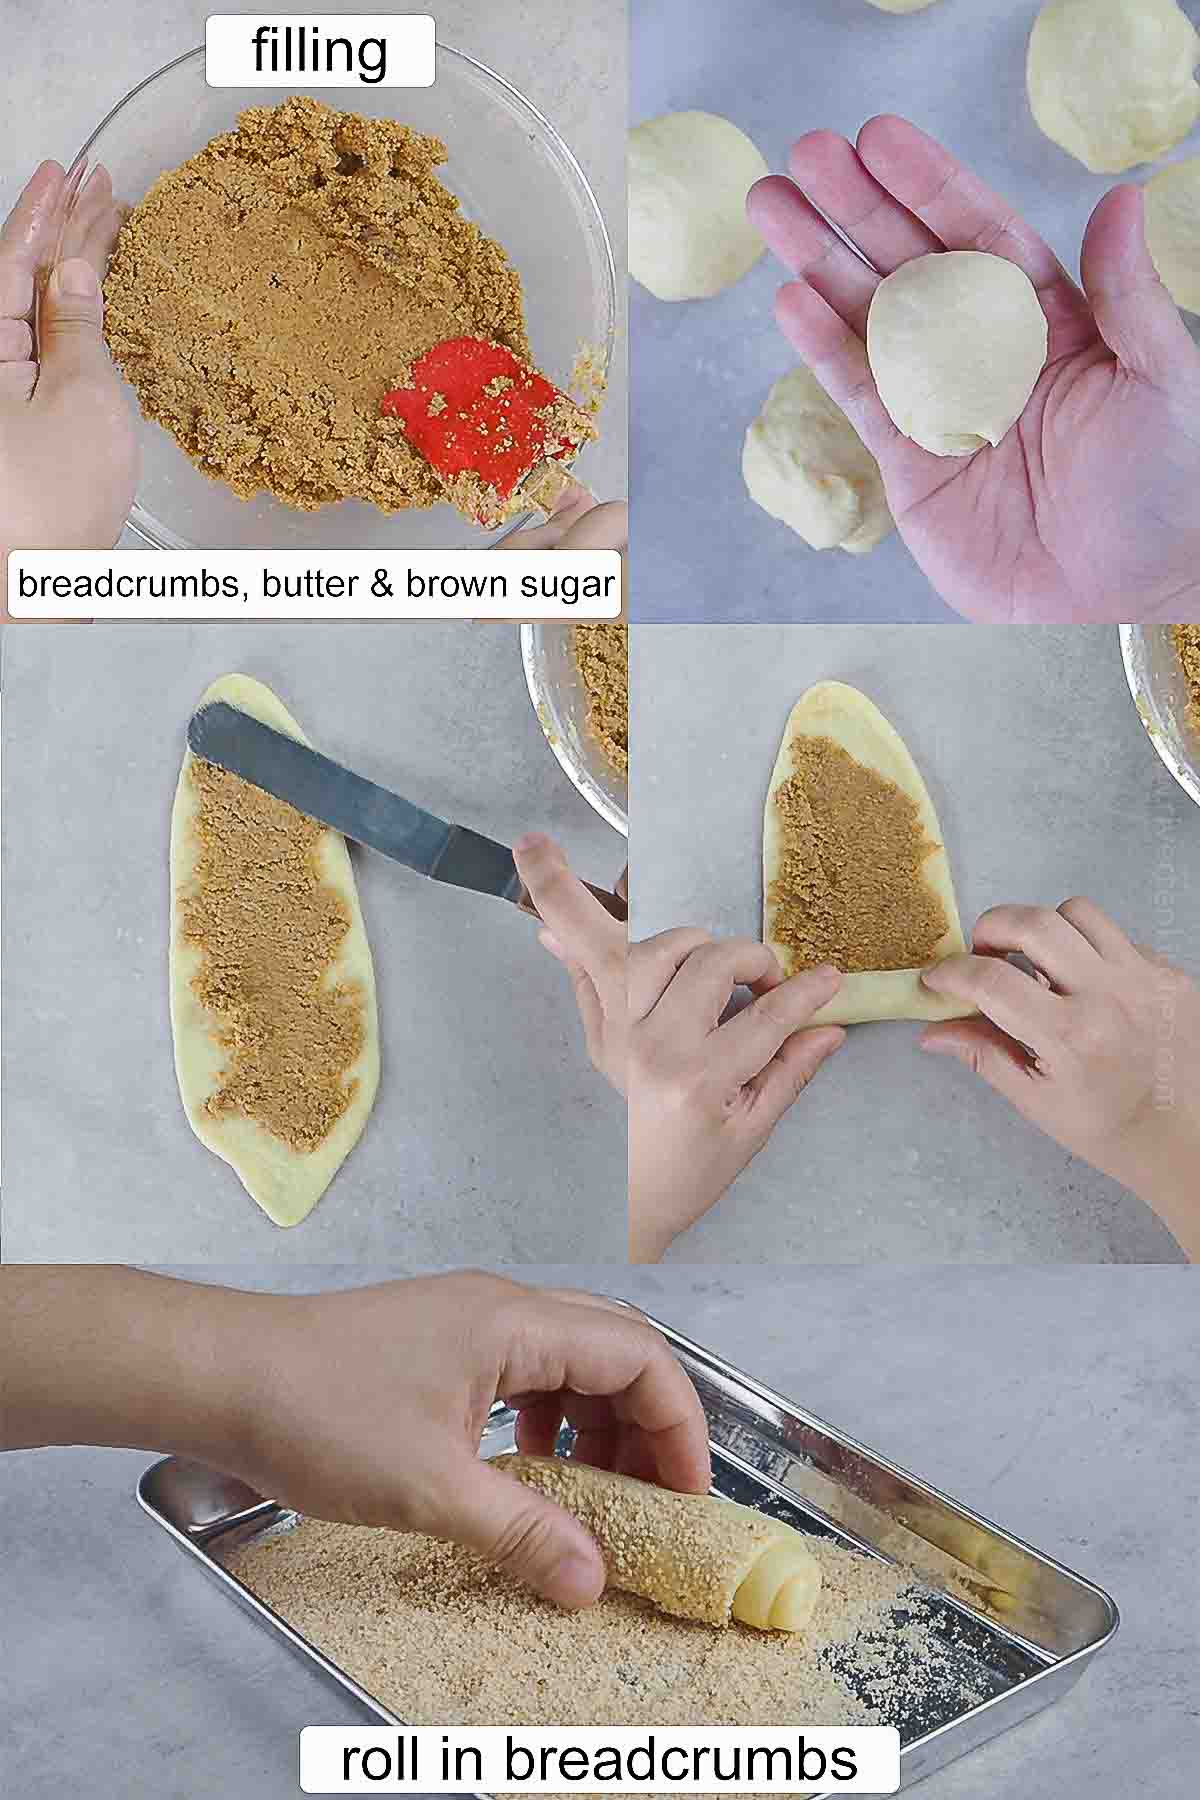
While waiting for the dough to rise, make the filling. Simply combine breadcrumbs, brown sugar, and soft butter in a bowl. Give it a good stir until the ingredients come together, forming a smooth paste.
Once the dough has doubled in size, release the air by giving it a gentle punch. To further enhance the aroma and taste of the bread, knead it a few times by hand. This helps reduce the “yeasty” smell, giving your rolls a more pleasant flavor.
Divide the dough into 20 to 24 portions. For an evenly sized dough, use a kitchen scale. Mine was about 50g each.
Part 3: Fill the Dough
Grab your rolling pin and gently flatten each portion of dough into an oval shape. Take a generous tablespoon of the filling and spread it evenly onto the dough. Then, roll the dough into a log.
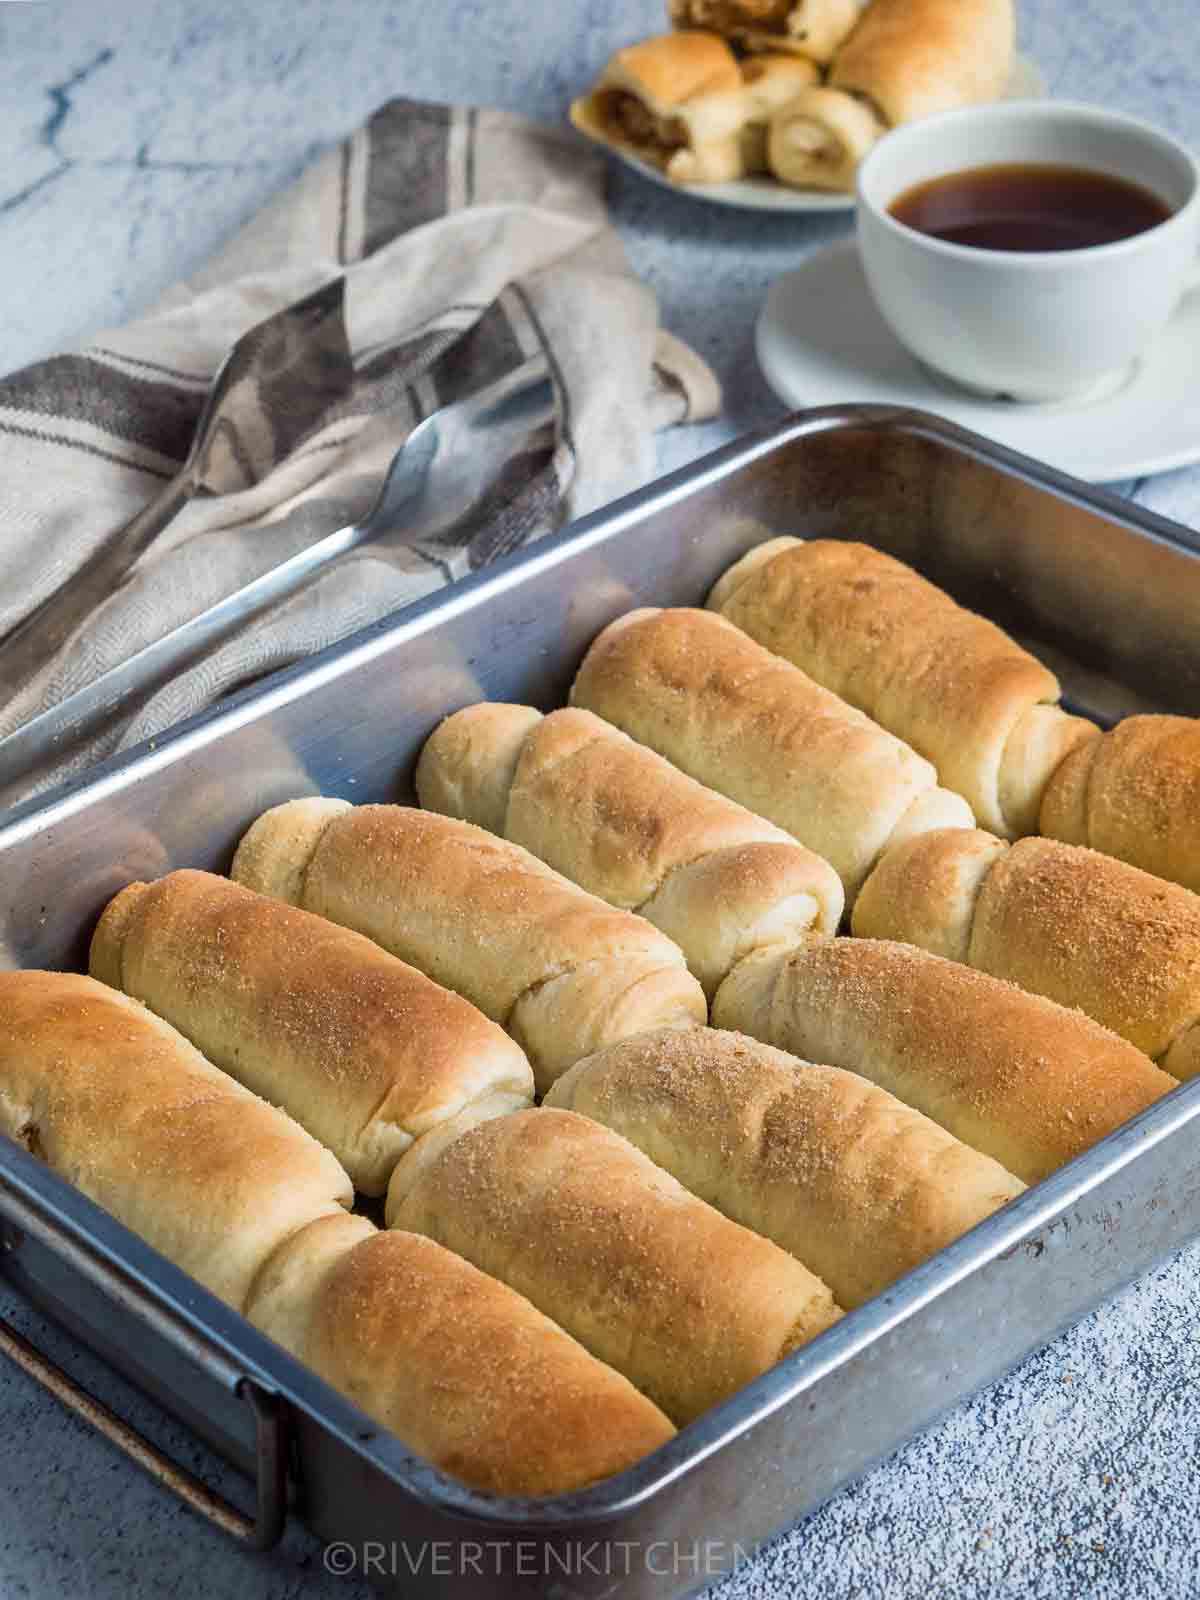
Once you’ve rolled each portion, it’s time to coat them in breadcrumbs. Lay each log in the breadcrumbs and give them a gentle shake to remove any excess.
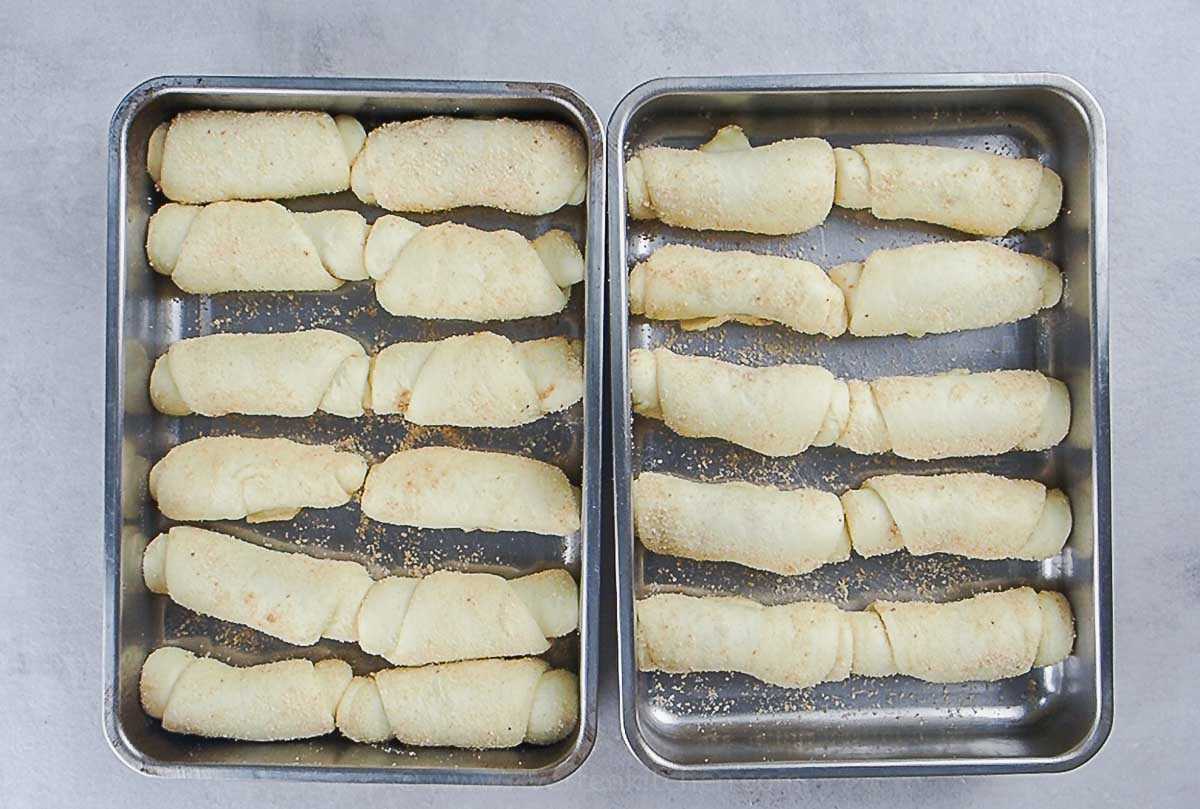
Now, place the coated logs onto a baking tray that’s either greased or lined with parchment paper. Remember to leave about two inches of space between each roll for them to expand.
To allow the rolls to rise further, cover them with a towel or cloth. Let them rest in a warm spot for approximately 40 minutes to an hour, allowing them to rise beautifully and develop a light, fluffy texture.
Part 4: Bake
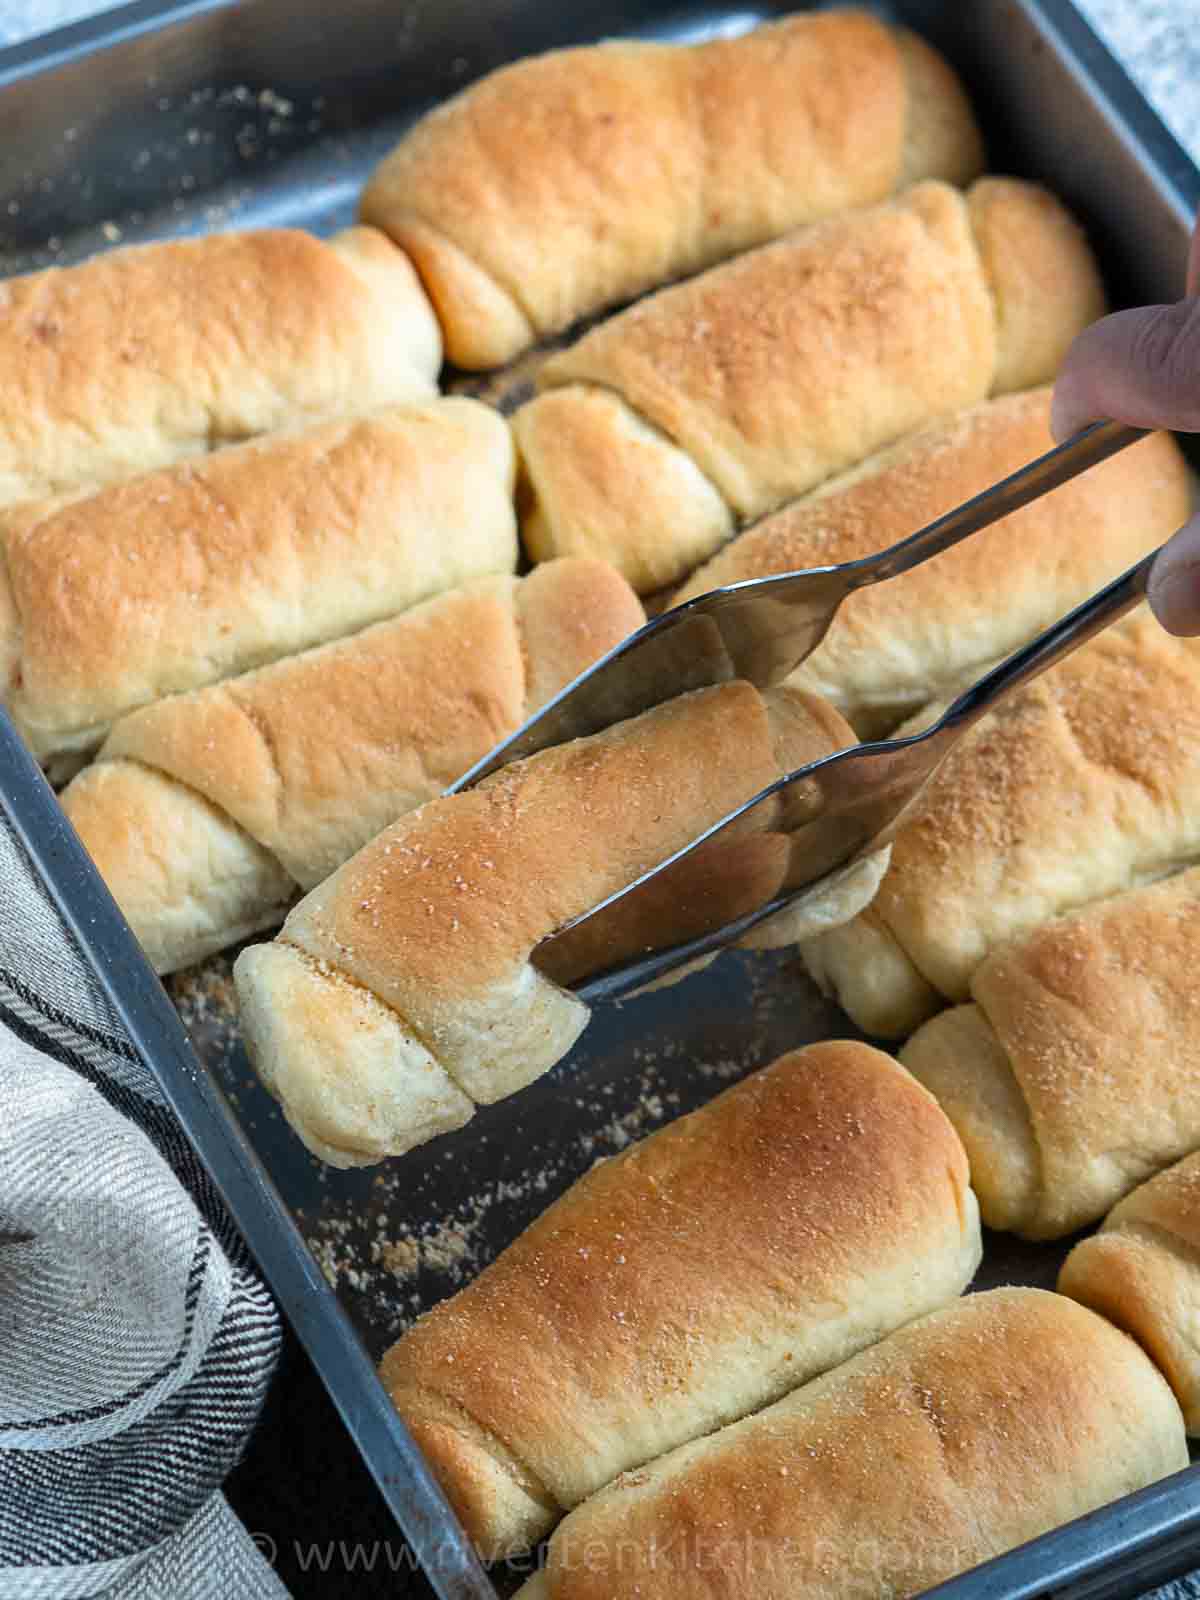
About 15 minutes before your dough rolls finish rising, preheat your oven to 180°C (356°F). This will ensure that it’s perfectly heated and ready to go when it’s time to bake.
Once the rolls have risen to their desired size, it’s time to bake them to golden perfection. Place the Spanish bread in the preheated oven and let them bake for approximately 18 to 20 minutes. Keep a close eye on them, and when you notice the tops turning a lovely light brown, you’ll know they’re done and ready to be enjoyed.
Make-ahead Tips
- Make the dough ahead of time then place it in the fridge. The dough will slowly rise and double in size overnight. On the day of baking, remove from the refrigerator 30-40 mins before you’re going to shape them into rolls.
- Another option is to make the dough and finish the first rise on the same day. Shape them into rolls then do the second or final rise in the fridge. Bake them the next day and you’re done! Bake them the next day and you’re done! Note: Once the shaped dough rolls have risen, you can’t remove or touch it in the pan. Otherwise, it will lose its shape.
Storage and Shelf-life
Store in an airtight container in the fridge. Spanish bread is best eaten within 2 to 3 days for the best flavor and texture
Reheating
To reheat, bake the bread in the oven for 10 minutes at 350f/180c. To prevent the top from burning, wrap it in aluminum foil.
If using a mini-toaster/oven, use a lower temperature of about 120c to 130c. Bake for 1 to 2 minutes. The top can easily burn if the bread is too close to the heat source, so I suggest wrapping the bread with aluminum foil.
I love having this with Chicken Sopas. How about you?
Frequently asked questions
Can I substitute bread flour with all-purpose flour?
Yes, you can substitute with all-purpose flour if bread flour is not available. Replaced in the same amount as mentioned in the recipe. Bread will just be less chewy with all-purpose flour.
How can I prove the dough during colder months?
For colder months, I use the oven to prove the dough. Place a glass baking dish on the bottom rack of the oven and fill it with boiling water. Put the dough in the middle or top rack and shut the door. The steam and heat from the boiling water will create a warm environment to help raise the dough.
What if the dough did not properly rise?
Check out my Beginner’s Guide: Baking with Yeast Bread for more tips.
Hungry for more? Try these recipes!
- Cassava Cake
- Filipino Chicken Adobo
- Easy Chocolate Cake – moist and not too sweet!
- Cheesy Baked Macaroni
- Pork and Shrimp Lumpiang Shanghai
- Pork Embutido with Cheese
More bread recipes
Watch the video on how to make Soft Spanish bread
Subscribe to my newsletter and follow along on Facebook, Pinterest, and Instagram for all of the latest updates.

Soft Spanish Bread
Ingredients
- 2 ¼ teaspoon instant yeast (see note 1)
- ½ cup water + 1 tsp sugar (lukewarm)
- 3 cups bread flour (see note 2)
- 1 cup all-purpose flour (i used wholemeal flour)
- ½ cup sugar
- ¾ teaspoon salt
- ¾ cup fresh milk (lukewarm, evap can also be use)
- 3 large egg yolks
- ½ cup unsalted butter (softened)
- oil for the bowl
Butter Filling
- ½ cup butter (softened)
- ¾ cup breadcrumbs
- ½ cup brown sugar
- 3 teaspoon milk
Breading
- ¼ cup breadcrumbs
- 2 teaspoons brown sugar (optional)
Instructions
For the Dough
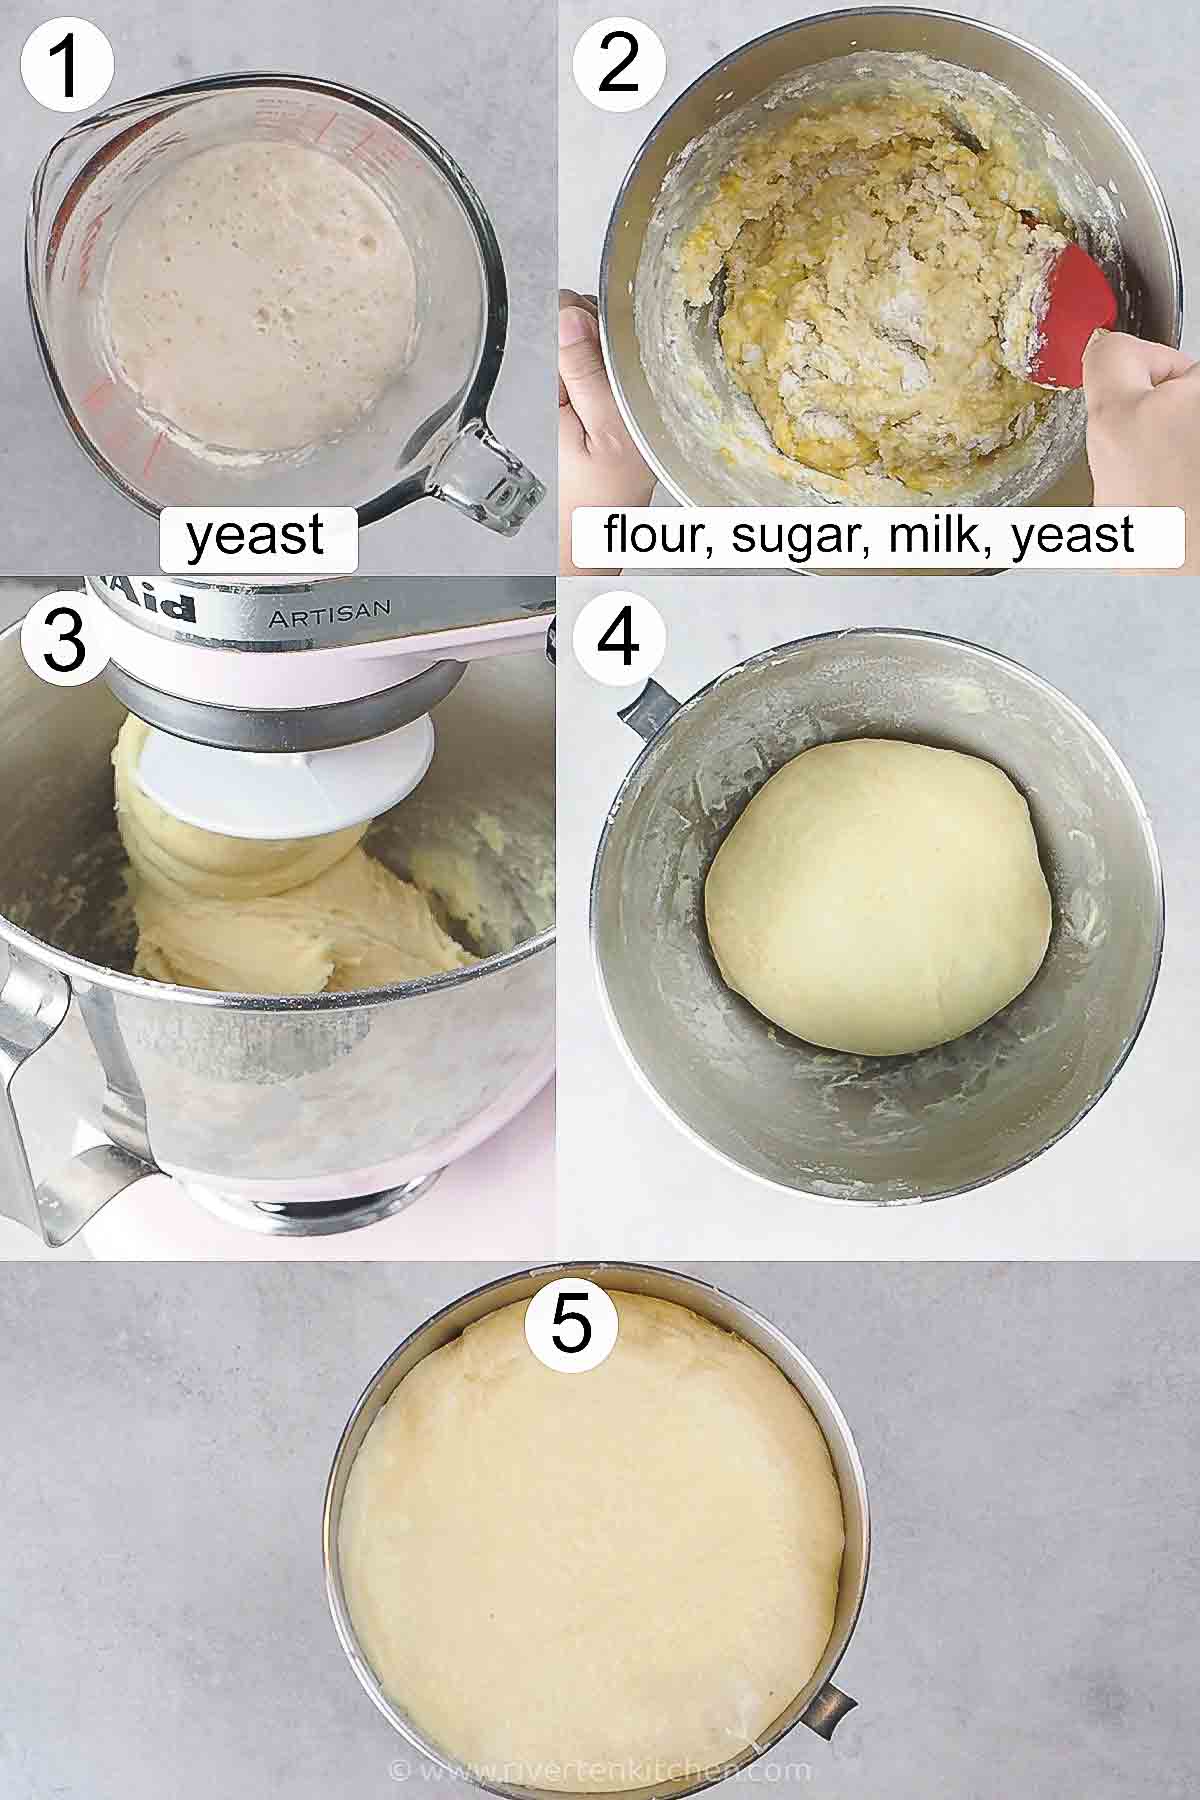
- In a medium-size bowl, combine lukewarm water, 1 teaspoon of sugar, and yeast. Stir until completely dissolved. Let it stand for 5 to 10mins until yeast begins to foam.
- Meanwhile, in the bowl of your stand mixer, combine flour, sugar, and salt. Mix thoroughly.
- Add warm milk, yeast mixture, egg yolks, and butter to the dry ingredients. Stir until just combined. Attach the dough hook and turn the mixer on to the lowest speed and mix until flour is incorporated, scraping down the sides of the bowl as necessary.
- Increase the speed to medium and beat for 2 minutes. Add additional flour as necessary, start with 2 tablespoons and go from there. Continue beating for 5 to 6 minutes until the dough is slightly sticky and elastic, and pulling away from the edge of the bowl. Be careful not to add too much flour.
Rise # 1 Warm rise or cold rise
- Wipe or spray oil on the sides of the bowl then form dough into a ball. Cover with plastic wrap and let it rise in a warm spot for 1 hour until it doubles in size. To make ahead, do a cold rise by placing the dough in the refrigerator. The dough will slowly double in size the next day. See the notes for more information.
Spanish Bread Filling
- Combine all the ingredients of the filling in a small bowl. Make this just before the dough finishes rising.
Rise #2 Shape the rolls
- Remove the plastic wrap and punch the dough down. Transfer onto a lightly floured surface. Divide the dough into 20 to 24 portions. (see video). For an evenly sized dough, use a kitchen scale. Mine was about 50g each. Adjust based on your preference.
- Using a rolling pin, flatten each portion into an oval shape. Spread 1 tablespoon of the filling, then roll it into a log (see video). Lay it in the bread crumbs. Shake off excess then place inside the baking tray greased or lined with a parchment paper. Repeat with all the other portions. Make sure that the dough is arranged two inches apart. Cover with a towel or cloth and let it rise for 40mins to 1 hour.
Baking
- Preheat oven at 180c/356f, 15 minutes before the dough rolls finishes rising. Bake the Spanish bread for 18 to 20 minutes until the top turns light brown.
Recipe Notes & Tips:
- Yeast – use instant or dry active yeast. Follow the same procedure for frothing
- Bread flour – substitute with all-purpose flour if not available. Use the same amount. Bread will just be less chewy with all-purpose flour.
- Spanish Bread Filling – double the recipe if you prefer a thicker filling.
- Proofing in colder months: Place a baking dish on the bottom rack of the oven (DO NOT TURN IT ON) and fill it with boiling water. Put the dough in the middle rack and shut the door. The steam and heat from the boiling water will create a warm environment to help raise the dough.
- Make-ahead: Make the dough ahead of time then place it in the fridge. The dough will slowly rise and double in size overnight. On the day of baking, remove from the refrigerator 30-40 mins before you’re going to shape them into rolls.
- Baking tip: If you’re using two racks, switch the trays after 12 minutes so all the rolls will brown evenly. Applicable only to 60cm/23 ovens and above. Bake in two separate batches if using compact ovens.
- Storage and re-heating: Store in an air-tight container. Wrap in foil and re-heat in a mini-oven toaster for 1 to 2 minutes over low heat.
Note: Photos updated, same great recipe. I’ve moved the old photo below.
Riverten Kitchen is a participant in the Amazon Services LLC Associates Program, an affiliate advertising program designed to provide a means for sites to earn advertising fees by advertising and linking to amazon.com.


Hi! Your recipe is superb . Its really soft . Now i can bake this spanish bread every now and then for my family.
I just want to inquire is this recipe ok too for Pandesal?
Made this last night at first i thought it wouldnt turn out good bec as i was proofing the dough (1st rise) The bottom part appeared cook and some part were burned from the warmer of my stove. But it turned the best spanish bread I have since we move in Canada. The next morning it was still soft and chewy made me more content to what i did. Thank you si much for this recipe and your tips was incredibly helpful too! ???
Hi Denise, I’m glad you liked my recipe. Regarding the dough, I guess the oven was too hot? Try this next time: Place a glass baking dish on the bottom rack of the oven and fill it with boiling water. Put your dough on the middle or top rack and shut the door. The steam and heat from the boiling water will create a warm environment to help the dough rise.
My first time to bake spanish bread and it turns out perfectly soft Yey!!! Thank you to your recipe and assistant message via instagram so helpful. I need to make more because everyone on the house like it and asking for more ?
Hi, I don’t have a bread flour. What substitute can I use?
Hi Kennely, you can substitute with All-purpose flour.
what is the difference po ng bread wheat flour sa bread flour?d po ba titigas yung bread sa wheat?thank you
Hi Andrea, bread flour is higher in protein content compared to APF which gives bread a soft yet chewy text ure. If bread flour is not available, apf can still be used as a substitute.
This was amazing! Thank you so much! First time making this, I think I’ll try this with cinnamon rolls next time!
Thanks for using my recipe Maureen! Cinnamon rolls sound like a good idea.
I only have salted butter. How much salt should I use? Also, how long will kneading take if I do it by hand? Thank you!
Hi Maricar, Yes you can. Use about 1/4 tsp of salt instead of 3/4 tsp. Knead by hand until elastic, about 10-12 minutes.
Just made this following your suggestion of adjusting the salt to 1/4 and kneading for 10-12 mins. My first ever attempt at bread-making. Soooo good. Thank you!
You’re welcome Maricar! Glad you enjoyed it. Kneading by hand is a talent which means you’re one skilled baker. I’m happy your bread turned out good 🙂
I tried making this recipe and it’s a success! Woohoo! Thanks for sharing this recipe.
Help! I only have 20more mins for the dough to completely rise but it has not risen yet 🙁
Can I do anything to save it or make it rise? Can I still go through with making it?
Hi Tina,
I’m sorry to hear that. Did the yeast properly activate before mixing in with the rest of the ingredients? Check out this post for more tips on baking with yeast.
Yes the yeast foamed and seemed to activate okay. I ended up going through with making it even though it didn’t rise. I think the 2nd rise was a little better and in the end it turned out good. It was still soft and fluffy!
Hi,
I got hard time purchasing bread flour because of the crisis. I have here is APF. Can I just use it rather than combining the two?Will it make the same result?
Thanks
Yes it’s fine. It will be just less chewy but will still be good.
I tried this recipe and my family loved it. Thank you so much for this.
Tried this just this morning and it’s a good one! Thanks for sharing
Hello! Thanks for the recipe! It turned out so good!!! Question: will it still be good if the half batch I prepared today will be put in the fridge (for the second rise) and will just bake it after 2 days? Thanks!
I’m so glad you liked it!
Yes, but they may lose the shape. What I suggest is divide the dough after the first rise. Put half of the dough in the fridge. Shape and set for the second rise when you need it.
Hi, can i make this without mixer? Thanks
Hi Mary, If you’re familiar with kneading the dough by hand then there shouldn’t be a problem.
I’m tempting to try cassava flour and add 1c apf. What do you think?
Hi Joy,
I’ve never tried using cassava flour for any of my bread recipes. If you ever make one, I’d be very interested in the outcome.
Your recipe for Spanish bread is awesome!!!! I made it today for kids .. they’ll love it! Super soft! Thanks for sharing your recipe.More power!
Hi Dhey, You’re welcome! I’m so glad to hear that your kids loved it. That makes me really happy 🙂