
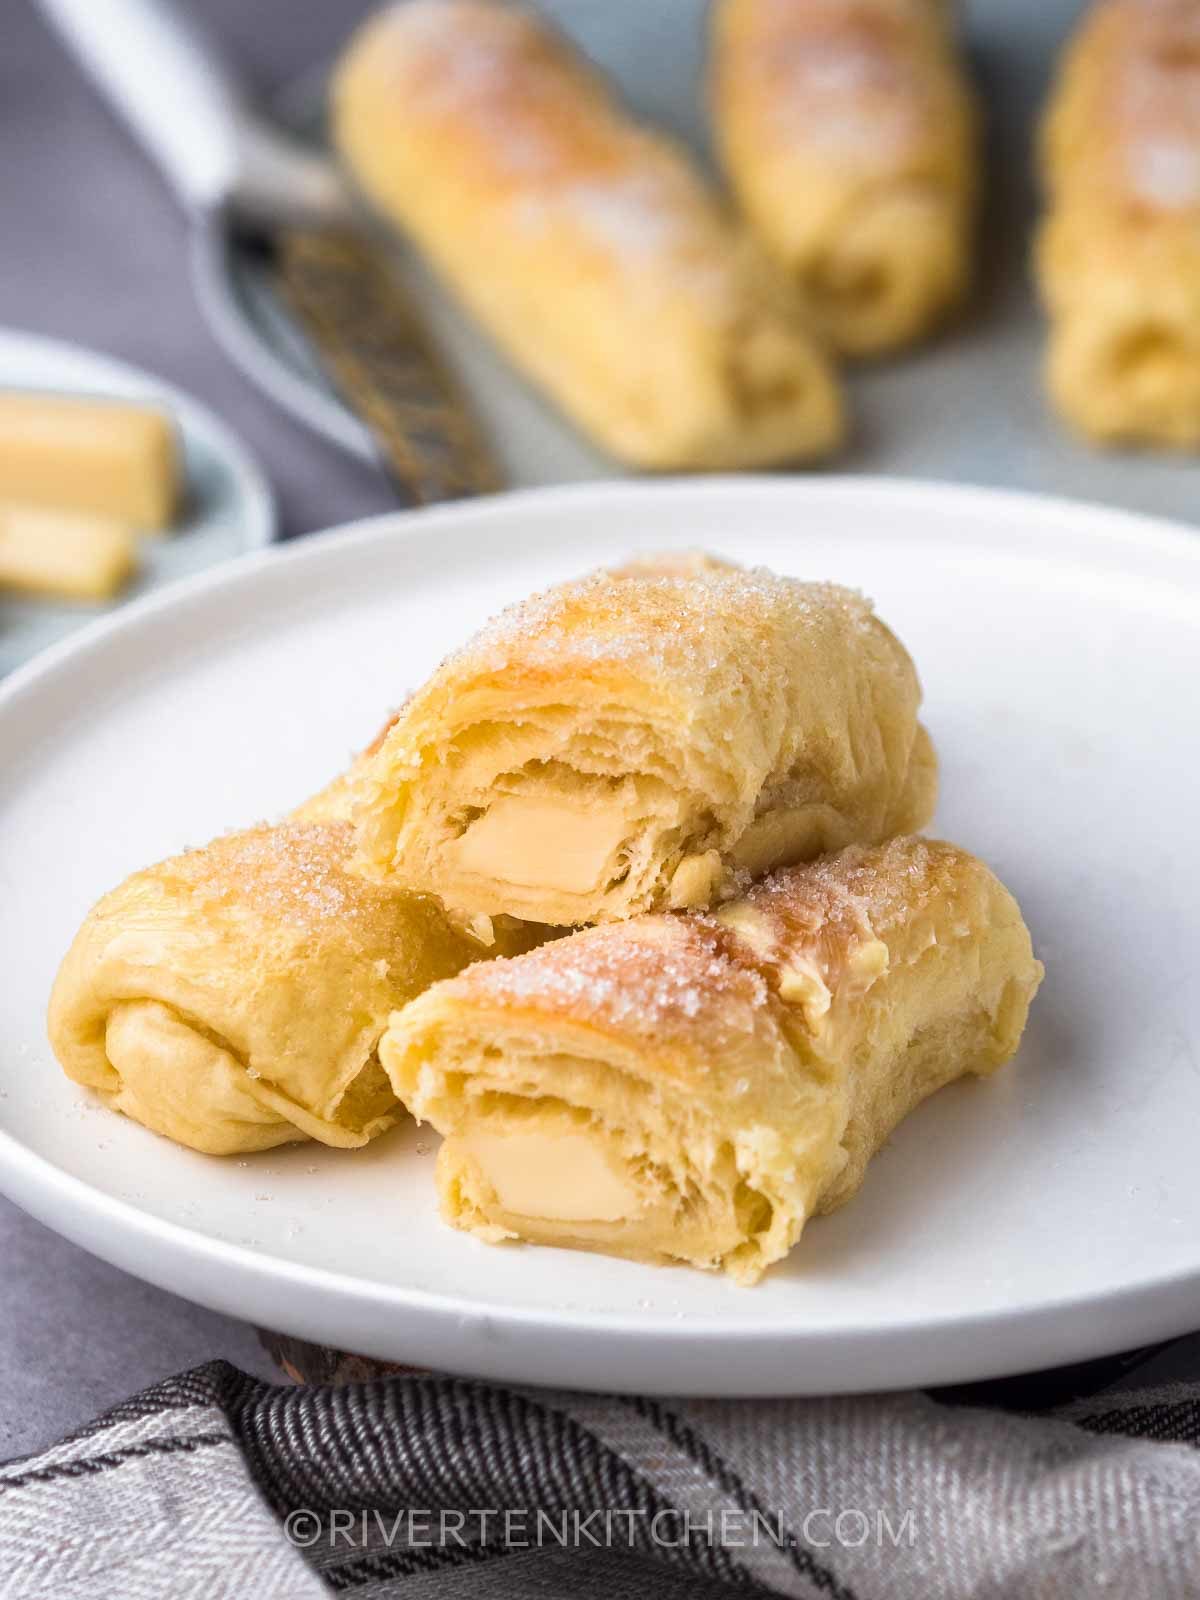
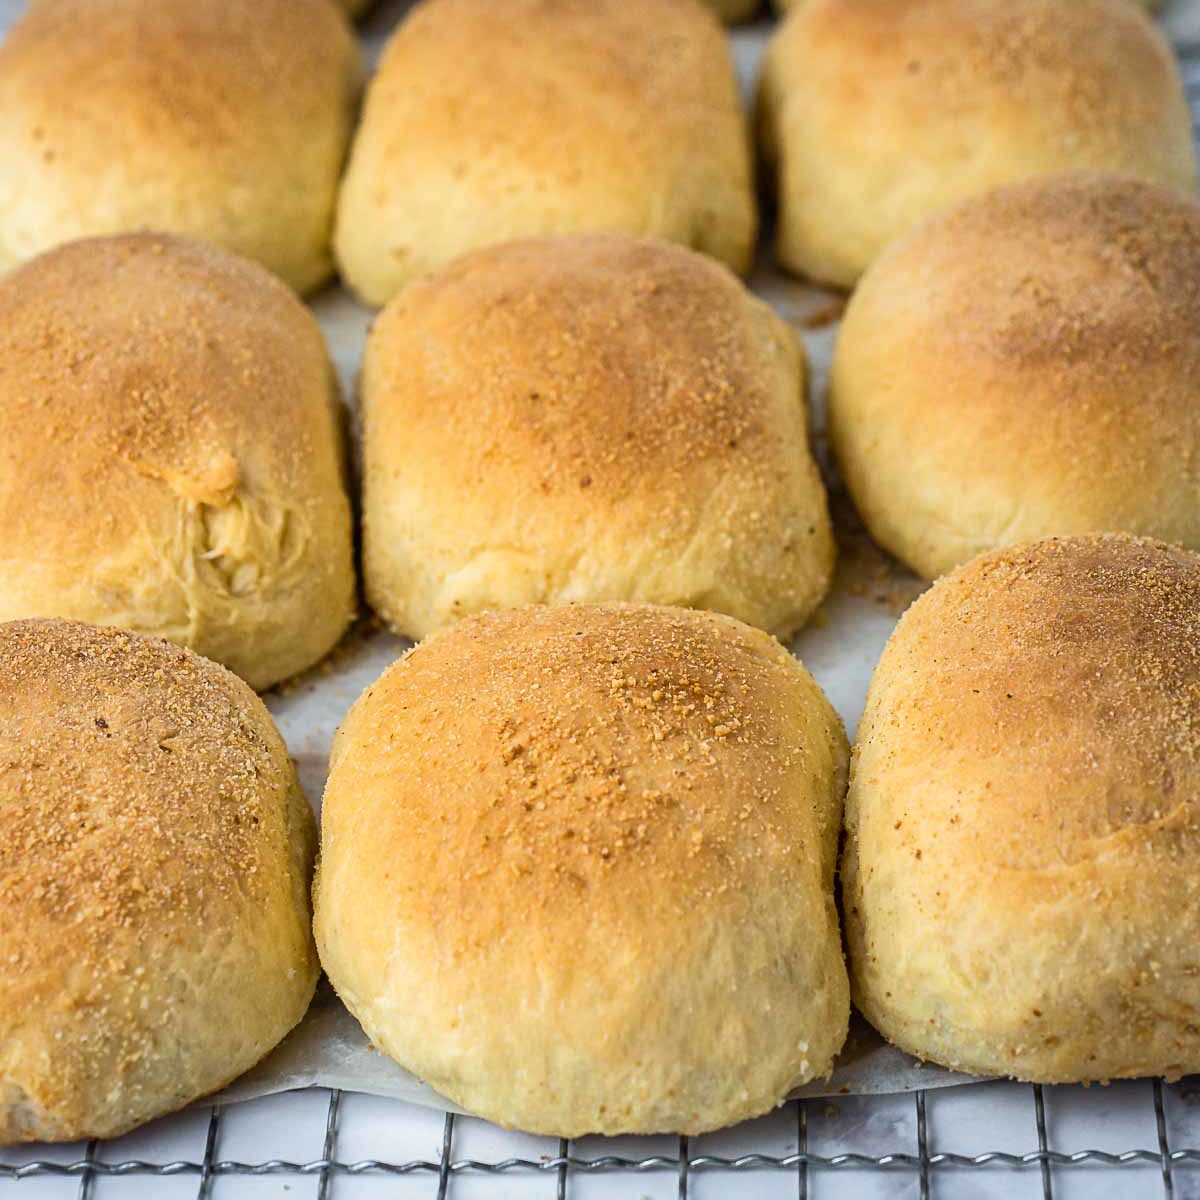
Filipino The cheese roll-ups of your dreams! Soft, luscious, pillowy bread filled with cheese and slathered with butter and sugar on top. Sweet, mildly savory, and buttery. It’s a triple treat that is so hard to resist!

Filipino Cheese Bread Rolls
This cheese-filled bread roll is another favorite bakery-style bread in the Philippines. I’m not entirely sure of its origin but I personally think that it’s inspired by our all-time favorite ensaymada. I mean it’s also buttery, cheesy, and sugary–three things that we Filipinos are so crazy about.
Why you’ll love this recipe
- The dough only requires one proofing and the rising time is faster than your regular dough recipe.
- The bread is pillowy-soft, luscious, and delicious.
- Made of simple bread ingredients that never fail to make the best softest yeast bread!
Bread Dough Ingredients
This dough is made with basic bread ingredients and it yields the softest and buttery bread. Not your typical bread if I may say so because it’s so, so good!
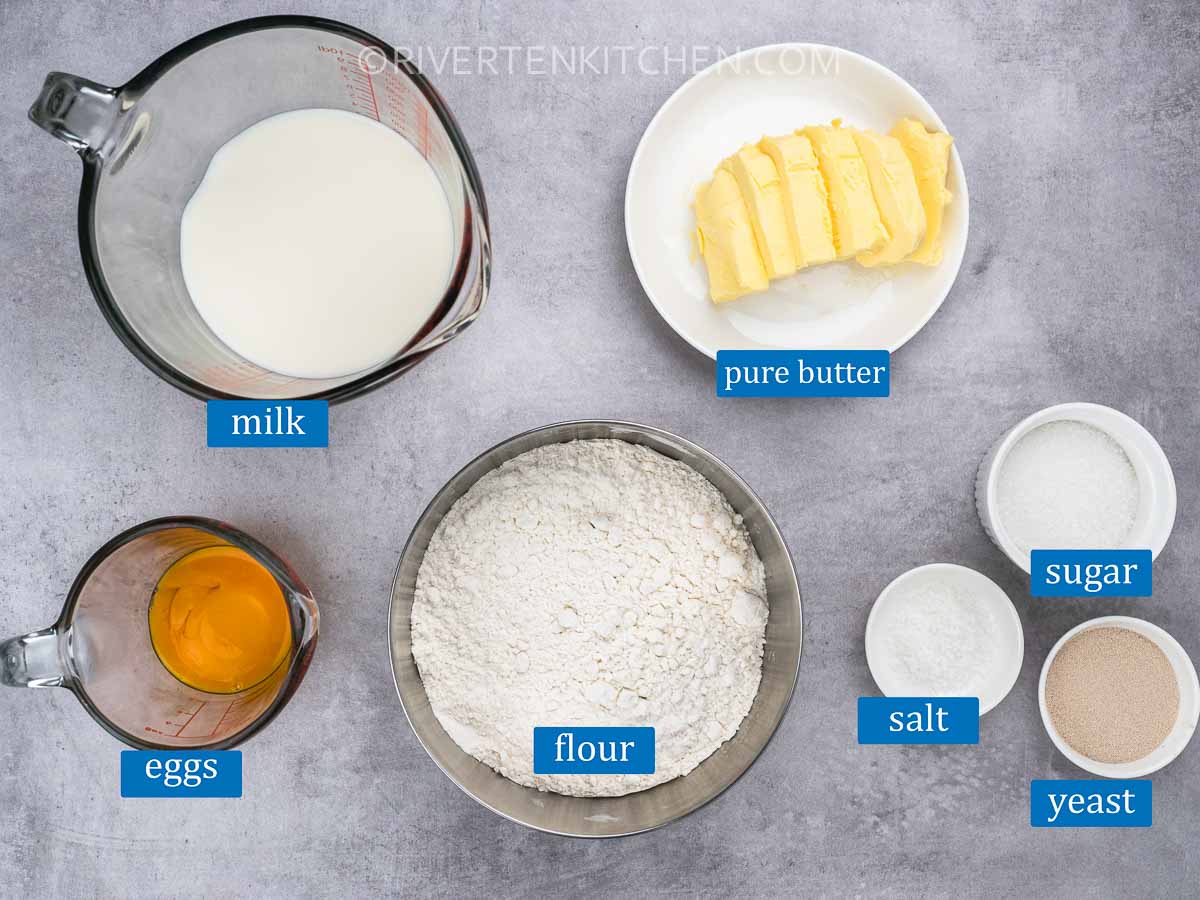
Here’s what you need to make it:
- Flour – using equal amounts of all-purpose flour and bread flour is a favorite technique of mine to create that lovely soft bread texture. You can use just one type if one or the other is not available.
- Instant Yeast – or rapid-rise yeast is needed which helps the dough rise faster.
- Milk – Use low-fat or whole milk. I use 2% milk.
- Egg Yolks – is the secret to a luscious, plush, and pillowy soft. Don’t tell anyone (wink!).
- Butter – use pure unsalted butter, the best you can find. This will define the overall flavor of your bread.
- Salt – not only gives flavor but helps properly develop the gluten in bread.
Types of Cheese
Any semi-hard mild-flavored cheese can be used as a filling for the bread. I used simple processed cheddar cheese and it worked wonderfully.
- Mild cheddar cheese
- Edam cheese – Queso de bola in Filipino
- Gouda cheese
- Monterey Jack or Colby
- Sandwich Cheese – roll into a log before using
What I don’t recommend are parmesan cheese (too hard) and mozzarella cheese (not enough flavor).
How to Make the Dough
And here’s how to make the softest yeast bread dough:
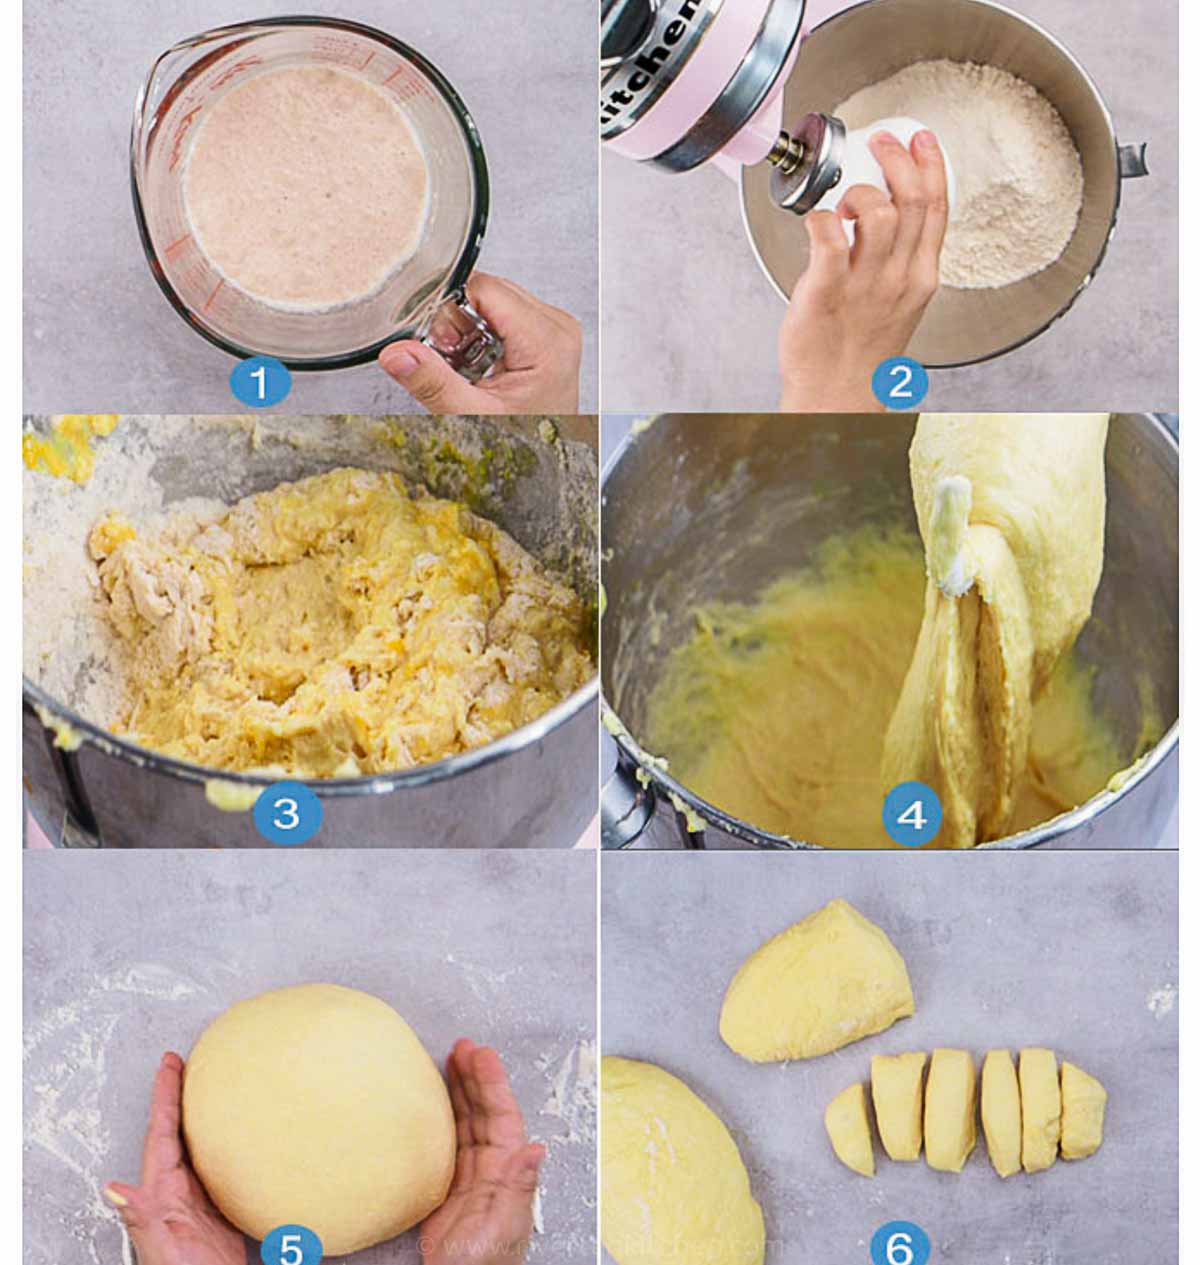
1. Proof yeast
To ensure your yeast activates, it’s advisable to proof it in warm milk. This step expedites the dough’s rising process. I have consistently used this method, resulting in consistently well-proofed dough. Whether you opt for instant or active dry yeast, I recommend proofing it as a precautionary measure to confirm its freshness before incorporating it into the remaining ingredients.
2. Combine the dry ingredients
Flour, salt, and sugar. You can go ahead and add the four cups of flour in one go. Then add more later on if the dough comes out very sticky.
3. Add yeast mixture and egg yolks to the flour
Incorporate the yeast mixture and egg yolks into the flour, gently stirring with a spatula until they are just blended. This step sets the stage for the dough hook to initiate the kneading process more smoothly.
4. Add the cubes of butter one at a time
Adding the butter gradually allows it to be evenly distributed throughout the dough. This gradual incorporation helps prevent clumps or uneven distribution of fat, which can affect the texture and structure of the final product.
5. Knead the dough
Beat the dough continuously for a duration of 10 to 12 minutes until it attains a smooth and elastic consistency. Gradually incorporate additional flour during the kneading process until the dough becomes less sticky and achieves a smooth texture.
In my experience, I found it necessary to add approximately 5 more tablespoons of flour. Don’t be concerned if the dough retains a slight tackiness. Periodically, remember to scrape down the sides of the bowl as you work.
How to Shape Cheese Rolls
After kneading the dough, roll it into a large smooth ball. Let it rest for 10 minutes to make it pliable. Divide the dough into 20 to 24 portions. For an evenly sized dough, use a kitchen scale. Mine was about 50g each.
Here’s how to shape it into rolls:
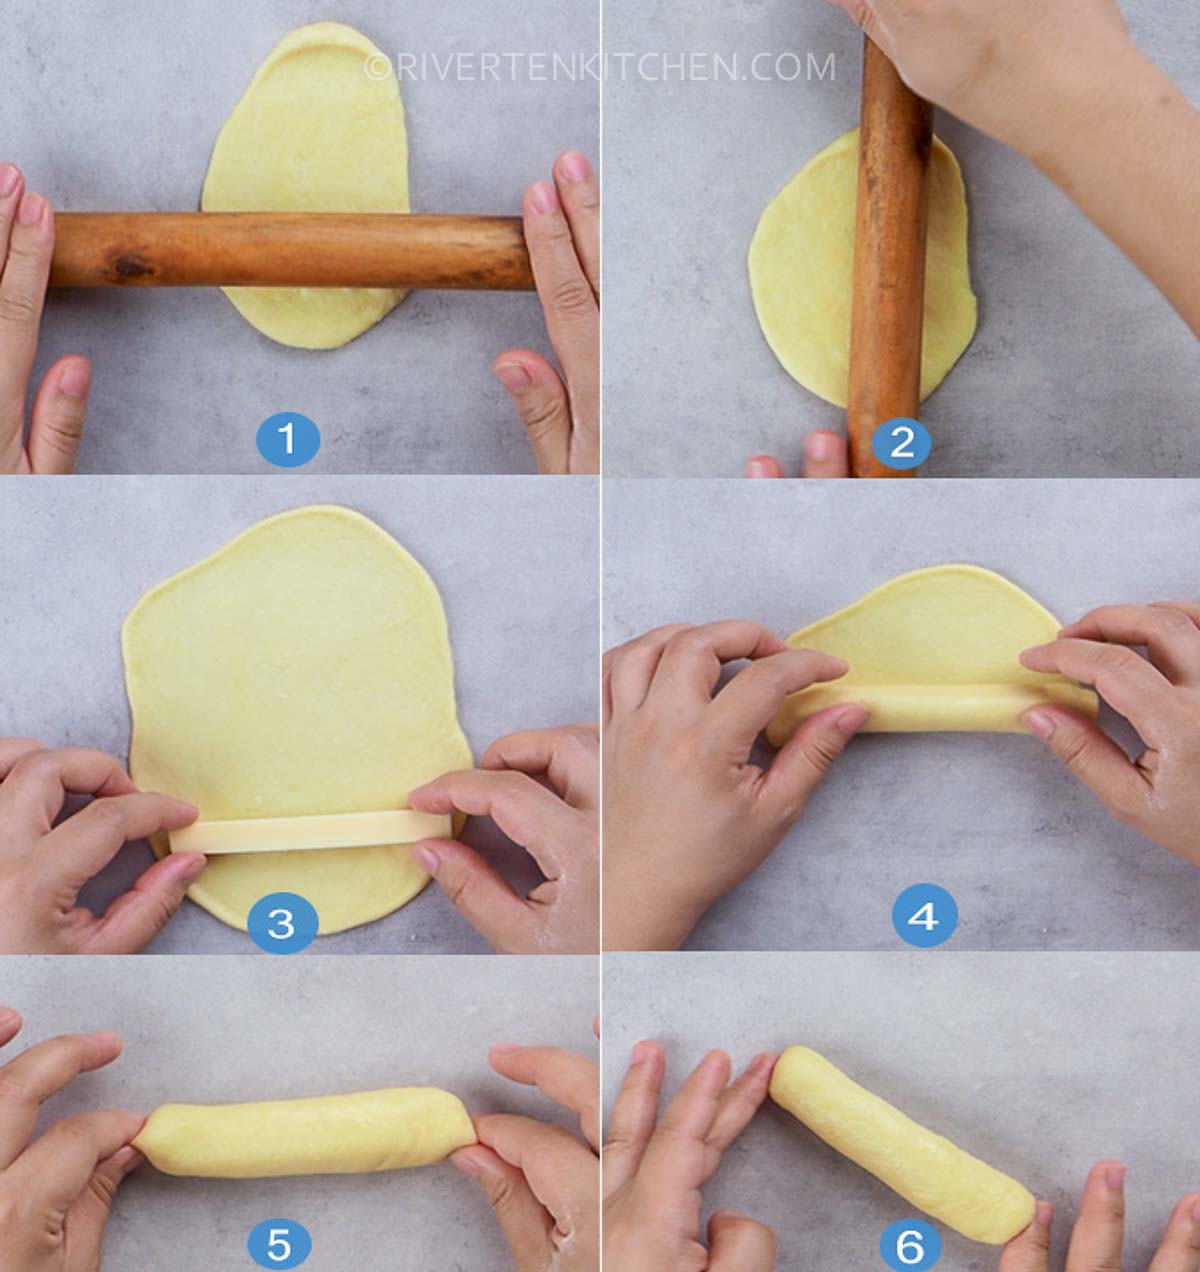
- Start off by flattening the ball with the palm of your hand. Using a small rolling pin, shape it into a rectangular oval. Doesn’t have to be perfect. If the dough becomes too elastic, let it rest further.
- Place cheese on one end of the dough then roll. Pinch the seam down as well as the sides to seal. Repeat with all the other portions.
- Arrange in the baking dish leaving spaces in between. Cover with a towel or cloth and let it rise for 30mins up to 40mins depending on room temperature.
That’s it! Easy. Peasy.

Storage and Shelf-life
These bread rolls stay soft for up to 3 days, sometimes even longer. Store in an airtight container and refrigerate. If using a large zip bag, push out excess air before sealing. Like any other yeast bread, flavor and taste may change if stored for longer than 5 days.
Love cheese? Here are more recipes for you!
Cheese Rolls Recipe Video
HUNGRY FOR MORE? Subscribe to my newsletter and follow along on Facebook, Pinterest, and Instagram for all of the latest updates

Filipino Cheese Bread (Easy Cheese Rolls!)
Equipment
- Baking Pan
Ingredients
Bread Rolls
- 1 ½ cup fresh milk + 1 tsp sugar (lukewarm, see note 1)
- 1 tbsp instant yeast (or rapid rise yeast)
- 2 cup bread flour (see note 2)
- 2 cup all-purpose flour (see note 2)
- 1 ½ tsp salt
- ½ cup unsalted butter (softened, slice into cubes)
- ¼ cup white sugar
- 2 large egg yolks (room temperature)
- 1 egg, whisked (for optional egg wash)
Filling and Topping
- 20-24 pcs cheese, slice into thick sticks (see note 3)
- butter (softened)
- white sugar
Instructions
Proof yeast
- Place milk and 1 tsp sugar in a microwave-safe cup. Heat for 30 seconds. Check if the temperature is LUKEWARM by dipping your finger or a kitchen thermometer. If it's still cold, heat for another 10 seconds until it reaches 40c/104f.
- Add yeast, stir and let it proof for 10 minutes until it froths.
Prepare other ingredients
- Meanwhile, prepare the rest of the ingredients. In the bowl of a stand mixer combine flour, salt, and sugar. Whisk to combine. Separate egg yolks from the egg whites. Set aside.
Knead the dough
- Add proofed yeast and eggs to the flour mixture. Stir with a spatula until just combined. Attach the dough hook and turn the mixer on to the lowest speed. Add the cubes of butter one at a time while running the mixer at medium-low speed. Beat for 2 minutes. Stop the mixer to scrape down the sides of the bowl.
- Increase speed to medium-high. Beat for 8 minutes, scraping down the sides of the bowl every now and then. While beating, add flour as necessary until dough becomes less sticky. Start with 2 tablespoons and go from there. I added about 4-5 tablespoons more bread flour.
- Scrape dough on a work surface dusted with flour. Form into a smooth bowl and let it rest for 10 minutes.
Divide, Shape and Rise
- Grease baking tray and line with parchment paper.
- Divide the dough into 20 to 24 portions (see video). For an evenly sized dough, use a kitchen scale. Mine was about 50g each. Adjust based on your preference. Shape into a ball to smoothen.
- Dust work surface with flour. Place the dough on the surface. Flatten with your hand then using a small rolling pin shape into a rectangular oval, doesn't have to be perfect.
- Place cheese on one end of the dough then roll. Pinch the seam down as well as the sides to seal. Repeat with all the other portions. Arrange in the baking dish leaving spaces in between. Cover with a towel or cloth and let it rise for 30mins up to 40mins depending on room temperature.
Baking/ Topping
- Preheat oven at 160c/320f, 20 minutes before the dough rolls finishes rising.
- Gently brush the top of each roll with egg wash. This is optional.
- Bake for 15 minutes. Increase oven temperature to 180c/350f and bake for another 5 to 7 minutes top turns light brown.
- Remove from the oven and COOL COMPLETELY.
- Once the bread rolls have cooled, brush with softened butter and sprinkle with sugar on top. Enjoy!
Recipe Notes and Tips:
- Milk – use low-fat or full cream fresh milk. I used 2% milk.
- Flour – I find that combining 2 types of flour makes a soft yet chewy bread. You can use pure bread flour or just all-purpose flour if one or the other is not available.
- Cheese – any semi-hard mild-flavored cheese can be used as a filling for the bread. I used simple processed cheddar cheese. You can also use mild cheddar cheese, Edam cheese (queso de bola), gouda cheese, Monterey Jack or Colby, sandwich slice cheese – roll into a log before using.
- Proving dough in colder months: Place a heatproof dish on the bottom rack of the oven and fill it with boiling water. Put the dough in the middle or top rack and shut the door. The steam and heat from the boiling water will create a warm environment to help raise the dough. You can also do this in an empty kitchen cabinet/cupboard so you can start preheating the oven while the rolls are rising.
- For a smaller batch dough – follow my Small Batch Soft Cinnamon Rolls dough recipe.
- Overnight Rising – is not recommended for this recipe due to the type and amount of yeast. You can use my Pandesal recipe for the based dough but substitute the water with milk.
Originally published Jan 2021. Updated Nov 2023.
Riverten Kitchen is a participant in the Amazon Services LLC Associates Program, an affiliate advertising program designed to provide a means for sites to earn advertising fees by advertising and linking to amazon.com


Hello ma’am, i would like to ask If possible can you indicate each measurements for the ingredients? Hoping you can help, Stay safe!
Hello! What brand of cheese did you use?
I’ve made this recipe countless times, and it’s consistently a favorite among my family and friends. The demand for it has grown, with many asking me to sell it. It’s been an exciting culinary adventure, and I’m considering taking it to the next level.
Thank you for the wonderful feedback, Melody! Your family and friends are lucky to have you. Best of luck and I’m sure many more people will get to enjoy your delicious creations with this recipe.
– Mella
Hello ma’am, i would like to ask If possible can you indicate each measurements for the ingredients? Hoping you can help, Stay safe!
This bread recipe was so good with ube jam! Everyone in the family loved it.
Recipe is a keeper for sure!
Thank you for sharing 🙂
I chose this recipe among many others I’ve seen because of the short proofing time. This recipe does not disappoint. I have made it my go to recipe for a side hustle and all my customers love it. They say it is “heavenly!” Thank you Mella for sharing this.
I’m so happy to hear this, Kay! This has been a family favorite too. Thanks for the wonderful feedback.
– Mella
Hi! Excited to try your recipe today. I’d like to point out though that 160 degrees Celsius is 320 degrees Fahrenheit. Not 356 Fahrenheit as stated in your recipe 🤔. Looking forward to tasting it in a few minutes. Thank you for sharing your recipe!
Thanks for letting me know Kay! That was a typo. Sorry about that. I’ve corrected it! Let me know how it goes 🙂
– Mella
You’re welcome! They turned out great! I will definitely make this over and over again. And oh sooo easy! Thanks for such a great recipe!
Hello, I noticed that the temperature indicated in your recipe is still unedited. You may want to check it.
Hi Cecile, which step? If you’re referring to step 3 under baking then it’s correct. It is 180c. I just added the Fahrenheit equivalent.
– Mella
Hi! Tried this recipe and i super like it! This is what i’ve been looking for for a cheese bread roll! Thank u for sharing your recipe! God Bless!🥰
You’re welcome, Belle! So happy to hear you enjoyed this recipe!
– Mella