
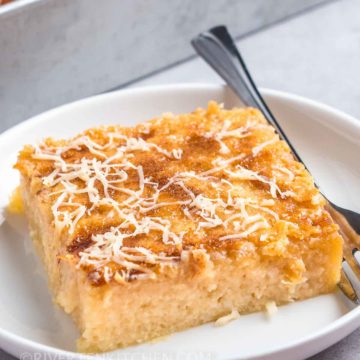
Cassava cake–easy to make, not too sweet, and stays soft even the next day! Top with condensed milk to make it simple or custard topping made of the “excess” ingredients from the cake. You can make this with freshly grated cassava or frozen grated cassava.
Cassava Cake
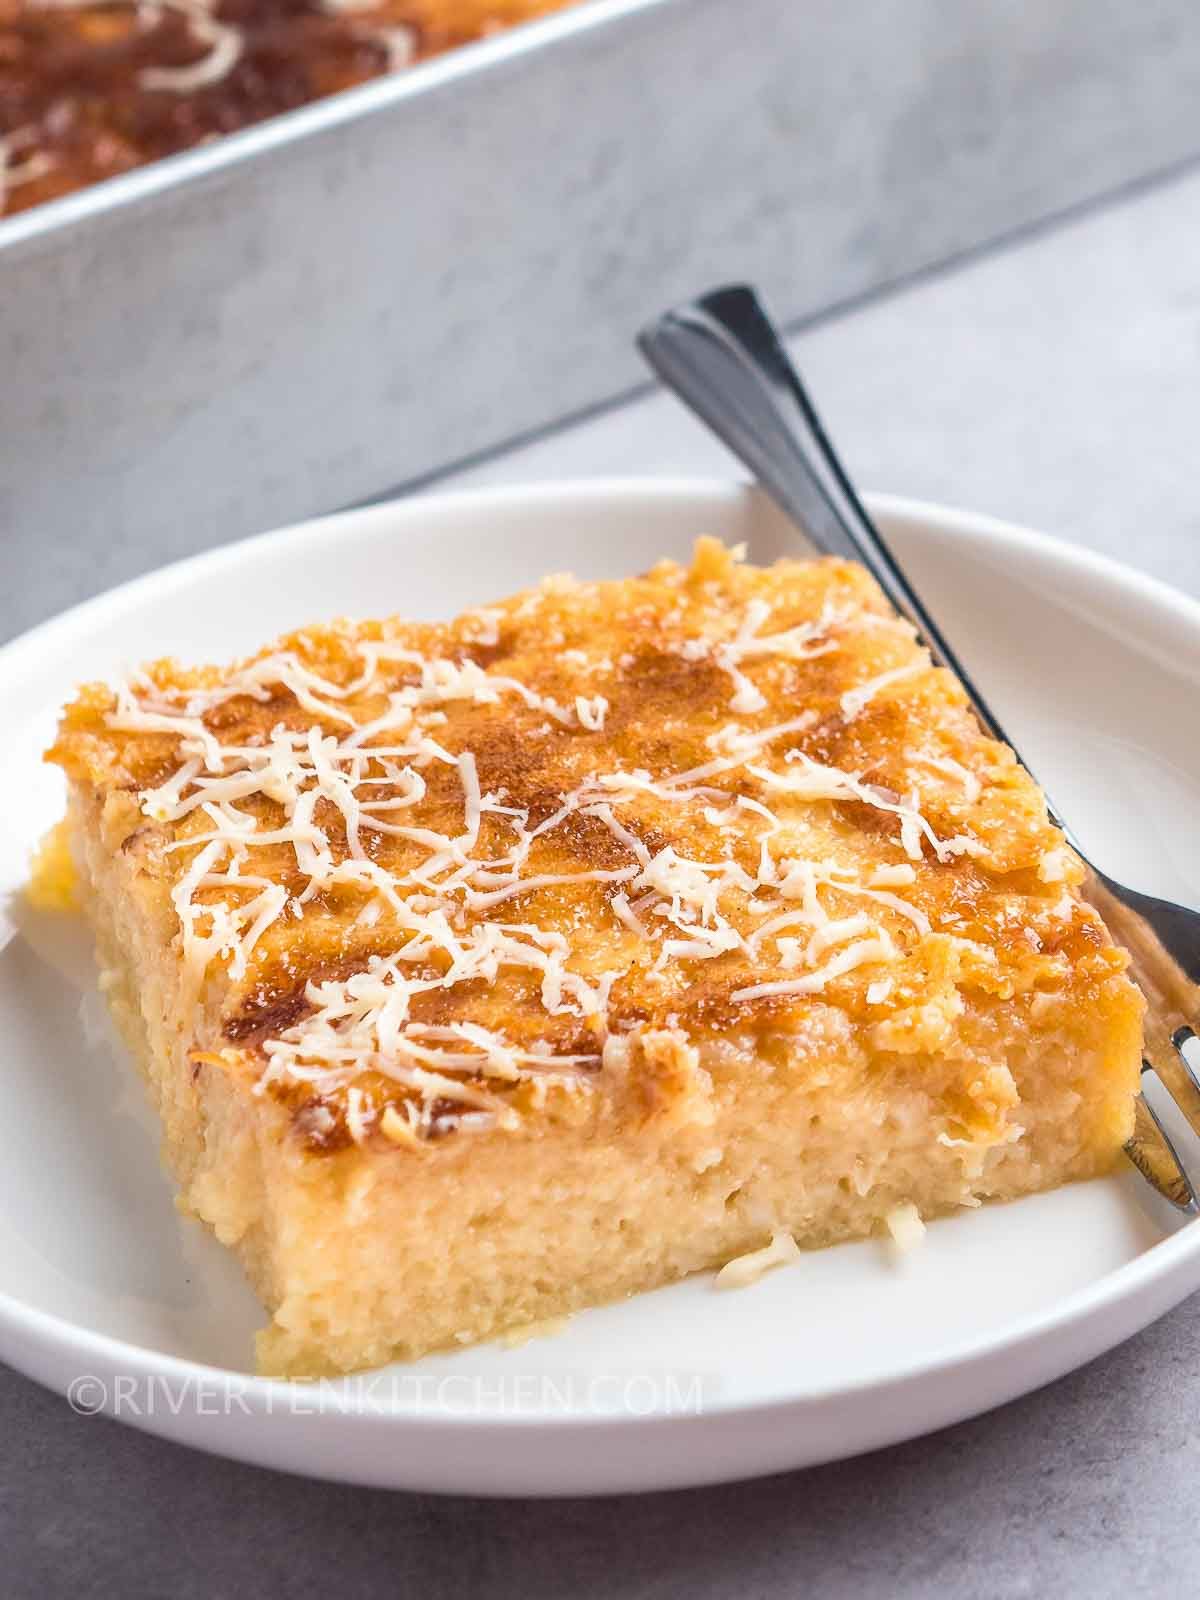
Also known as cassava bibingka in the Philippines. It is a classic Filipino dessert enjoyed at special gatherings, and Christmas, and New Year celebrations. It can be eaten warm or cold and is usually served in small slices. I personally prefer it warm and fresh out of the oven.
Why you’ll love this recipe
- It’s not too sweet–compared to others, my recipe uses less sugar and less condensed milk.
- Stays soft even the next day–just like a regular cake 🙂
- It’s so easy to make–it’s as straightforward as adding all the ingredients in a bowl.
- It’s gluten-free! This recipe does not use any flour. The cassava, coconut milk, eggs, milk, and butter are gluten-free.
What is Cassava?
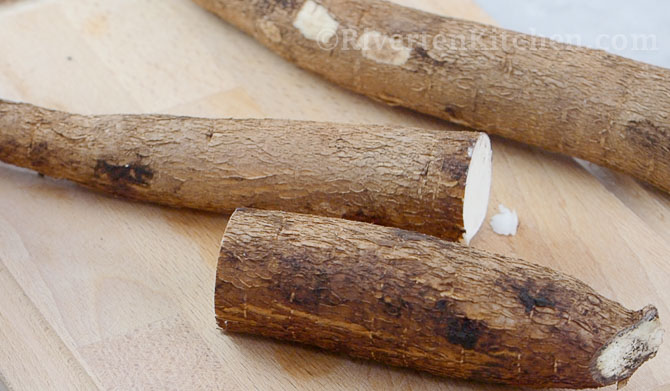
Cassava or kamoteng kahoy in Filipino, is a starchy tubular root vegetable. It has a subtle earthy and nutty flavor. When boiled, it has a similar texture to potato.
In the Philippines and many Asian countries, cassava is a popular ingredient for dessert and snacks with cassava cake being the most popular.
Fun fact: Did you know that tapioca flour is made from cassava root? Tapioca is a popular gluten-free ingredient for making cakes, puddings, and is also often used as a binding and thickening ingredient.
How to Prepare Fresh Cassava Root
Start by cutting the root into 2 to 3 pieces. Slice through the peel of each piece vertically then gently wedge a paring knife under the bark so that it lifts up and be easily removed (see video).
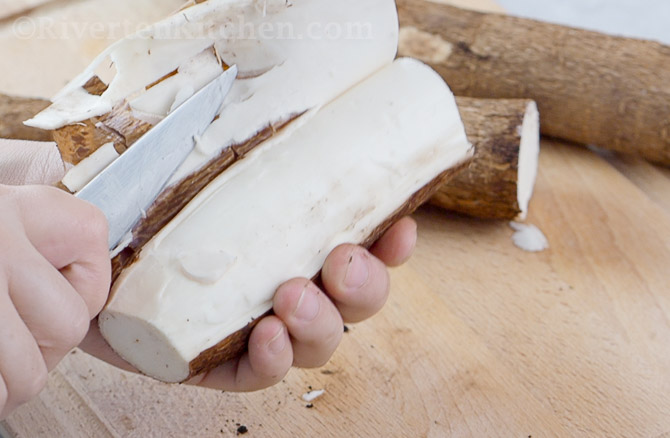
Wash the flesh thoroughly to remove any dirt and leftover pieces from the bark. Soak for 20 minutes then discard the water.
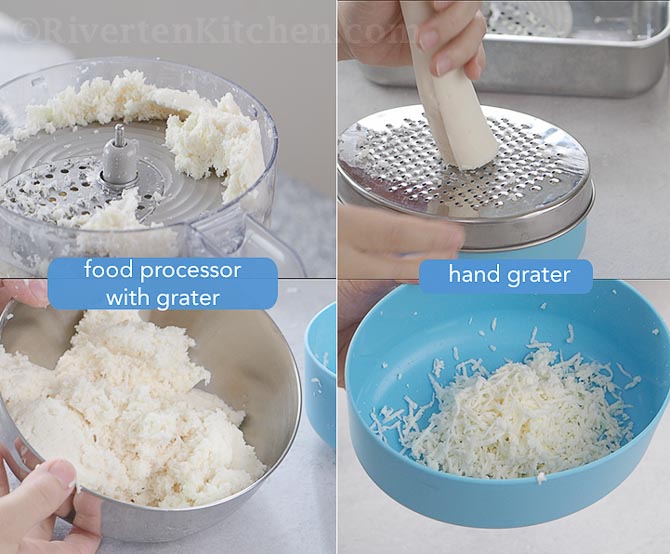
Grate using a food processor or a hand grater. For added texture, shred the cassava using the large holes of the grater.
Ingredients
Here are the ingredients to make the best cassava cake:
- Cassava – You can use fresh cassava root to make cassava cake. For convenience, you can buy frozen packs that have already been grated. This can be found in some online stores and most Asian supermarkets.
- Whole Eggs – give the cake firmness, structure, and stability.
- Coconut Milk – for the best flavor, use the purest you can find. At most, it should only have water as an added ingredient. Avoid using those that contain thickeners like xanthan gum, guar gum, or carrageenan.
- Evaporated Milk – gives the cassava a cake-like mixture and flavor.
- Condensed milk – makes the cake deliciously sweet
- Sugar – use white or brown sugar.
- Salt – balances the sweetness of the cake
- Melted Butter – the secret to making a moist cassava cake
How to Make It
And this is how I make cassava cake:
Make the Cake Batter
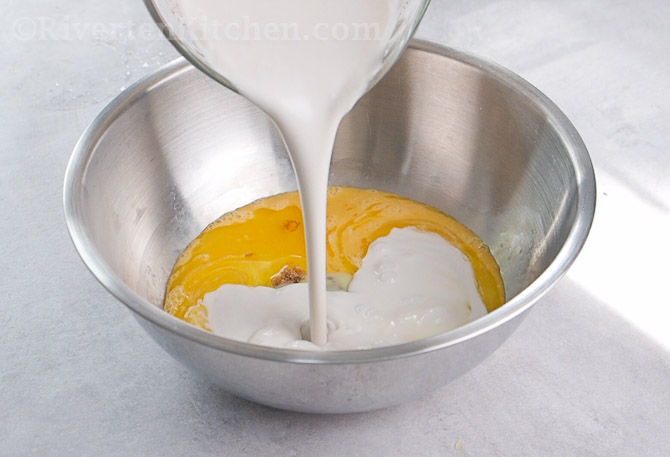
Combine all the ingredients of the cake in a large bowl, EXCEPT for the grated cassava. Taste the batter and adjust the sugar based on preference.
Note: Cassava is completely safe to eat when it’s properly peeled and thoroughly cooked.
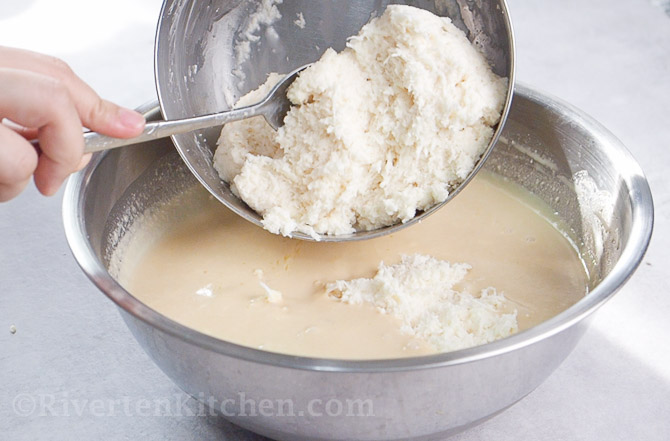
After tasting and adjusting the sugar of your batter, add the grated cassava and whisk to combine all the ingredients together.
Bake and Broil
Bake for 45 minutes to 1 hour. The cassava cake is cooked when it is completely set and not jiggling. Check doneness as early as 45 mins.
Note that cooking time may vary depending on the size of the pan you’re going to use and how thick the batter will be.
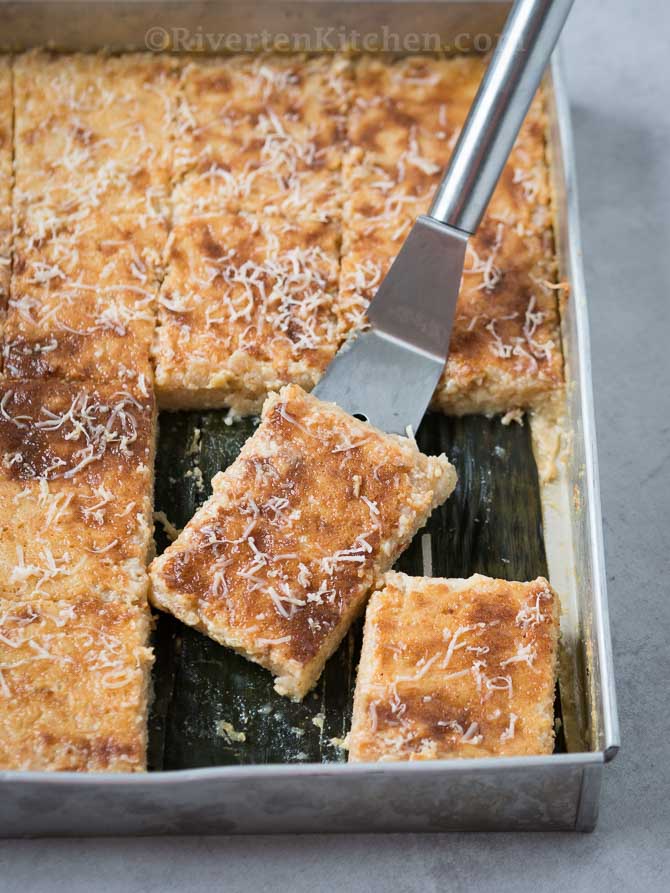
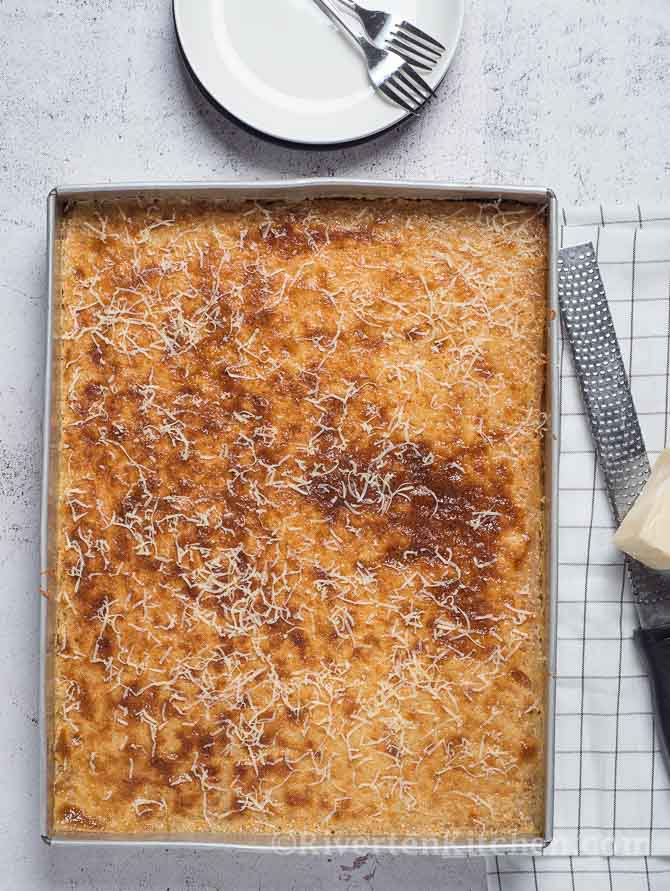
Once the cassava cake is completely set, pour the topping on top and broil until golden brown. Note: Broil is also known as “grill” mode in some ovens.
What baking pan to use
The recommended baking pans for cassava cake are rectangular or square aluminum cake pans. They’re flat, stable, and have a greater surface area compared to round pans. Non-stick and glass baking dishes of similar shape will work well too.
Recommended pan-size
You can use these baking pans for a single sheet of cassava cake. Note that the wider the pan, the thinner the cake will be:
Square:
- 9 x 9 x 2 inches
- 10 x 10 x 2 inches
Rectangular:
- 11 x 7 inches
- 12 x 7 inches
- 13 x 9 – inches
- 13 x10 – what I used in this recipe
If using smaller pans, divide the batter into two and pour into two pans.
Topping Ingredients
Filipino cassava cake is never complete without a topping. That is what makes it special from other cassava recipes. In this recipe, I have included two kinds of toppings you can use for the cake. Use alternatively based on preference.
Here they are:
Condensed Milk Topping
The simplest topping you can use for the cake. You don’t need any other ingredients. Just the milk. Pour it all over the cake and spread it evenly then bake until golden and caramelized.
More delicious recipes with condensed milk
- Ube Cheese Bread 3 ways!
- Whole eggs Leche Flan
- Filipino Fruit Salad
- Buko Pandan Salad
- Filipino Cheese Cupcakes
- Turon with Dulce de Leche
- Leche Flan (Ultimate Guide to Making Filipino Flan)
- Mango Float (Graham Cake)
Custard Topping
Made of the “excess” ingredients from the cake–coconut milk, condensed milk, and sometimes evaporated milk plus egg to set the mixture. Pour it all over the cake and spread it evenly. Bake until golden. Baking time is longer, about 20 minutes.
Optional Add-ins
- Cheese can be added to the batter and as a topping. Filipinos love using this as a topping as it balances the sweetness of the cake.
- Young grated coconut for some texture. You can add this in the batter or in the custard topping.
- Sweetened macapuno – I recommend draining the syrup if you don’t like the cake to be too sweet. You can add this to the cake batter or combine it with the topping.
How to Serve
Cassava cake will have a very soft and tender texture fresh out of the oven. Let it cool to room temperature before slicing and serving. For a firmer texture, cool in the fridge for 4 hours or overnight.
Cut into equal squares and top with cheese. Enjoy it as a dessert, or afternoon snack, or serve it with your other favorite Filipino dishes. I love this with pancit bihon, pansit canton, and Filipino spaghetti 🙂
Shelf-life and Storage
Leftover cassava cake lasts in the fridge for 3 to 4 days stored in an airtight container. Freezing is not recommended as it will affect the overall texture of the cake.
Re-heating
To reheat, microwave for 20 to 30 seconds on high. You can also bake in the oven at 100c/200f until just warm.
Frequently asked questions
I recommend straining the excess liquid from the frozen cassava instead of squeezing it.
This recipe has not been tested yet using cassava flour or tapioca starch.
Cassava cake becomes hard if the batter does not have enough fat (e.g. butter) and liquid (e.g. coconut milk).
Watch the Recipe Video
More dessert recipes
- 2 Ingredient Ube Ice Cream
- Special Palitaw
- Bibingka Malagkit
- Biko with Latik Sauce
- How to make Kutsinta (No Lye water)
- Mango Sticky Rice
Cassava Cake (easy recipe)
Equipment
- Banana leaves (optional)
- Food Processor with grater or Hand grater (for fresh cassava)
- Baking Pan
Ingredients
Cake
- 32 oz cassava (grated, note 1)
- 2 large eggs
- 2 tablespoon unsalted butter (melted)
- ¾ cup evaporated milk
- 2 tbsp condensed milk (note 2)
- ¾ cup sugar (add more if preferred)
- 1 cup coconut milk
- ¼ tsp salt
- ½ cup grated young coconut or macapuno (optional, note 3)
Cassava Topping (option 1)
- 1 can 14oz condensed milk (use remaining condensed milk)
- ½ cup grated cheddar cheese (for topping, add more if preferred)
Cassava Custard Topping (option 2)
- 2 large eggs
- ½ cup condensed milk
- ⅔ cup evaporated milk
- 1 ½ tsp vanilla extract
Instructions
- Grease baking pan with butter or oil. Place banana leaves on top if using and grease the top as well. Pre-heat oven to 180c/ 375f.
- Beat the eggs in a large mixing bowl. Add all the cake ingredients EXCEPT for the grated cassava. Mix well until sugar is dissolved. Do a taste test and add more sugar, if preferred.
- Add the grated cassava. Stir until combined. Pour into the baking pan.
- Place in the middle rack and bake for 45 minutes to 1 hour until a toothpick inserted comes out clean. Check doneness at 43 mins. Remove the cake from the oven.
- Sprinkle 1/4 cup grated cheese on top. This is optional. Pour condensed milk, spreading evenly to the edges. If using the custard topping: place all ingredients in a bowl. Stir until combined then pour on top of the cake. Spread evenly.
- Return to the oven on the upper-middle rack. Bake for 15 minutes then turn the fan on and bake for another 10 minutes until the top is golden. Watch carefully and rotate the pan if needed.
- Sprinkle the remaining cheese on top. Let the cake cool. Slice and serve. Enjoy!
Recipe Notes & Tips:
- Cassava – 32 oz grated cassava is approximately 2 packs of frozen cassava that you can buy from Filipino stores and Asian supermarkets. If using fresh cassava root: Cut the root into 2 to 3 pieces. Slice through the peel of each piece vertically then gently wedge a paring knife under the bark so that it lifts up and is easily removed (see video). Wash the flesh thoroughly to remove any dirt and leftover pieces from the bark. Soak for 20 minutes then discard the water. Grate using a food processor or a hand grater. For added texture, shred the cassava using the large holes of the grater.
- Condensed Milk – use one 14 oz can of condensed milk. Divide it for the cake and choice of topping.
- Grated young coconut can be substituted with macapuno. I recommend draining the syrup to lessen the sweetness.
- Baking time – the smaller the pan, the shorter the baking time. Check doneness at 30 minutes for smaller pans.,
- Storage and shelf life: Leftovers can last in the fridge for 3 to 4 days but I highly recommend consuming it within 3 days for the best flavor and texture.
Updated with a streamlined recipe after further testing to improve the recipe!
Riverten Kitchen is a participant in the Amazon Services LLC Associates Program, an affiliate advertising program designed to provide a means for sites to earn advertising fees by advertising and linking to amazon.com.


I love this recipe as it’s not too sickly or nakaka-umay because it’s not too sweet. Perfect with coffee or just on it’s own! Super simple and easy to make! Will be making this again for sure!
Glad you enjoyed this, Mimi! Thanks for the wonderful feedback.
-Mella
Made this Cassava cake last week! We didn’t have evaporated milk so we used soymilk instead and a light version of condensed milk. It was still so good and yummy! Will surely make this when cravings hit again!
Hi ms. Mella, okay lang po kaya na walang young coconut or macapuno? Thanks.
Yes, perfectly fine 😊