
Make your own soft, buttery, and chewy Filipino pandesal at home! This is your ultimate guide to making your favorite breakfast rolls. A beginner-friendly pandesal recipe with lots of tips and step-by-step photos on how to make pandesal.
Soft Pandesal Ingredients
Yeast
The key to successfully making pandesal or any yeast bread for that matter is making sure that the yeast is alive and active. So, even if I’m using instant dry yeast or active dry yeast, I always proof in lukewarm water with a little bit of sugar.
Preparation: If you are new to yeast bread making, I highly suggest using a food thermometer to measure the temperature of the water. It should be at least between 105 and 110°F / 40 to 43°C. Touch it (before adding the yeast and sugar) so you’ll become familiar with how lukewarm feels.
On your second or third bread, you probably won’t be needing that thermometer 🙂
Flour
I find that using equal amounts of bread flour and all-purpose flour makes soft and chewy pandesal. Bread flour has higher protein content than all-purpose flour (usually 11-13%) giving the dough its stringy and elastic feature.
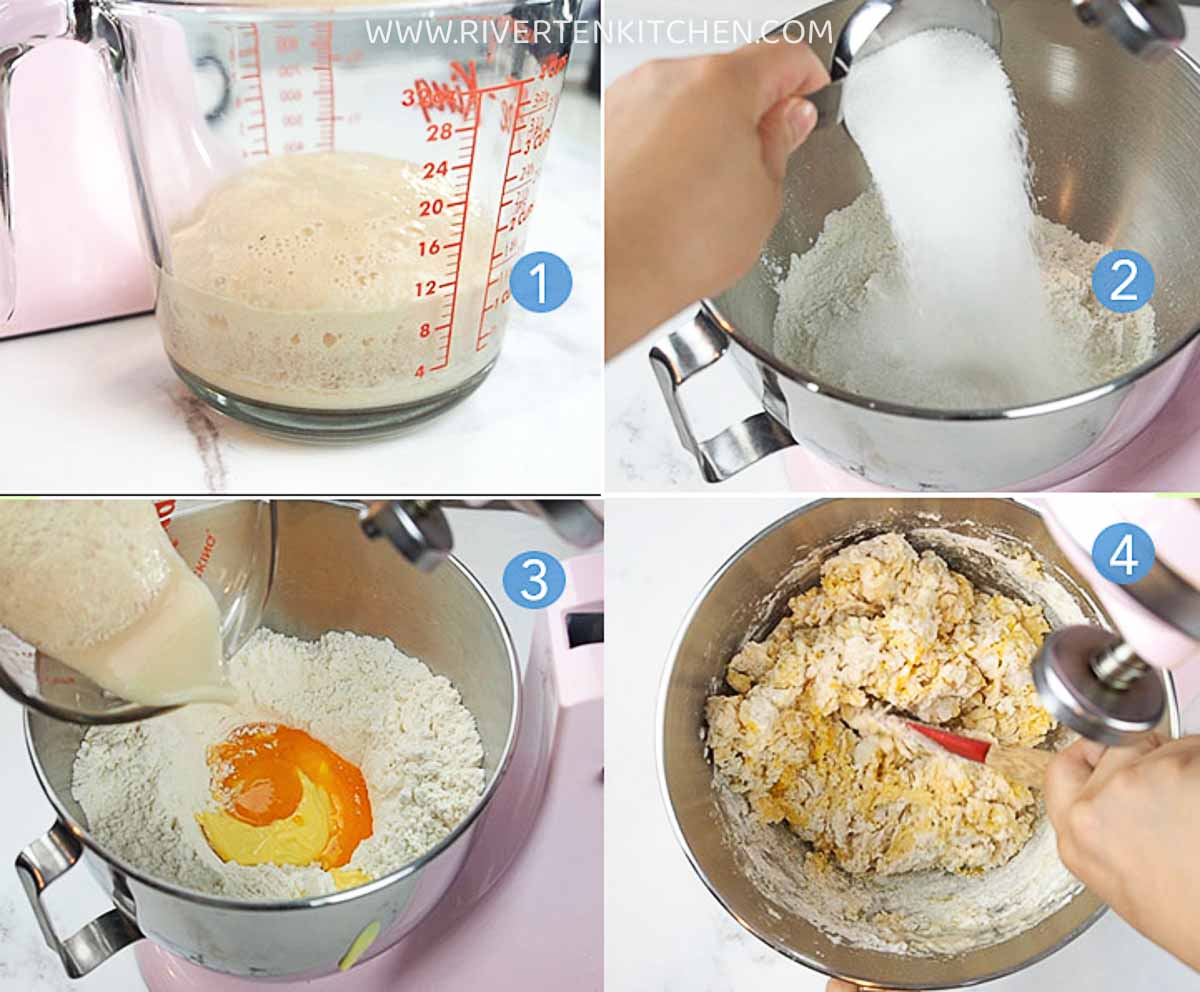
Preparation: While the yeast is proofing, whisk bread flour together with sugar and salt in the large bowl of your stand mixer. This ensures that the sugar and salt are evenly distributed before adding the liquid ingredients.
Egg Yolks
Using egg yolks instead of whole eggs is one of the secrets to making the softest and most delicious pandesal. Trust me on this!
Preparation: For tips on how to separate egg yolks from the white, please follow this link.
Butter
Use pure unsalted butter. This will give the pandesal a delicious buttery flavor and smell.
Preparation: Weigh on a food scale to get the exact measurement. Soften at room temperature for 30-40 mins before making you start baking.
The Secret to Soft and Fluffy Pandesal
A well-kneaded dough is another secret to making your pandesal soft and chewy. Kneading the dough not only combines the ingredients but also increases its elasticity and further develops its gluten.
Using a stand mixer with a dough hook is the easiest way to knead the dough. Kneading by hand could take up to 10-12 minutes and it is going to be a bit tiring especially if it’s your first time.
Once the dough ingredients are combined, attach the dough hook to your stand mixer. Turn the mixer on to the lowest speed and mix until flour is incorporated, scraping down the sides of the bowl as necessary.
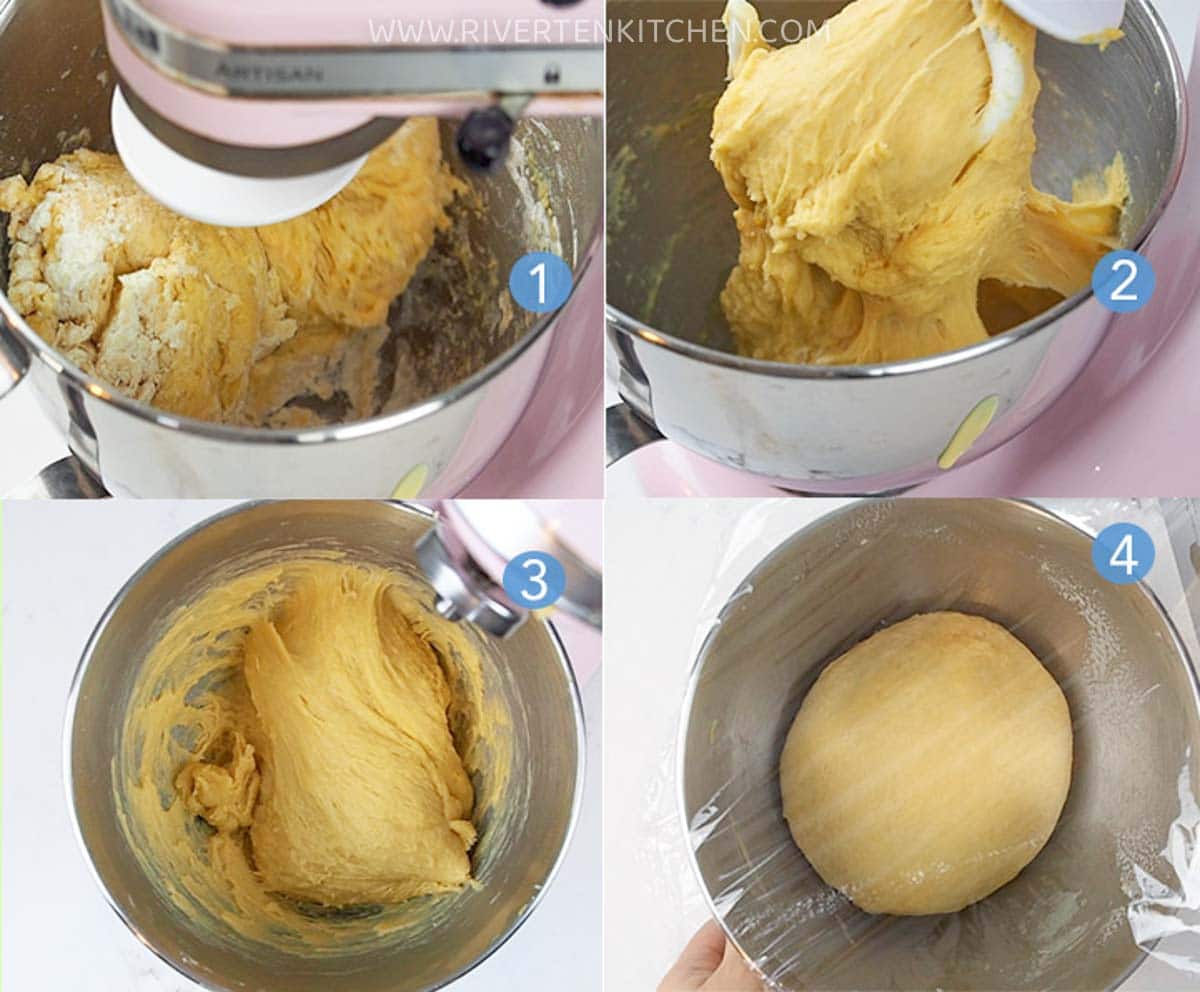
Increase the speed, and continue beating until the dough is SLIGHTLY STICKY and soft and pulling away from the edge of the bowl of a stand mixer. Give the dough a firm poke with your finger. If the indentation fills back quickly, you’re good to go. If it stays looking like a deep dimple, continue kneading.
Let the dough rise for an hour in a warm place or overnight in the fridge.
How to shape pandesal the easy way
- Once the dough has doubled in size, punch it down to release the air.
- Kneading it a few times by hand. This will help lessen the “yeasty” smell of the bread.
- Form into a smooth ball, and make a cut through the dough to the center.
- Divide the cut dough again into two.
- Shape into a small log as evenly as possible.
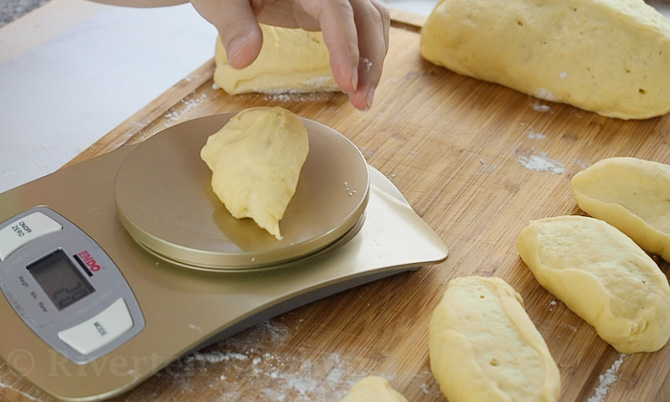
- Divide into 4 portions. Repeat the same steps for 3 of the remaining dough until you get 18 to 22 rolls.
I find that shaping the dough into small logs rather than one long log is so much easier to do for a non-professional home baker like myself.

Once the dough has been divided into portions, place it on a baking sheet or baking pan and let it rise for 45 mins to 1 hour covered with a towel. Bake in a preheated oven and enjoy!
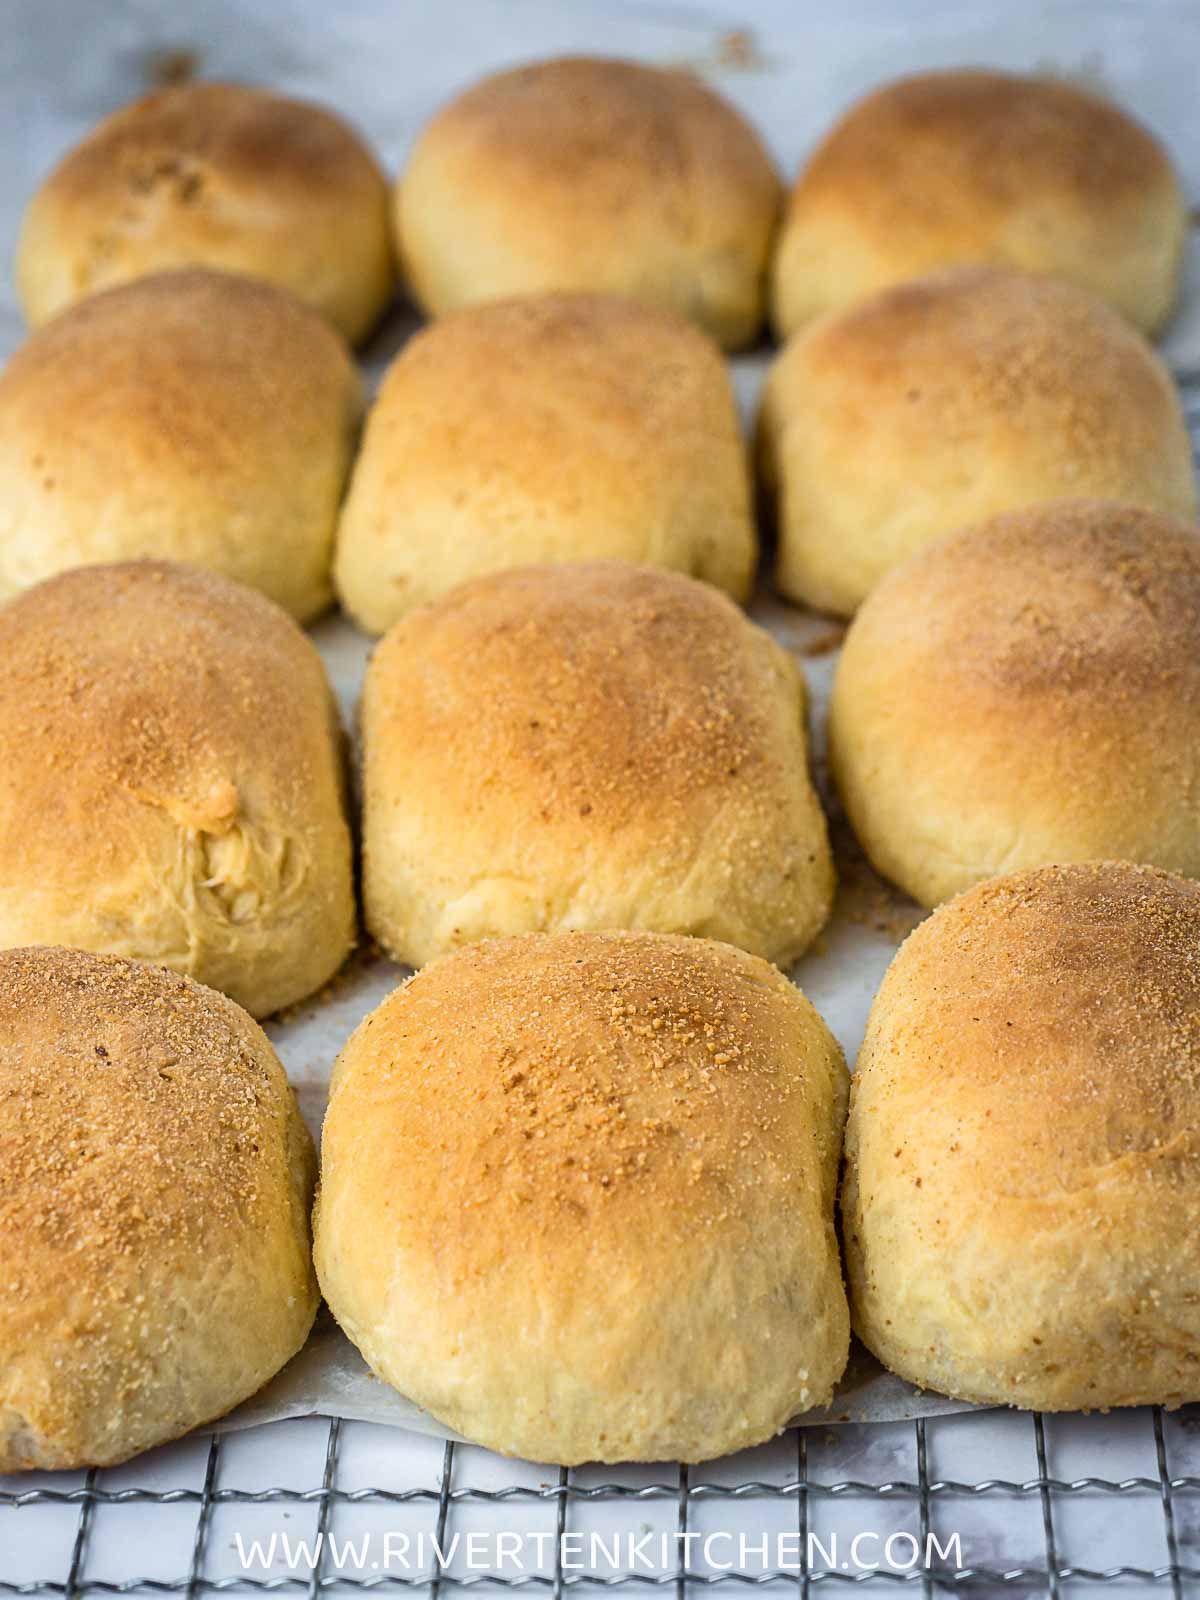
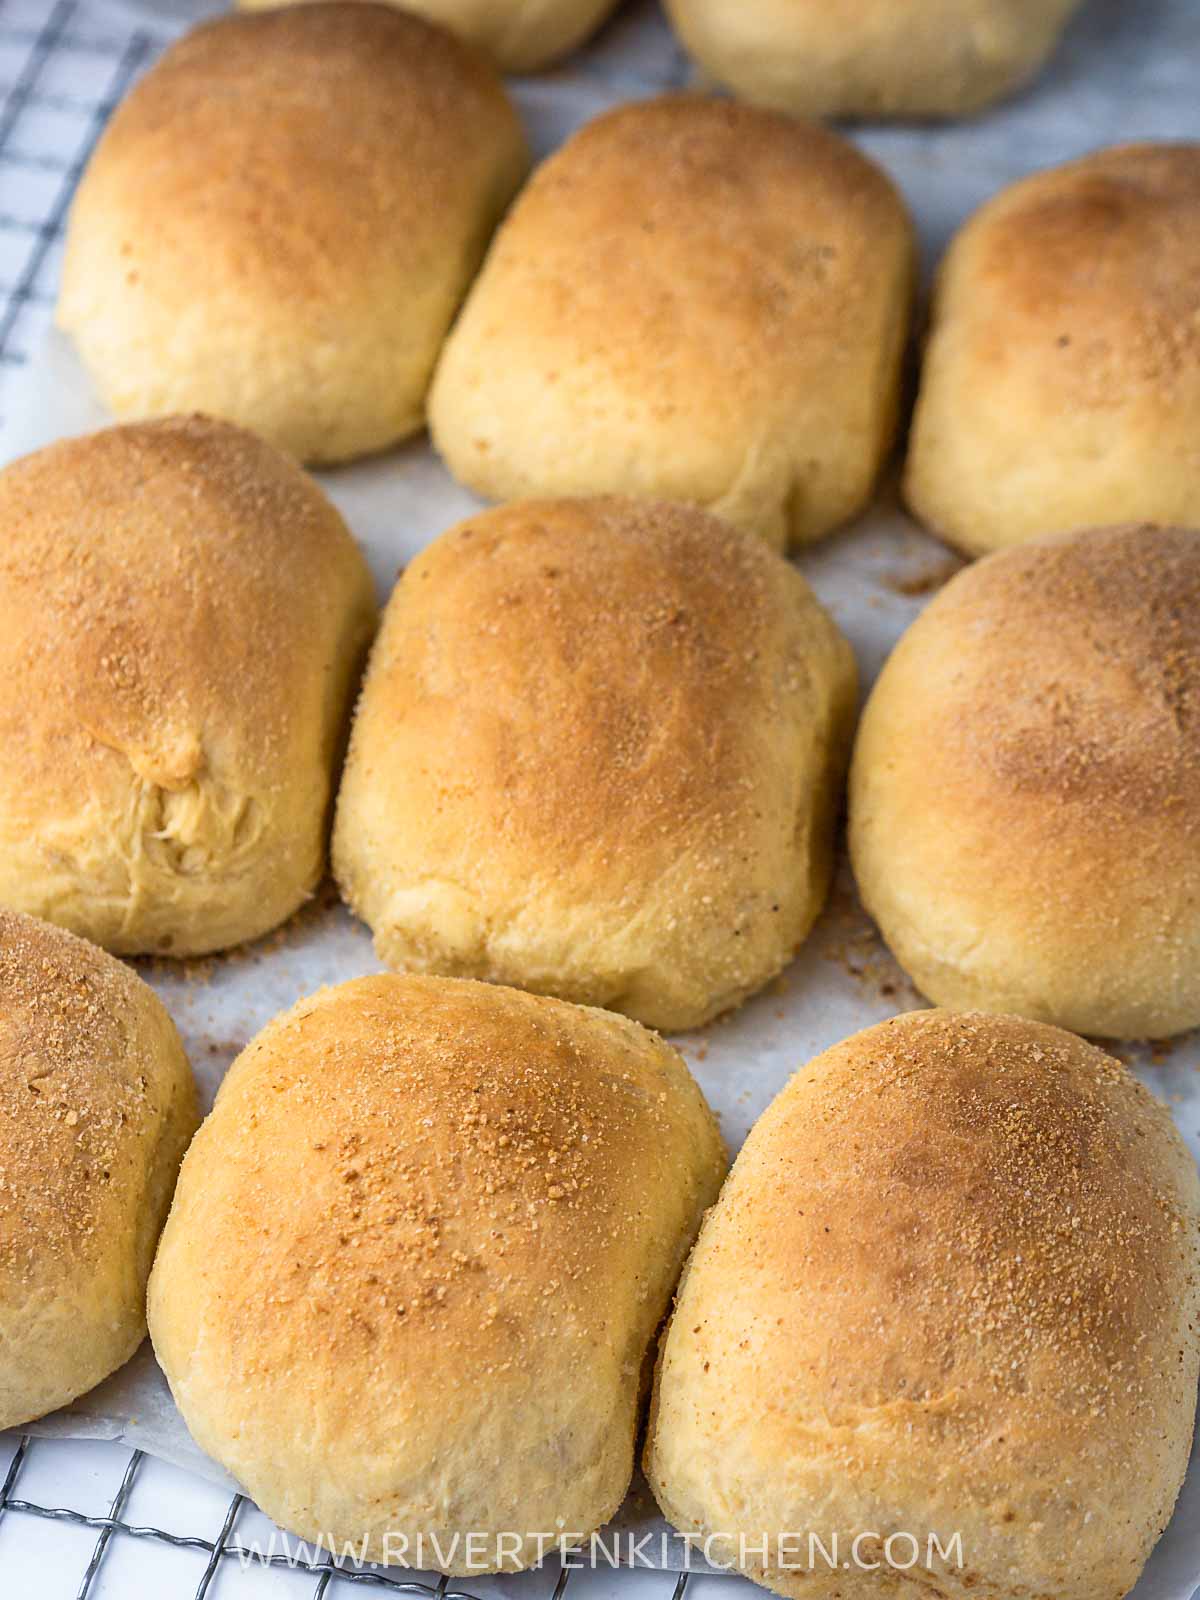
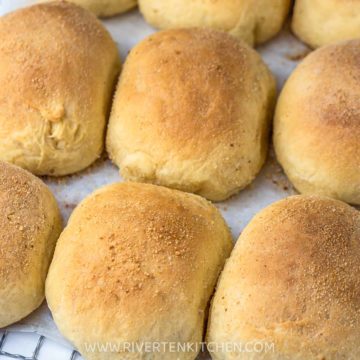
Evenly sized Pandesal
If you want to accurately divide the dough into equal portions of the same size and weight, use a kitchen scale. Mine weighs about 50g each which creates a medium-sized roll. Adjust based on your preference.
Shape into a roll by tucking it under to create a smooth top. Press down, and rotate to an even dough ball (see video). Repeat the process for each roll and place it on a baking tray.
What is Pandesal?
Pandesal, sometimes spelled out as pan de sal means “salt bread” in Spanish. It is one of the most popular breakfast food in the Philippines. Many bakeries all around the country sell it. Some even make their own variation like malunggay pandesal which includes powdered moringa leaves and kalabasa pandesal which includes mashed squash.
What we’re making today is a homemade version of this Filipino bread. It is an easy recipe made of accessible ingredients that you can buy in your local grocery store.
Why you will love this recipe
- It yields the softest and most delicious bread. And it smells so good! Your house will smell like your neighborhood Filipino panaderia while baking. Don’t you love that smell?
- The bread stays soft until the next day and even the next day after. I promise!
Breadcrumbs for Pandesal
I recommend using breadcrumbs with a finer texture. I often use Progresso plain breadcrumbs (this is not sponsored).
You can also use panko breadcrumbs but I suggest doing the following before using it:
- Place breadcrumbs on a tray. Spread it evenly.
- Bake in the oven for 10-15 minutes at 120c/248f until it’s lightly toasted. Stir every now and then.
- Pound into a finer texture by placing it inside a zip bag and pounding with a rolling pin. You can also use a blender or food processor.
What to Eat with Pandesal
These Filipino bread rolls would not be complete without a slather of these spreads:
- butter or margarine with a sprinkle of sugar
- peanut butter
- strawberry jam, orange jam, pineapple, etc.
- Filipino coconut jam (minatamis na bao)
- Kaya Coconut Jam
- cheese spread i.e. cheez whiz or cheese slices
- ube halaya (purple yam jam)
Enjoy it for breakfast or a light snack to serve with hot chocolate, coffee, tea, or hot whole milk.
If you want pandesal to be a little more filling, serve with it ham, corned beef, fried eggs, spam/luncheon meat, and even canned sardines and tuna.
Storage and Shelf-life
Store left-over pandesal in the fridge for up to 3 days. Store in an airtight container or large zip bag, and push out excess air before sealing.
Reheating
To reheat, bake the bread in the oven for 10 minutes at 350f/180c. To prevent the top from burning, wrap it in aluminum foil.
If using a mini-toaster/oven, use a lower temperature of about 120c to 130c. Bake for 1 to 2 minutes. The top can easily burn if the bread is too close to the heat source, so I suggest wrapping the bread with aluminum foil.
Frequently asked questions
Pandesal tastes like sweet butter rolls only coated with bread crumbs. It is soft on the inside with a coarse and toasted texture on the outside. Contrary to its name, it is anything but salty bread.
A dense and pandesal can be caused by using inaccurate proportions of ingredients, for example, not enough liquid or fat, or using too much flour. Another reason is under rising. If the dough did not have enough time to rise, then the bread might come out dense and hard.
The best flour for pandesal is a combination of all-purpose flour and bread flour. This creates a good balance of texture–soft, chewy yet still fluffy. But of course, you can still make it with just all-purpose flour or just bread flour if that’s what you have in your pantry.
If your bread dough is not rising, it means that the yeast is inactive or was not properly activated. This usually happens if it was dissolved in water/liquid that was too hot.
Make another batch and ensure that the water is lukewarm. Adding inactive yeast to flour will end up in a wasted batch of dough.
Check out my Beginner’s Guide: Baking with Yeast Bread for more tips on yeast bread making.
If yeast did not bubble, it means that it’s inactive or has died because of too much heat. Make another batch and ensure that the water is lukewarm. Adding inactive yeast to flour will end up in a wasted batch of dough.
Check out my Beginner’s Guide: Baking with Yeast Bread for more tips on yeast bread making.
To make a healthier pandesal, use wholemeal flour and a flaxseed meal. You can get the complete recipe here.
You can use vegetable oil to make pandesal. Use the same amount as the butter in this recipe which is 1/2 cup. It will also yield the softest bread texture without the butter flavor.
Watch how to make Soft Pandesal
Love baking? Try these next…
- The best Mocha Cupcakes
- Fudgy Chocolate Crinkles
- Ensaymada Cupcakes
- The Best Cheese Cupcakes with Cheese Crumble
- Easy Chocolate Cake
For bread lovers!
- Condensed Milk Bread (new!)
- Soft Spanish Bread
- Brown Pandesal
- Filipino Pan de Coco
- Small-batch Soft Cinnamon Rolls
Soft Pandesal Recipe (stays soft even the next day!)
Ingredients
- 2 ¼ tsp yeast mixed with 1 teaspoon sugar
- ½ cup lukewarm water (temp 40c/105f)
- 2 cups bread flour (see note 1)
- 2 cup all-purpose flour
- ⅓ cup sugar
- 1 ½ teaspoon salt
- ¾ cup fresh milk
- 3 large egg yolks
- ½ cup unsalted butter (softened)
- oil for the bowl
- ¼ cup plain breadcrumbs (add more if needed)
Instructions
- In a medium-size bowl, combine lukewarm water, 1 teaspoon of sugar, and yeast. Stir until completely dissolved. Let it stand for 5 to 10mins until yeast begins to foam.
- Meanwhile, in the bowl of your stand mixer, combine flour, sugar, and salt. Mix thoroughly.
- Add warm milk, yeast mixture, egg yolks, and butter to the dry ingredients. Stir with a spatula until just combined. Attach the dough hook and turn the stand mixer on to the lowest speed and mix until flour is incorporated, scraping down the sides of the bowl as necessary.
- Increase the speed to medium and beat for 2 minutes. Add additional flour as necessary, start with 2 tablespoons and go from there. Continue beating for 5 to 6 minutes until the dough is SLIGHTLY STICKY and soft and pulling away from the edge of the bowl. Be careful not to add too much flour.
Rise # 1 Warm rise or cold rise
- Wipe or spray oil on the sides of the bowl then form dough into a ball. Cover with plastic wrap and let it rise in a warm spot for 1 hour until it doubles in size. To make ahead, do a cold rise by placing the dough in the refrigerator. The dough will slowly double in size the next day. See the notes for more information.
Rise #2 Shape the rolls
- Remove the plastic wrap and punch the dough down. Transfer onto a lightly floured surface. Divide the dough into 20 to 24 portions (see step-by-step photos above) and shape into a smooth ball. For an evenly sized dough, use a kitchen scale. Mine was about 50g each. Adjust based on your preference.
- Lay it in the bread crumbs. Shake off excess then place inside the baking tray greased or lined with a parchment paper. Repeat with all the other portions. Make sure that the dough is arranged two inches apart. Cover with a towel or cloth and let it rise for 40mins to 1 hour.
Baking
- Preheat oven at 180c/356f, 15 minutes before the dough rolls finishes rising. Bake for 18 to 20 minutes until the top turns light brown. If you're using two racks, switch the trays after 12 minutes so all the rolls will brown evenly.
Recipe Notes & Tips:
- Bread flour – substitute with all-purpose flour if not available. Replaced in the same amount as mentioned in the recipe.
- Sugar can be increased up to 1/2 cup if you prefer a sweeter bread.
- Don’t add too much flour. Add additional add about 2 tbsp at a time until the dough is slightly sticky and pulling away from the sides of the bowl. Knead the dough with the stand mixer after every addition and then feel and test the texture after.
- Cover the bowl with a plastic wrap and seal the edges. I find that the yeast activates more quickly when moisture is locked-in in the bowl.
- For colder months, I use the oven to prove the dough. Pre-heat it at the minimum temperature for 5 minutes, turn it off then place the bowl inside. Warning: Use a heat-proof cling wrap or a wet towel instead of a regular cling wrap if you’re proving in a warm oven.
- Make-ahead Tip: Make the dough ahead of time then place it in the fridge. The dough will slowly rise and double in size overnight. On the day of baking, remove from the refrigerator 30 mins before you’re going to shape them into rolls.
- Storage and Shelf-life: Store left-over pandesal in the fridge for up to 3 days. Use an airtight container or large zip bag, push out excess air before sealing.

made these tonight and OMG I couldn’t help myself I ate two lol. I’ve been searching for the PERFECT pandesal recipe and I’ve found it! Reminds me so much of my fave bakery (neighbor) in the Ph. It’s super soft and tasty and the smell just takes me back. Thank you so much for sharing this recipe♥️
Thanks for the lovely feedback! This means so much to me 🙂
And you’re right this bread does make your entire house smell like a true bakery.
– Mella
Your recipe is a game-changer! My son doesn’t like the pandesal I get from bakeries in Sacramento, but this one he gobbles up. My husband calls them the Vanishing Pandesal because they go fast. Also greatly appreciate your explaining why bread flour and egg yolks make a big difference.
Thanks for the lovely feedback, Maida. I’m so happy to hear your family loved this pandesal recipe. This is also a family favorite and does vanish pretty quickly 🙂
– Mella
interesting .helpful and useful specially we beginners.thanks a lot for this pandesal recipe.
Best pandesal 😋😋
Thanks, Liesel!
– Mella
This is now my go to recipe, my family and friends love it! It stays soft even after 2 days. Thank you!
Hi. I followed the recipe to the dot but after an hour, my dough didn’t rise. I proofed the yeast as directed- will I just continue to wait and see if it does rise?
I’m wondering if I can still use the dough though?
Thanks!
P.s I used only all purpose flour so not sure if that was the issue but I’ve used similarly process making cinnamon buns and the dough did rise on it. Thoughts? Thanks, again for your time!
Hi Maria, Did the yeast froth? It’s possible that the water was too hot which caused the yeast to not activate.
– Mella
Hello! I’d like to ask if active or instant dry yeast ang ginamit po ninyo for this recipe? 😊
I used instant yeast. Active dry is also ok. I froth either of them anyway 🙂
– Mella
I have read and tried so many pandesal recipes and this is the most successful! The taste and texture is the best…still soft even after days in the pantry!😊 This is now part of our regular staple in our kitchen! 🙂
If I do the slow rise in fridge overnight, do I still do a second rise after shaping the pandesal?
Hi Meron kayong metric measurements for pandesal? And by the way i tried your spanish bread recipe it was really soft and tasty i want to make it again and again my fave now❣️ thank you for your amazing recipe
Amazing recipe! My pandesals turned out perfect and so buttery good! Thank you for the lovely recipe and sharing some of your tips – which were very helpful!
Finally said yes to a Kitchen Aid last Christmas and your pandesal recipe was my buena mano. I’ve made three batches so far and all have been big hits with my family. My hubby calls it the Vanishing Pandesal 🙂 You’ve brought a piece of home for this Pinay in California.
I am going to use machine bread making the dough, do i still have to dissolved the yeast with the lukewarm water with the sugar?
I have a question pala, what adjustments do I need to make if i want to use whole wheat flour?
Use half whole wheat flour and half all-purpose or bread flour. I actually have a brown pandesal recipe. It uses less butter but good too! Sort of “healthier” pandesal. Here’s the link.
– Mella
Mella, it’s me again!!!! Because of the success of my (your) ensaymada and baked pork buns i made pan de sal!!! Just to note you can actually do the second rise overnight in the fridge —I did it for the ensaymada and the pork buns as well— so that I could bake it in the morning! Ang sarap! Parang I went to the neighborhood bakery at 5 am like I used to back in the Philippines. Tataba ako lalo into pero I’m so happy. I’m sharing your recipes to all my friends and my family. Salamat ulit!
Thanks for the wonderful feedback, Gia. This means so much to me! Happy holidays!
-Mella
Hello! My bread tastes sour everytime I make bread with yeast. Is that normal? Or am I doing something wrong? I keep looking for that bakery kind of sweet smelling and tasting kind of bread. My yeast is recently bought though so it couldn’t have been that? Help, please.
Hi Aly, how much yeast are you using and how long was your first and second rise? This usually happens due to over fermentation or using too much yeast. If the dough doubles in size in less than an hour (e.g 30-45 mins) then don’t let it sit for too long as it will keep on fermenting. After the first rise, knead the dough for a few minutes either by hand or a stand mixer until the sour smell dissipates.
Hope this helps.
– Mella
Hi! Can i use all bread flour? What would be the outcome if i dont use apf? Thank you
Yes, you can! texture will still be soft-chewy and still good 🙂
– Mella