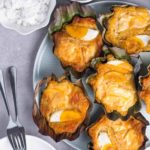
Easy Bibingka Recipe (Filipino Rice Cake)
This is the easiest and yummiest bibingka! Moist, tender, slightly gooey, and buttery rice cake. Why wait for Christmas when you can make these anytime of the year?
Servings: 10 servings
Calories: 310kcal
Ingredients
Wet Ingredients:
- ¼ cup unsalted butter
- ¾ cup + 2 tbsp white sugar
- 3 large eggs
- ½ teaspoon salt
- 1 teaspoon vanilla extract
- ⅓ cup evaporated milk
- 1 cup coconut milk canned, see note 1
Dry Ingredients
- 1 ½ cup glutinous rice flour see note 2
- ½ cup rice flour
- 2 ½ teaspoon baking powder see note 3
- grilled banana leaves for lining
Choice of Toppings
- processed cheese sliced into strips, divided-see note 4
- grated coconut or coconut flakes unsweetened
- salted duck egg
- coconut palm sugar
Instructions
- Pre-heat the oven to 190c/375f. Grease large muffin cups with melted butter or line with grilled banana leaves. Place in an oven-proof tray.
- In a small pot, melt butter slowly over low heat until it turns clear and brown. Watch carefully to prevent burning. Remove from heat and pour onto a heat-proof bowl. Residual. Let it cool completely.
- In a large bowl, whisk brown butter and sugar. Add eggs, salt, vanilla, evaporated milk, and coconut milk. Whisk until sugar has completely dissolved.
- Sift the rice flour, glutinous rice flour, and baking powder into a strainer over the liquid ingredients. Stir until well combined and lump-free.
- Immediately fill the muffin cups with the bibingka batter. If the batter sits on the counter for a period of time, make sure to stir it well before pouring it over the muffin cups.
- Top with a slice of cheese and sliced salted egg on top. Bake for 12 to 15 minutes in the top rack of the oven until the top is brown. Start checking at 10 minutes. Move the rice cakes to the middle rack and bake for another 10 to 12 minutes until the toothpick inserted comes out clean (see notes for oven types).
- Let it cool completely. Sprinkle with sugar or grated coconut on top. Serve and enjoy!
Video
Notes
- Canned Coconut Milk - avoid using those that contain thickeners like xanthan gum, guar gum, or carrageenan. It should, at the minimum, only have coconut milk and water.
- Glutinous Rice flour - also known as sweet sticky rice flour. It is not the same with rice flour.
- Baking Powder: Make sure baking powder is fresh and not expired.
- Cheese: If using grated cheese, top it just before the bibingka finishes cooking.
- Oven - lower oven temperature may be needed if using a smaller size oven.
- Storage/Shelf life: Refrigerate in an airtight sealed container. When properly stored, it can last up to 3 days. Reheat for 40 seconds in the microwave.
Nutrition
Calories: 310kcal | Carbohydrates: 46g | Protein: 5g | Fat: 12g | Saturated Fat: 8g | Cholesterol: 70mg | Sodium: 280mg | Potassium: 124mg | Fiber: 1g | Sugar: 16g | Vitamin A: 243IU | Vitamin C: 1mg | Calcium: 110mg | Iron: 2mg