
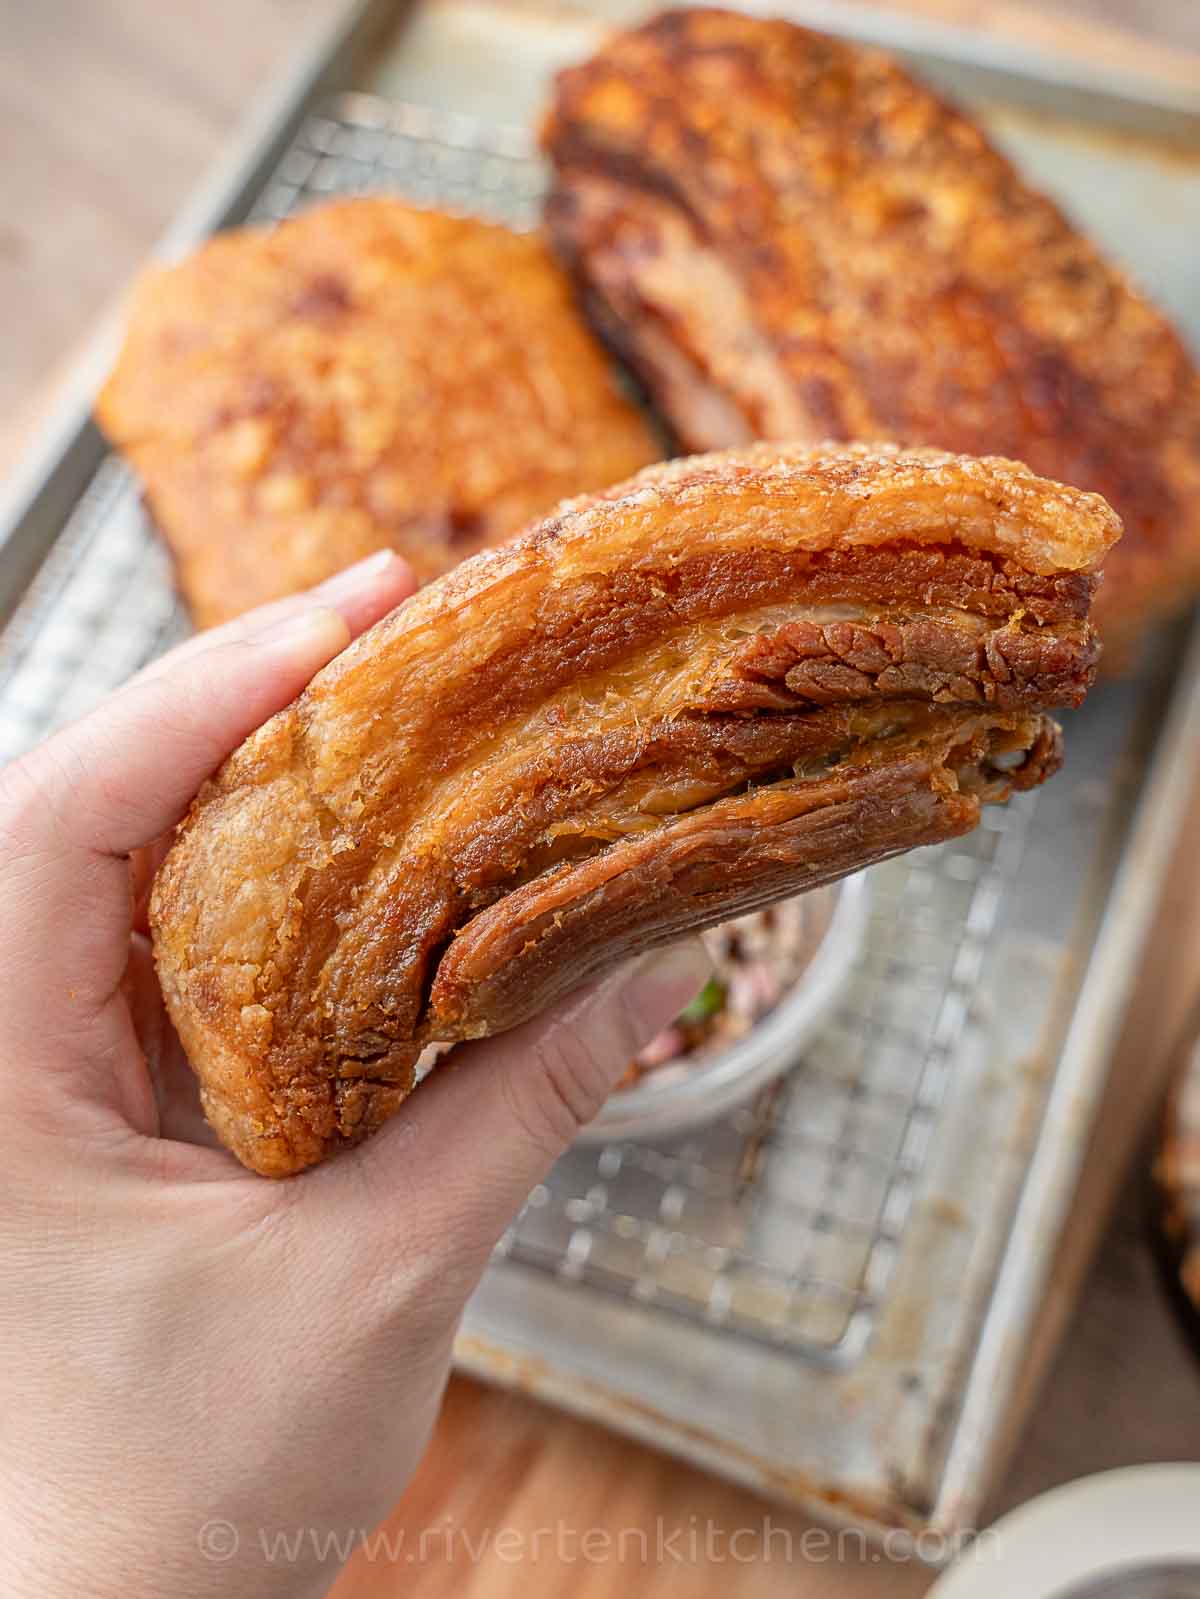
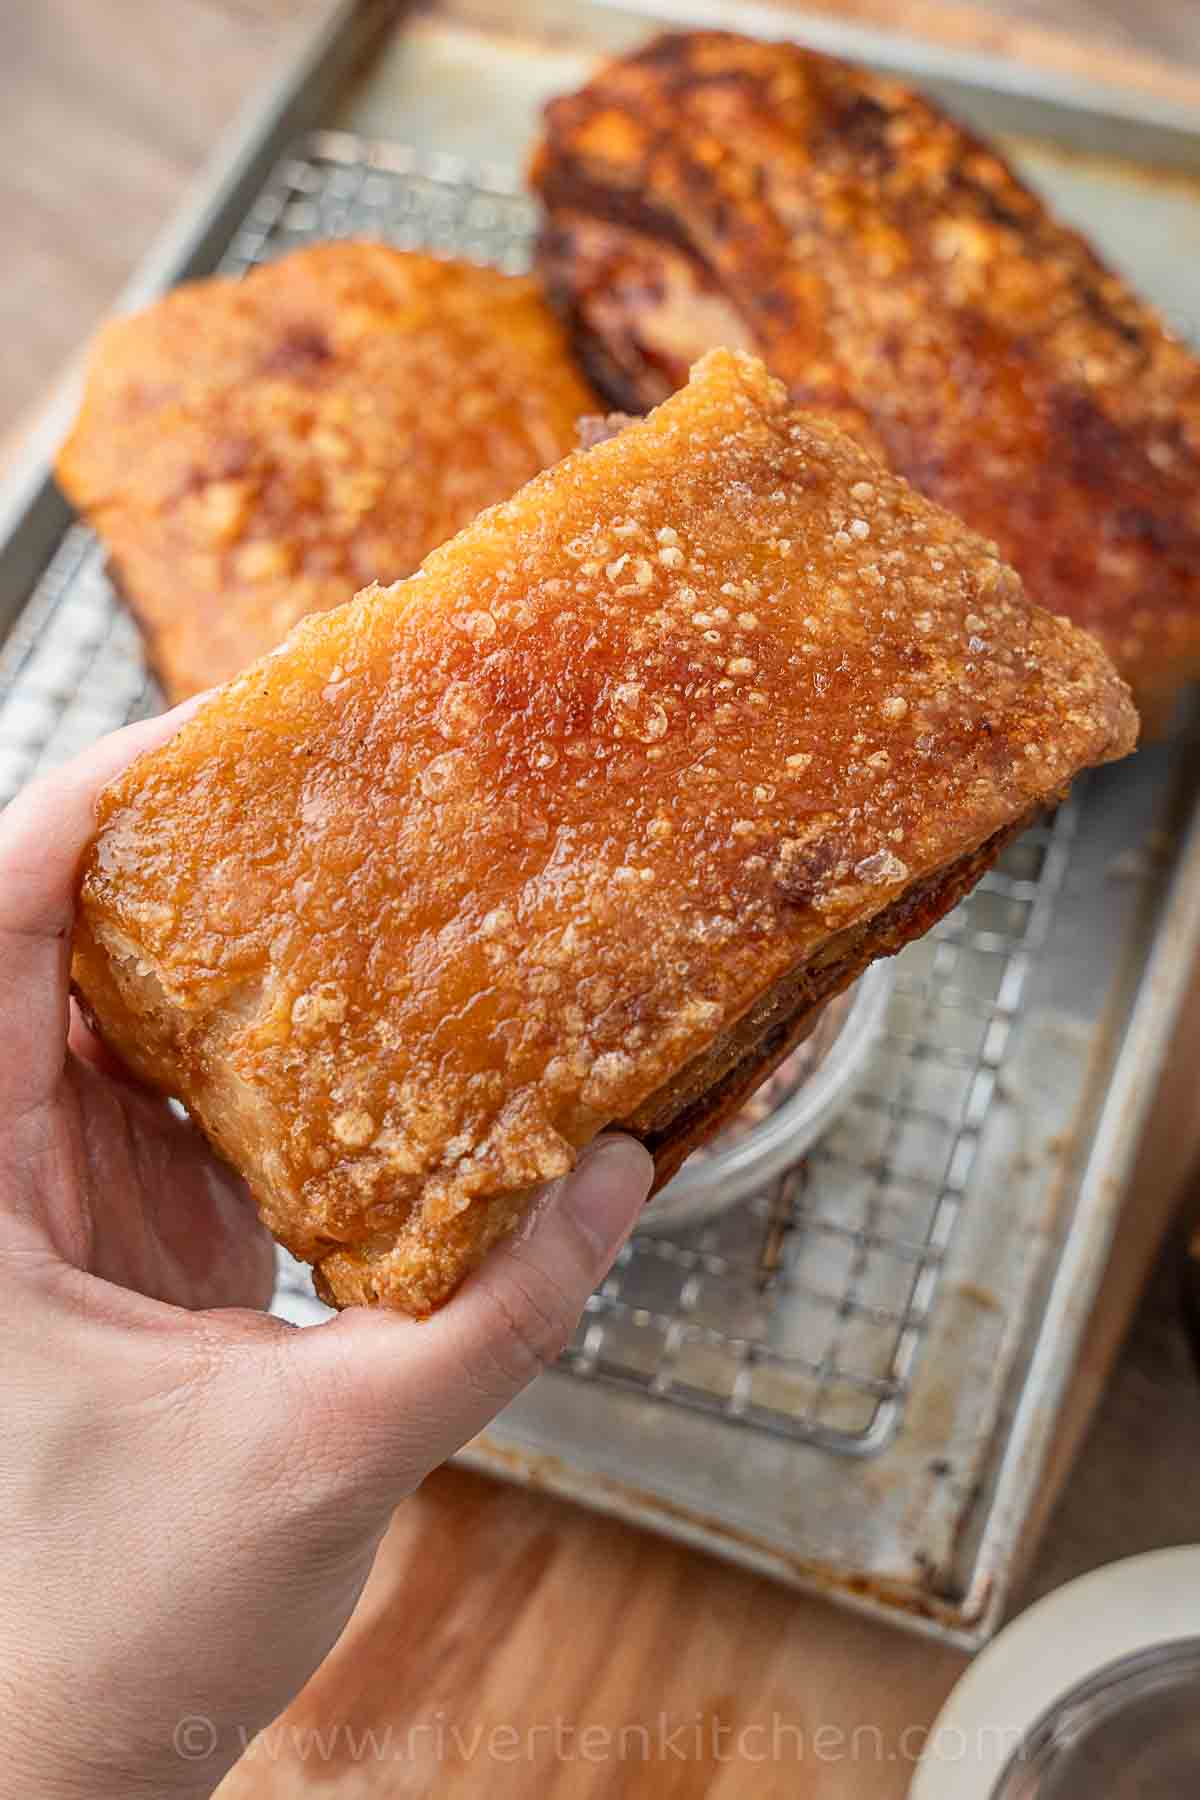
Super crispy skin, tender, and juicy lechon kawali! Cook in an oven or air-fryer or go traditional by deep-frying! This is your favorite Filipino crispy pork belly made easier and more delicious with the simplest seasoning.
What does “Lechon Kawali” mean?
“Lechon Kawali” is a Filipino dish that consists of a deep-fried or pan-fried pork belly with crispy skin.
The term “lechon” comes from the Spanish word “lechón,” which refers to a roasted whole pig traditionally prepared for festive occasions. “Kawali” is a Filipino word that translates to “pan” or “skillet” in English. Therefore, “Lechon Kawali” can be understood as “pan-roasted or pan-fried pork.”
Why you’ll love this recipe
- It makes the crispiest and most tender lechon kawali you’ll ever have.
- I will show you 3 different ways how to make it crispy and delicious.
- Safe to cook – no oil splatters, or accidental oil burns.
Ingredients
Here’s what you need to make lechon kawali:
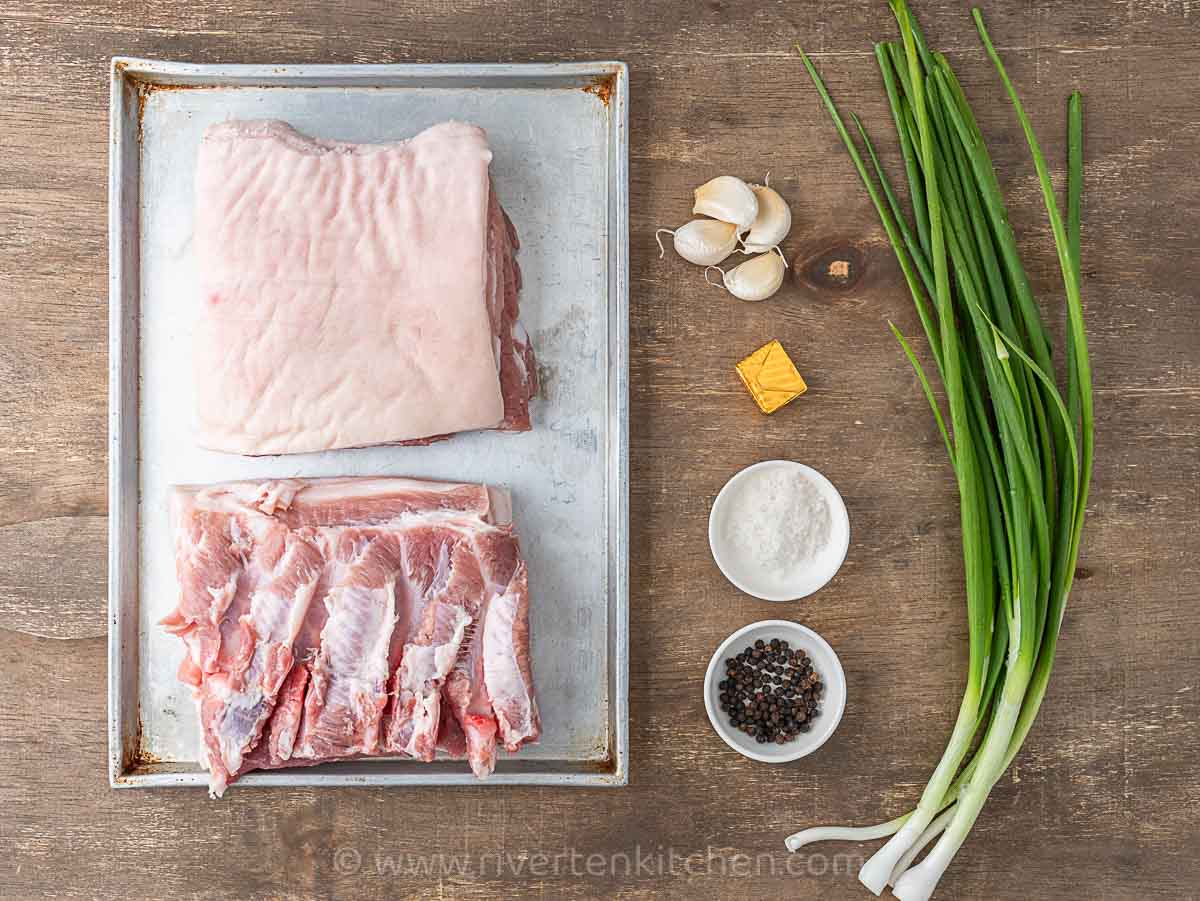
Pork Belly
For the most optimal results, I highly recommended using the freshest slab of pork belly available, preferably sourced from a trusted butcher.
Tip: Avoid frozen cuts that have been stored for an uncertain duration, as they may not achieve the desired level of crispiness. This advice is based on personal experience, which has taught me the importance of starting with high-quality, fresh ingredients when preparing lechon kawali.
Seasoning
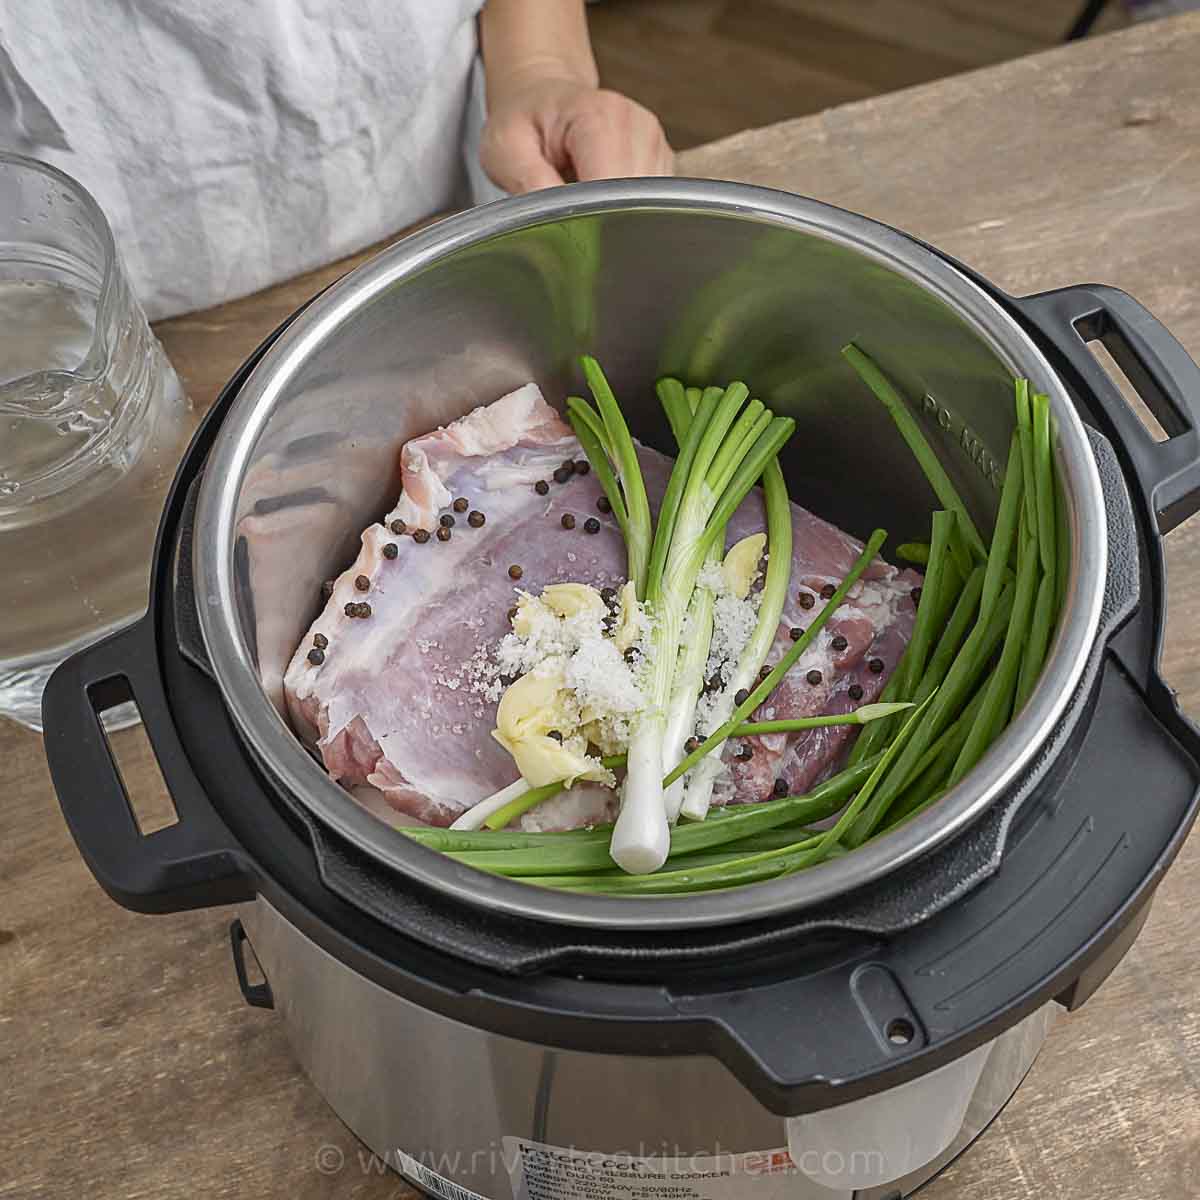
This version of lechon kawali uses salt, whole black pepper, scallions, g, garlic, and one secret ingredient to make the pork tasty–chicken bouillon! It’s so basic and simple yet does wonders in bringing out the bacony flavor of the pork.
For frying, salt the skin of the pork to make it crispy. I recommend using a coarse-grained type such as sea salt and kosher. Don’t use iodized salt or table salt, please.
How to Make Lechon Kawali
Regardless of the cooking method you choose—whether it’s deep-frying, air-frying, or cooking in the oven—here are essential tips to help you make the best Lechon Kawali at home:
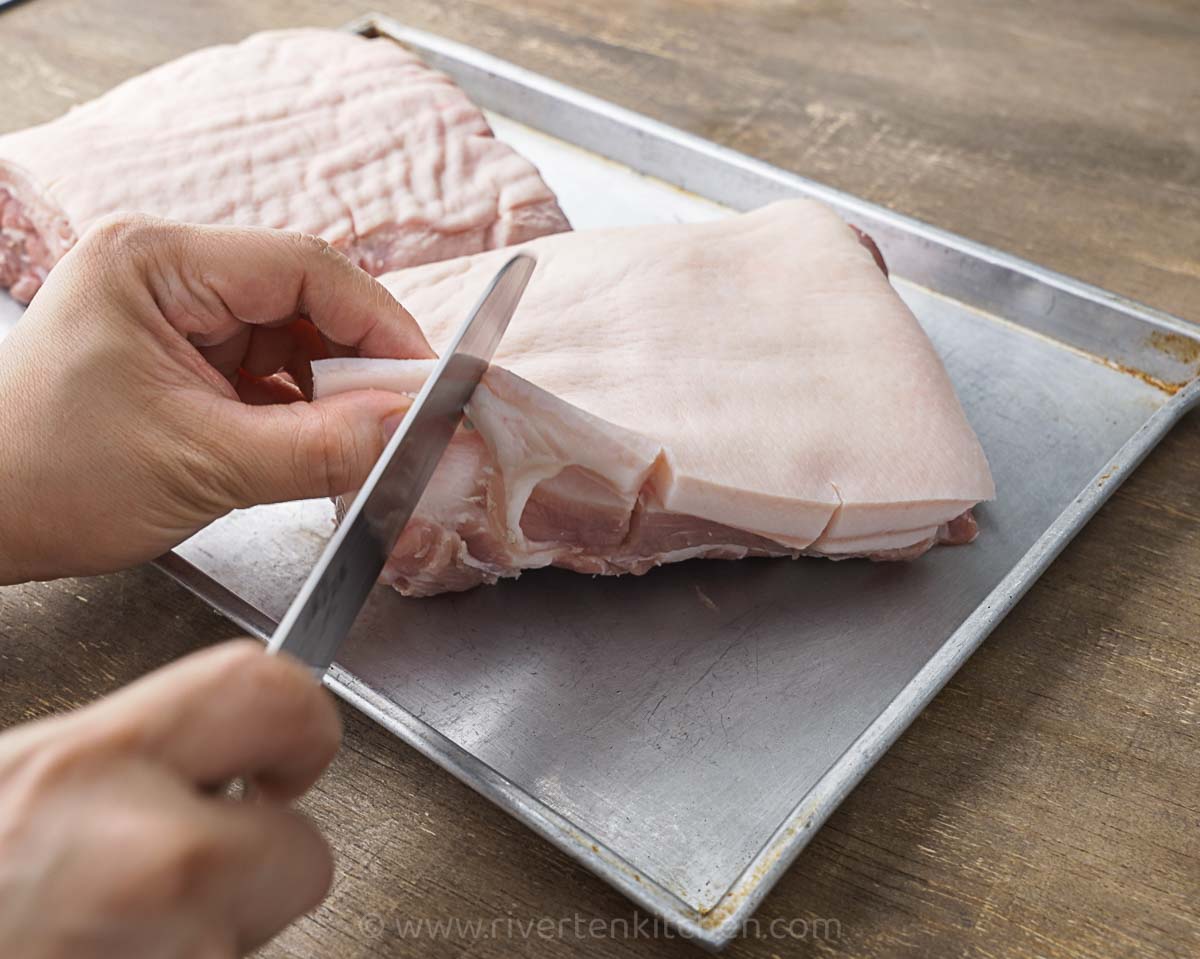
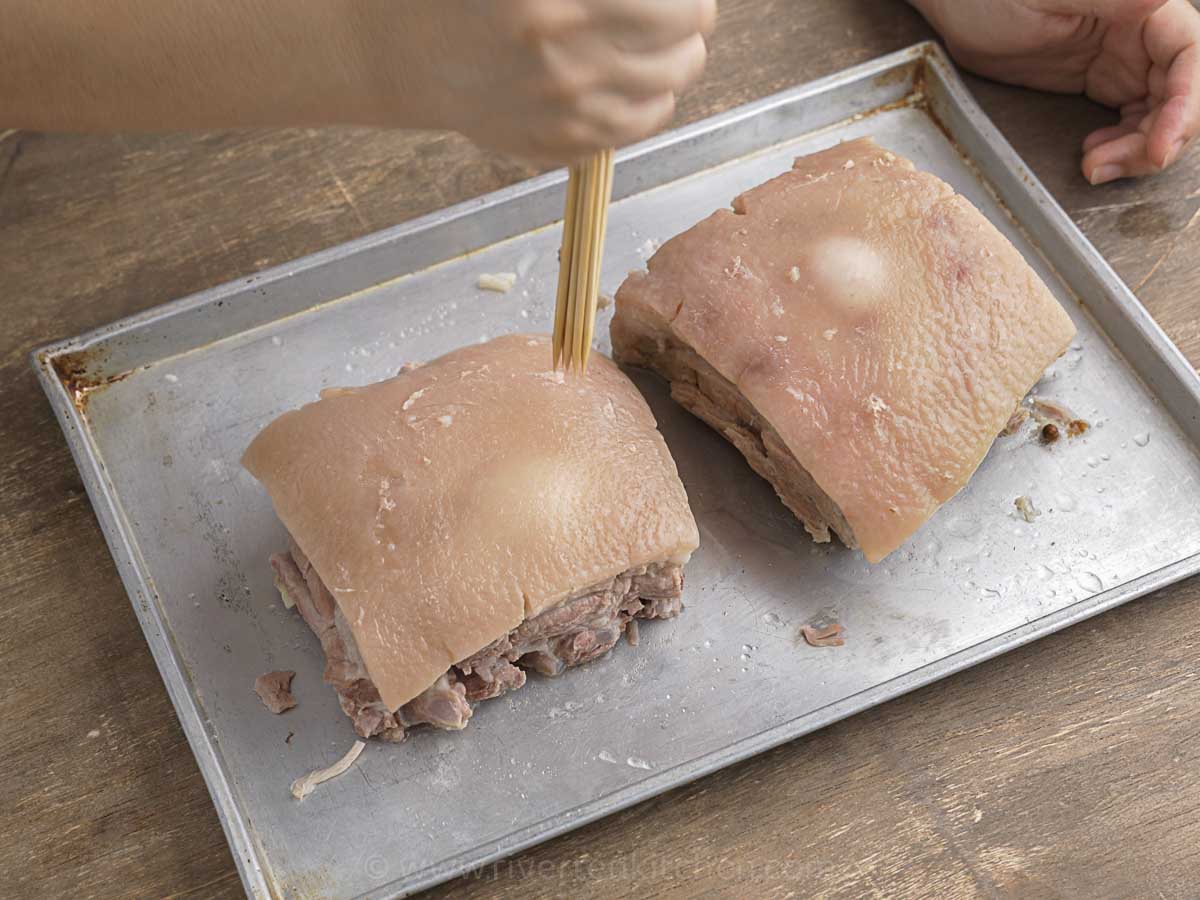
1. Prevent the meat from curling
Make vertical slits (don’t cut through!) to the edges of the skin (see video). It’s important that the pork can be laid flat on the wire rack and that the skin is side up throughout the broiling process.
2. Boil the pork belly
Boiling pork belly before frying ensures that the meat is tender and fully cooked. Moreover, the boiling process renders some of the fat, which aids in achieving a satisfyingly crisp skin and meat when it’s later fried.
Cooking time
Here are two methods of boiling pork and their recommended cooking times:
- Stovetop – Place the pork in a deep pot. Add the seasonings then pour tap water until all the meat is covered. Boil the pork for 45 minutes to 1 hour until fork tender. A longer cooking time may be needed if using thicker or larger cuts of meat.
- Pressure Cooker or Instant Pot – Cook at high pressure for 25 minutes for thick slabs of pork and 15 to 20 minutes for thinner cuts. Use quick release to release the pressure. Please refer to your instruction manual for more details.
3. Prick holes in the skin
Pricking holes in the skin helps to create small bubbles and prevent the skin from puffing up during cooking. The tiny openings also allow the skin to crisp up evenly and the seasoning to penetrate the meat more effectively.
Tip: Use a skewer or fork that is sturdy enough to pierce through the skin. Hold the pork belly or lechon kawali firmly and aim to pierce through the skin and into the layer of fat beneath it, but be careful not to go too deep into the meat.
4. Season with salt
Season the skin with salt as soon as the pork is cool to the touch. Include the sides and bottom part of the pork.
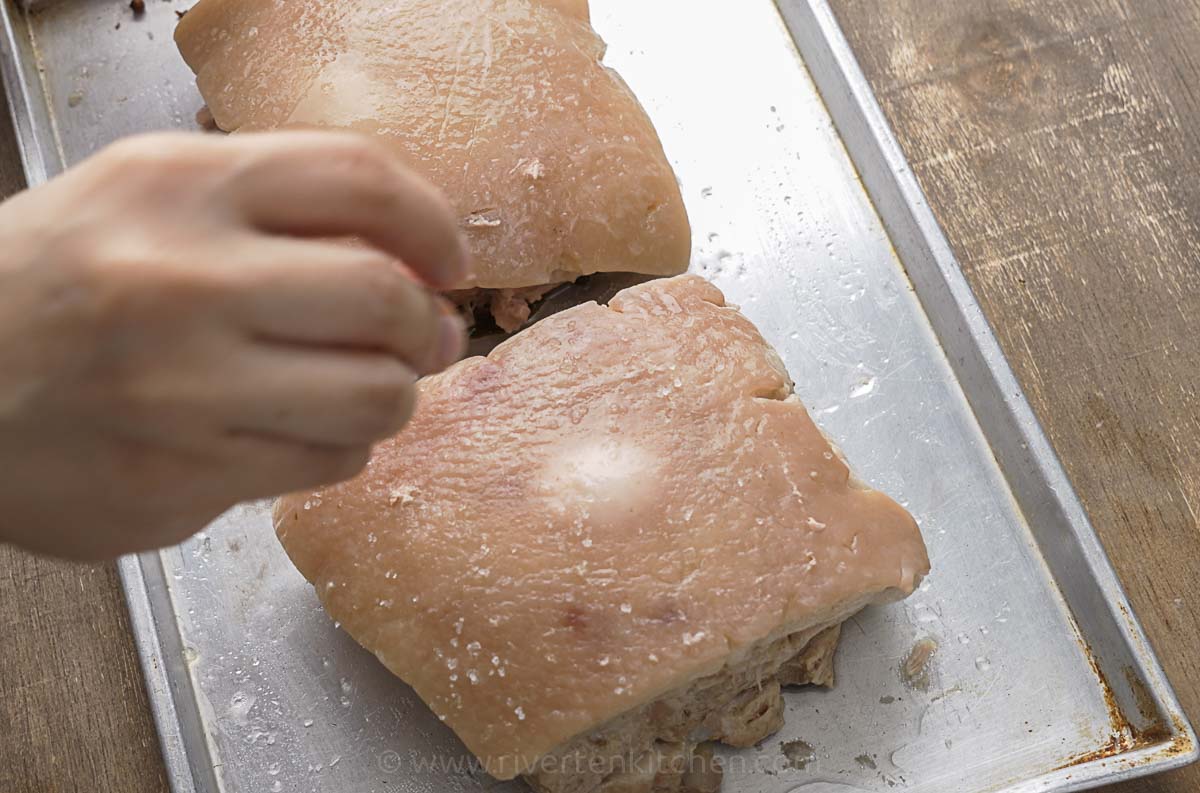
When the pork belly is seasoned with sea salt, it helps draw out moisture from the skin. This moisture loss aids in the formation of a drier surface, which, when cooked, promotes a more delicious crispness.
5. Dry the skin: an important step when deep-frying
When the skin is thoroughly dried before cooking, it helps promote the desired crispiness by reducing moisture content.
This is also the secret to preventing oil splatters during cooking. Water on the skin causes oil to splatter, leading to potential safety hazards and a less-than-optimal cooking experience.
There are two ways to dry out the skin:
- Air Drying Method – Air dry the pork belly skin by placing it uncovered in the refrigerator for several hours or overnight. This method helps moisture evaporate naturally and encourages the skin to dry out.
- Oven Drying Method – Pre-heat oven or air-fryer to 350°F/ 180°C. Let the pork belly skin dry out in the oven for approximately 20 minutes.
Note: You may skip this step if cooking in the oven or air-fryer. The skin will naturally dry out by
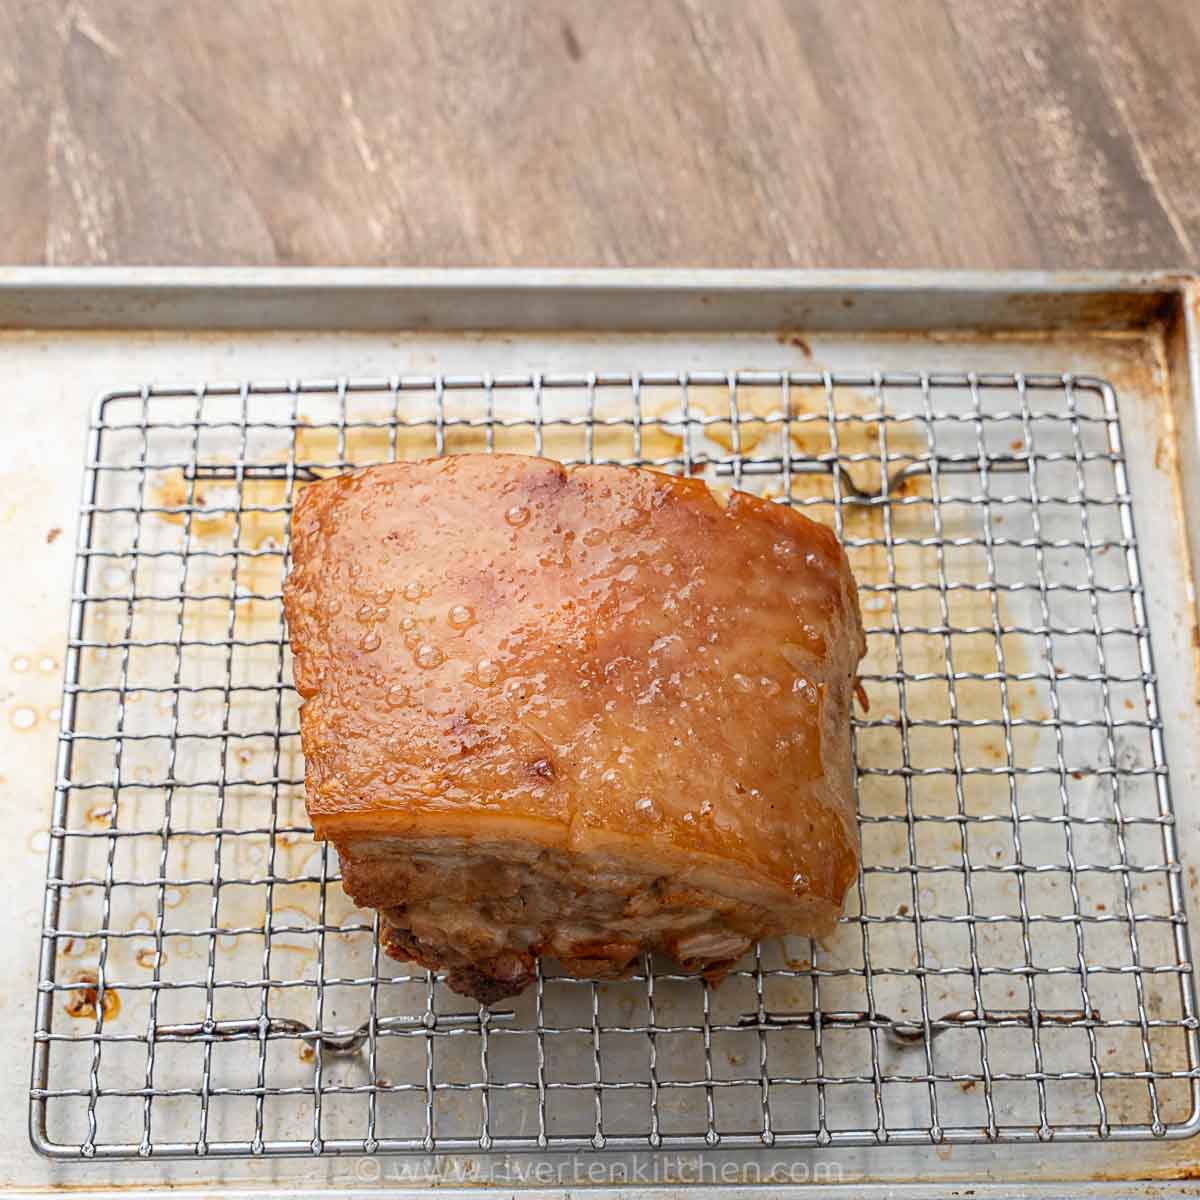
6. Deep-fry, air-fry, or bake in the oven
To achieve the crispiest Lechon Kawali, you have the option to deep-fry, air-fry, and cook in the oven. Each approach offers distinct advantages and results in its own unique crispy texture.
The “best” method for achieving crispy Lechon Kawali depends on personal preference, equipment availability, and desired health considerations. Experimenting with each method allows you to discover your preferred balance of taste, texture, and convenience.
Traditional Deep-Frying Method
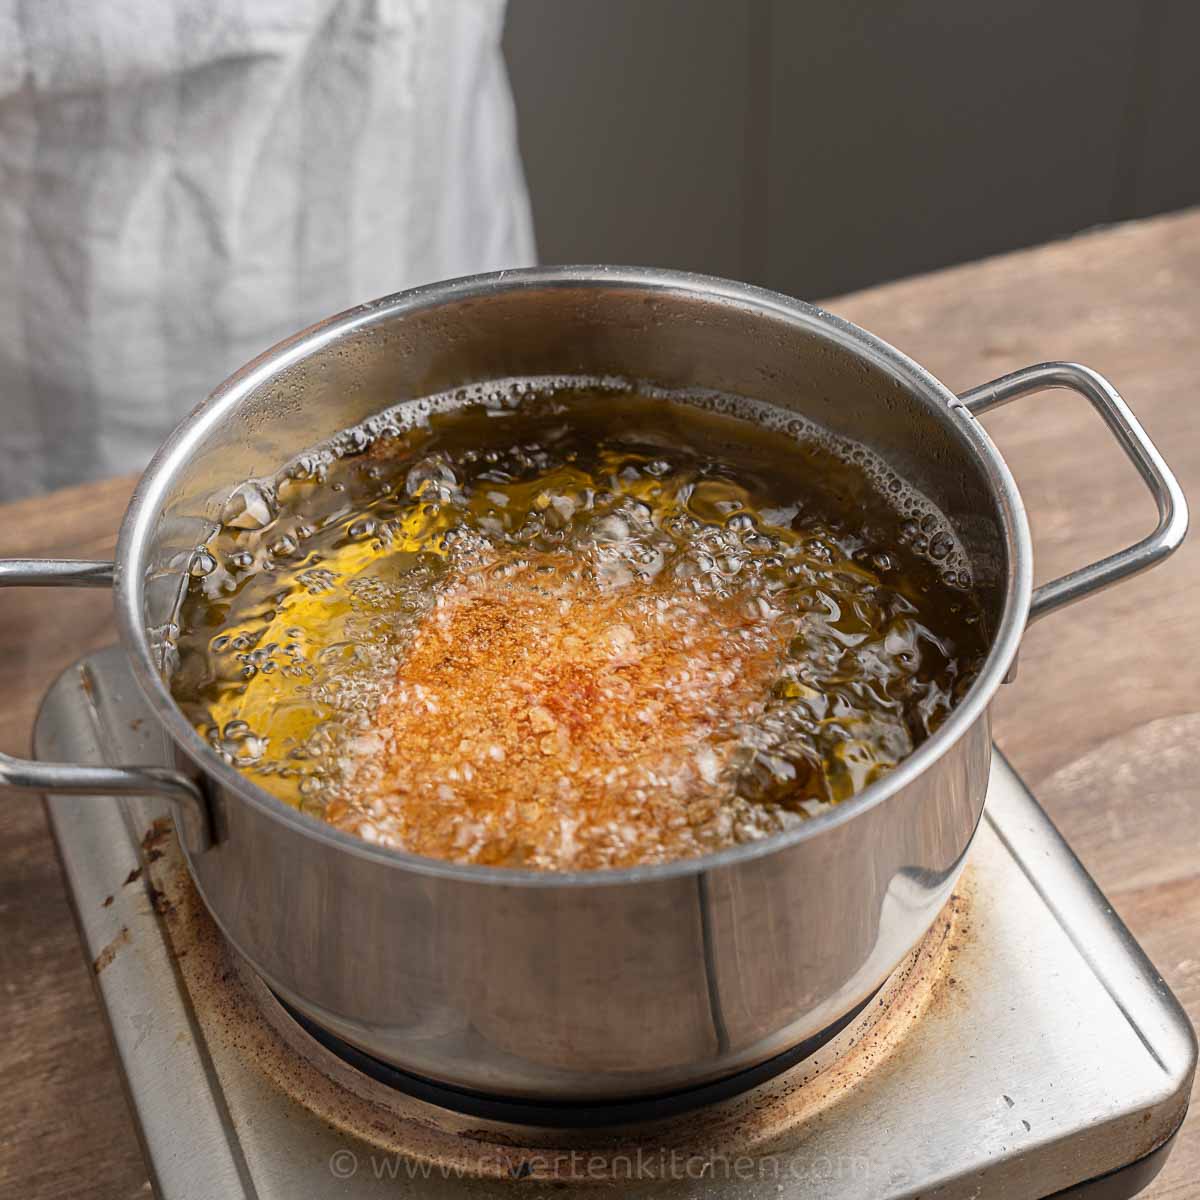
Here are my best tips for deep-frying lechon kawali:
- Use a deep, heavy-bottomed pot that is deep enough to accommodate the pork belly without causing oil splatters. A heavy-bottomed pot helps maintain a consistent temperature and prevents hot spots.
- Heat the cooking oil to the proper temperature before adding the pork belly. For Lechon Kawali, aim for a temperature of around 350°F (175°C). You can use a cooking thermometer to ensure accuracy.
- Lower the pork belly gently skin side down, using long tongs. Be cautious to prevent any splatters or accidents. Adjust the heat as needed to maintain the desired frying temperature.
- Deep-fry the pork belly until the skin turns golden brown and becomes crispy. Adjust the frying time based on the thickness of the pork belly. Flip the pork belly occasionally during frying to ensure even browning.
Air-fryer Method
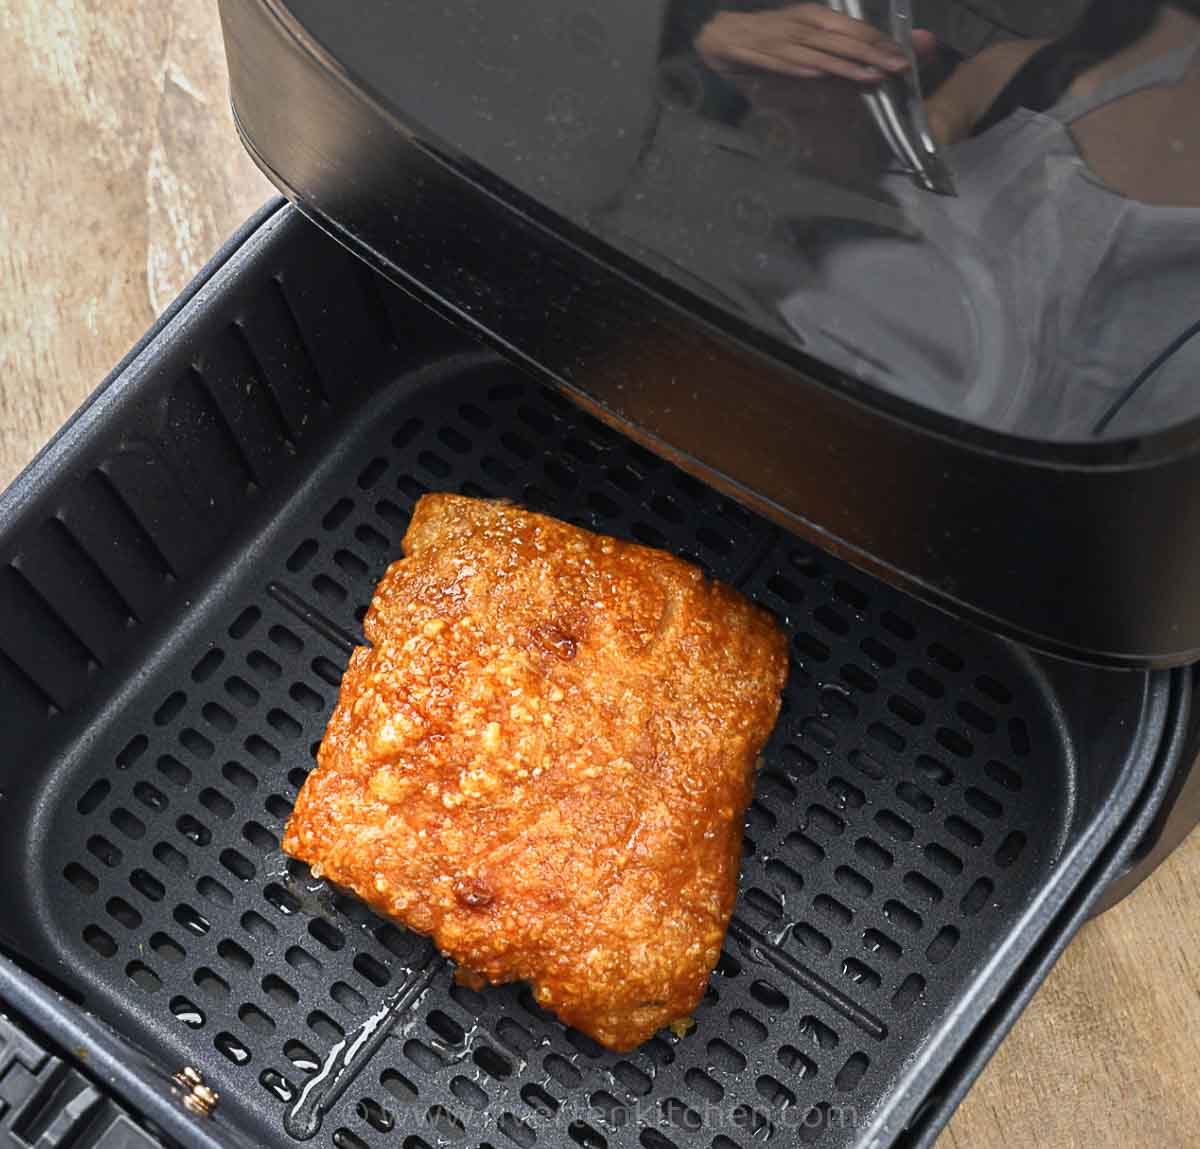
- Preheat the air-fryer to 400°F (200°C).
- Lightly coat the skin with vinegar BEFORE seasoning with salt. Vinegar helps tighten the skin of the pork belly, which can contribute to achieving a crisper texture during air-frying/ oven-frying.
- Keep an eye on the cooking time, as air fryers tend to cook faster than other methods. Adjust the cooking duration based on the thickness of the pork belly, ensuring it reaches the desired level of crispiness.
Oven Method
- Preheat the oven to a high temperature, around 425°F (220°C).
- Use a wire rack when cooking in the oven to allow hot air to circulate around the pork belly, promoting even cooking and crispiness. Place the baking tray on the upper-level rack.
- Broil the skin at the start of the cooking process. When the skin begins to puff, lower the temperature to 350°F (180°C) and continue cooking until crispy and brown all over.
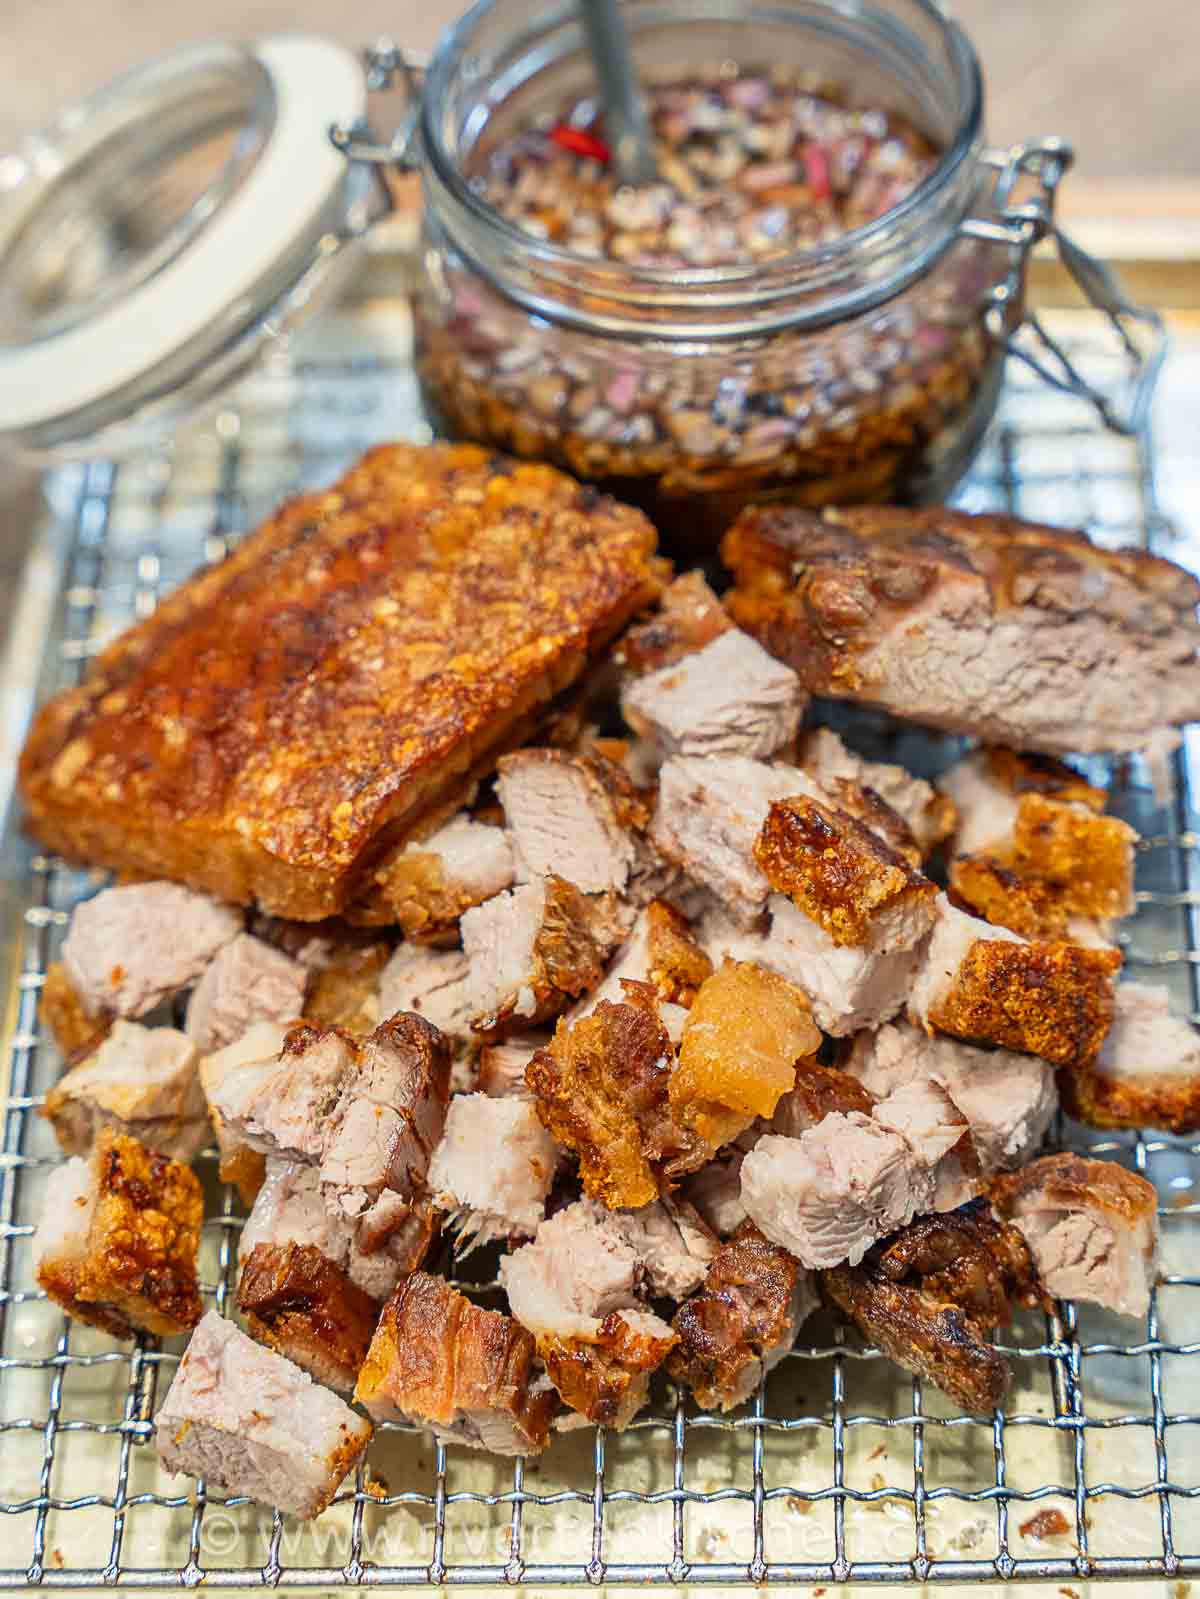
How to Serve
Cut into pieces and serve with your favorite dipping sauce. I love soy, and vinegar with raw onion dip (get the recipe). It’s tangy, salty, and sweet. I recommend reducing the amount of salt if you like using this dip too!
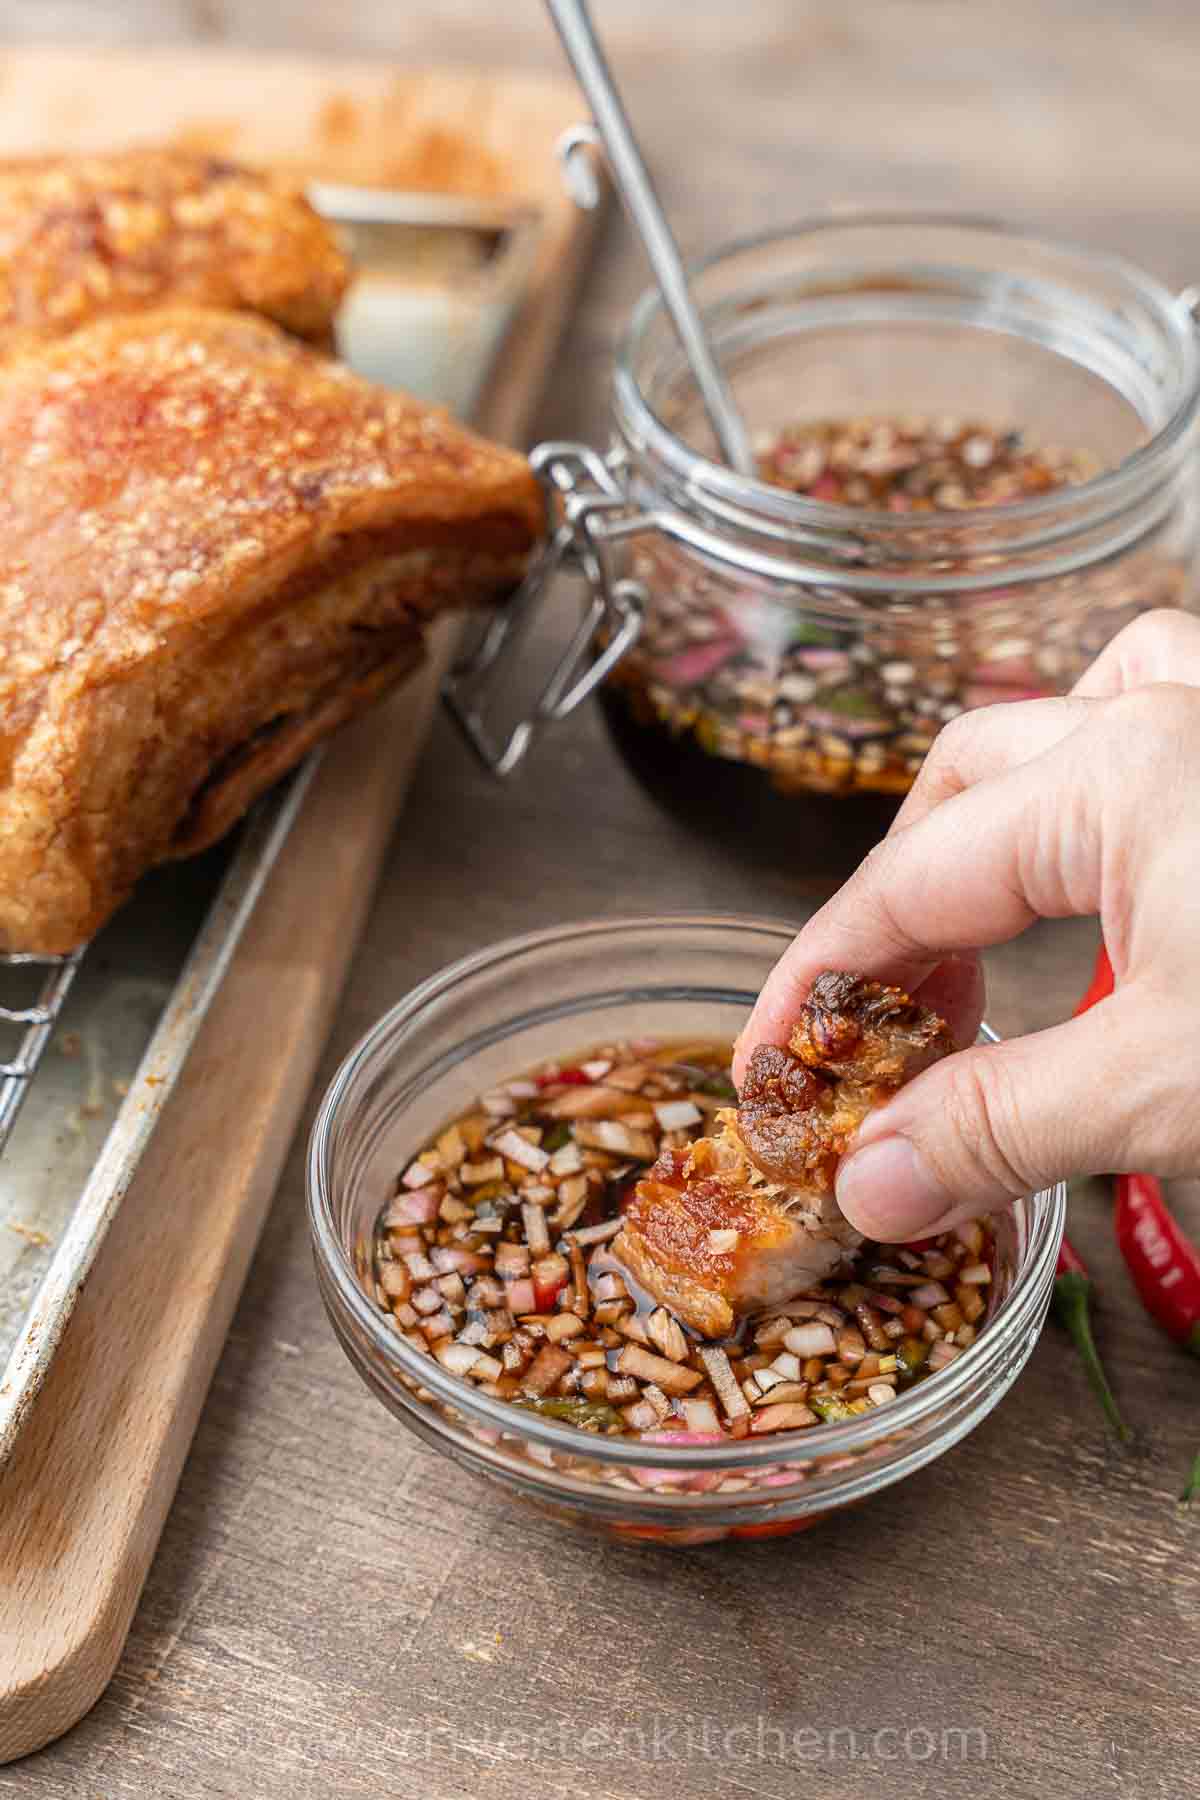
Other popular dips for lechon kawali are spiced vinegar, liver sauce (also known as lechon sauce), and ketchup or sweet chili sauce.
What to Serve with Lechon Kawali
Lechon kawali is usually served as a main dish with a warm cup of rice and vegetables on the side. You can also use it as a topping for pancit bihon, pancit canton, palabok, and laing.
Frequently asked questions
Pork belly is a cut of meat that comes from the underside of a pig, known for its combination of succulent meat and a layer of fat. Lechon Kawali, on the other hand, refers specifically to the cooking method used for pork belly. While pork belly can be prepared in various ways, lechon kawali involves deep-frying or air-frying the pork belly until the skin becomes incredibly crispy, while keeping the meat tender and juicy.
Lechon Kawali and Crispy Pata are both delicious Filipino pork dishes known for their crispy textures. The main difference lies in the specific cut of meat used: Lechon Kawali focuses on pork belly, which includes both the meat and a layer of fat. This cut offers a balance of tenderness, juiciness, and crispy skin.
Crispy Pata, on the other hand, features a whole pork leg or trotter. The leg portion contains a higher amount of collagen, resulting in a gelatinous texture. After boiling or braising the pork leg, it is deep-fried until the skin becomes exceptionally crispy, while the meat inside remains tender.
More recipes for special occassions
- Filipino Pork BBQ Skewers
- Embutido with Cheese
- Pork Humba (Meltingly tender Pork!)
- Beef Caldereta
- Lechon Manok
- Pork belly Sisig
- Garlic Butter Crab
- Easy Beef Kare Kare
- Lechon Pork Belly with Crispy Crackling
Watch the Lechon Kawali Recipe Video
Filipino Desserts and Snacks
- Biko with Latik Sauce
- Special Palitaw
- Bibingka Malagkit
- Maja Blanca
- Leche Flan
- Cassava Cake
- Kutsinta No Lye
- Easy Bibingka (Filipino Rice Cakes)
HUNGRY FOR MORE? Subscribe to my newsletter and follow along on Facebook, Pinterest, and Instagram for all of the latest updates.

Crispy Lechon Kawali (Deep Fry, Air Fry or Oven)
Ingredients
- 1 kg pork belly
- 4 cloves garlic
- 2 tbsp salt (for boiling)
- 2 tsp whole black pepper
- 1 piece chicken bouillon
- 5 stalks scallion/green onion leaves
- water
- 2 tsp vinegar
- 1-2 tsp kosher or sea salt (for frying, note 1)
- 2-3 cups vegetable oil (for frying)
Instructions
- Make vertical slits (don’t cut through!) around the edges of the skin of the pork belly (see video). This prevents the pork from curling–easier to lay flat in the air fryer and oven.
- Boil until tender (note 2) – Place pork belly, salt, chicken bouillon, scallions, and whole black pepper in a deep pot or Instant pot. Pour water enough to cover. Bring to a boil, then turn the heat down to medium. Cook the pork until fork tender. Cooking time will depend on the thickness of the meat.
- Remove the pork from the pot and place it on a wire rack with a baking sheet under it. Rub the skin with vinegar. Let it cool.
- Poke the skin with skewers or a fork across the entire surface of the pork belly skin. Be careful not to go too deep into the meat.
- Season with salt – Lightly season the flesh side with salt then flip to the other side skin side up. Sprinkle the remaining salt evenly all over the skin. Do this by section using small amounts until all parts are salted.
Option 1 – Crisp in the oven (note 3):
- Preheat the oven to 425°F /220°C for 20 mins.
- Place pork in a baking tray with a wire rack. Set oven to BROIL mode if available. Cook until the skin starts puffing. When the skin begins to puff, lower the temperature to 400°F/200°C and continue cooking until crispy and brown all over. Rotate with a tong every now and then to evenly brown all sides as needed.
Option 2 – Crisp in an air fryer:
- Preheat the air-fryer to 400°F (200°C) for 5 minutes.
- Air-fry the pork for 30 to 40 minutes until the skin starts puffing. Reduce the heat to 180c/356f and continue cooking until the pork belly is crispy all over. Rotate with a tong every now and then to evenly brown all sides.
Option 3 – Deep fry (note 4):
- Dry the skin – Pre-heat oven or air-fryer to 350°F/ 180°C. Place the pork inside and cook for around 20 minutes to dry out the skin. Another option is to air dry the pork belly skin by placing it uncovered in the refrigerator overnight.
- Heat oil – Pour oil into a deep pot making sure that it doesn’t go above halfway up the pot. Heat oil over medium heat to 190°C / 375°F (note 4).
- Fry – Using long tongs, lower the pork belly gently skin side down. Fry until golden brown, and crisp, and skin is puffed and crispy.
Serve
- Transfer to a wire rack and let it rest for 10 minutes.
- Cut pork into slices and serve with your favorite dipping sauce.
Recipe Notes & Tips:
- For the salt, I recommend using a coarse-grained type such as sea salt and kosher. Table salt and iodized salt is not recommended for this recipe.
- Boiling the pork: Stovetop usually takes 50 minutes to 1 hour. Longer if using thicker cuts of pork belly. To quickly tenderize the meat, you can use a pressure cooker or instant pot. Reduce the water as needed. Pressure cook for 20 minutes (high pressure in the Instant Pot and use quick release). Thicker cuts many need longer cooking time.
- Broil mode is often known as grill mode in other oven settings. Temperature can be adjusted in this mode in most ovens. Please refer to your manual. Caution: Don’t place the pork at the top rack as oil may splatter into the heat source and create smoke inside the oven.
- Oil Temperature – The easiest way to check if the oil is at the right temperature is to stick a wooden chopstick or the end of a wooden spoon into the oil. If it’s bubbling (see picture above), then it’s ready. If it’s bubbly too rapidly then it’s too hot and will burn the chicken. Let it cool a bit then test again.
- Reserve the broth for other recipes. Use to make pancit bihon or canton or other Filipino vegetable dishes.
- Nutrition – Assuming the pork absorbs 3 tablespoons of oil. It is impossible for me to determine exactly how much oil is absorbed during frying.
Published November 2019. Updated with new photos, video, and a streamlined recipe after further testing to improve the recipe!
Riverten Kitchen is a participant in the Amazon Services LLC Associates Program, an affiliate advertising program designed to provide a means for sites to earn advertising fees by advertising and linking to amazon.com

The broil should be no longer than 5-10 minutes.
This will depend on the size of the pork and the size of the oven. Smaller ovens will need lesser browning time.
How many minutes should i put in the oven, ? Then i broil for 30-40 mins.
Thank you,
Cecille
Place pork in the oven, lower rack. Lower the heat to 200c /400f then bake with the fan on (BROIL) for 30 to 40 mins until the skin starts puffing and brown all over. Rotate with a tong every now and then to evenly brown all sides.
Im a bit confused. You said on the instruction to broil it first then bake. So should I bake it first then broil?
Hi Kristine, I meant cook/bake in the oven using the BROIL mode.
– Mella
The instructions on the recipe differs from the cooking instructions in the video. Video says broil first then bake , written recipe instructions only say bake.
Hi Cathleen, it’s “bake with fan” in the written instructions which is similar to BROIL. I’ll update the recipe to clarify. I appreciate the feedback.
Mella
I’m trying this recipe now, and i saw your tip so late in the recipe. It’s the broil option, for the love of me I couldn’t find it for a good 5 mins and spent so much time checking how to broil in the oven.Note to self, read more carefully. Haha
Ended up doing top heating,then midway changing to grill element on top with fan.
I’m now doing the baking part!! Will let you know how it goes
So far my kawali is stuck to the rack LOL
It was wonderful,very crispy…crunchy.
Any tips because the meaty part on the other edge became a bit too crispy? Lessen heat? Lessen time? But i want to keep the crispiness of the skin from your original recipe?
So happy to hear that! You can use a folded foil to wrap around the meat part. Fold in such a way that it matches the thickness of the meat, and won’t go beyond the skin.
Hope that helps.
– Mella
I’m trying this again! I’m doing your foil tip, im seeing oil collect in the foil, hopefully that keeps the meat juicy!!
Thank you for the recipe. I followed it just like you said except when boiling. I boiled the whole pork. After boiling only did I cut the pork and make the slits. It turned out just the same crispy. I like it cooked in the oven than frying in oil since it removes more of the oil from the meat. =)
You’re welcome, Joy! It’s so convenient isn’t it? Glad you liked this recipe.