
This is your ultimate guide to making the best homemade Filipino Pan de Coco! This sweet, soft coconut bread is easier to make than you might think. In this guide, we’ll take you through every step of the process, complete with video and easy-to-follow photos. Perfect for beginners and seasoned bakers.
This is a highly requested Filipino bread recipe. Finally, we’re here! It took a while huh.
When I received your request to make a Pan de Coco recipe, I took it as a challenge and an opportunity. As a self-taught baker, I still have a lot to learn. I still make mistakes, quite a lot actually. And I still get frustrated every time that happens.
That’s why I’m so glad I finally made this and now writing about it. I have so much to share! This is a long post but I promise that every bit will be useful. Perfect for beginner home bakers!
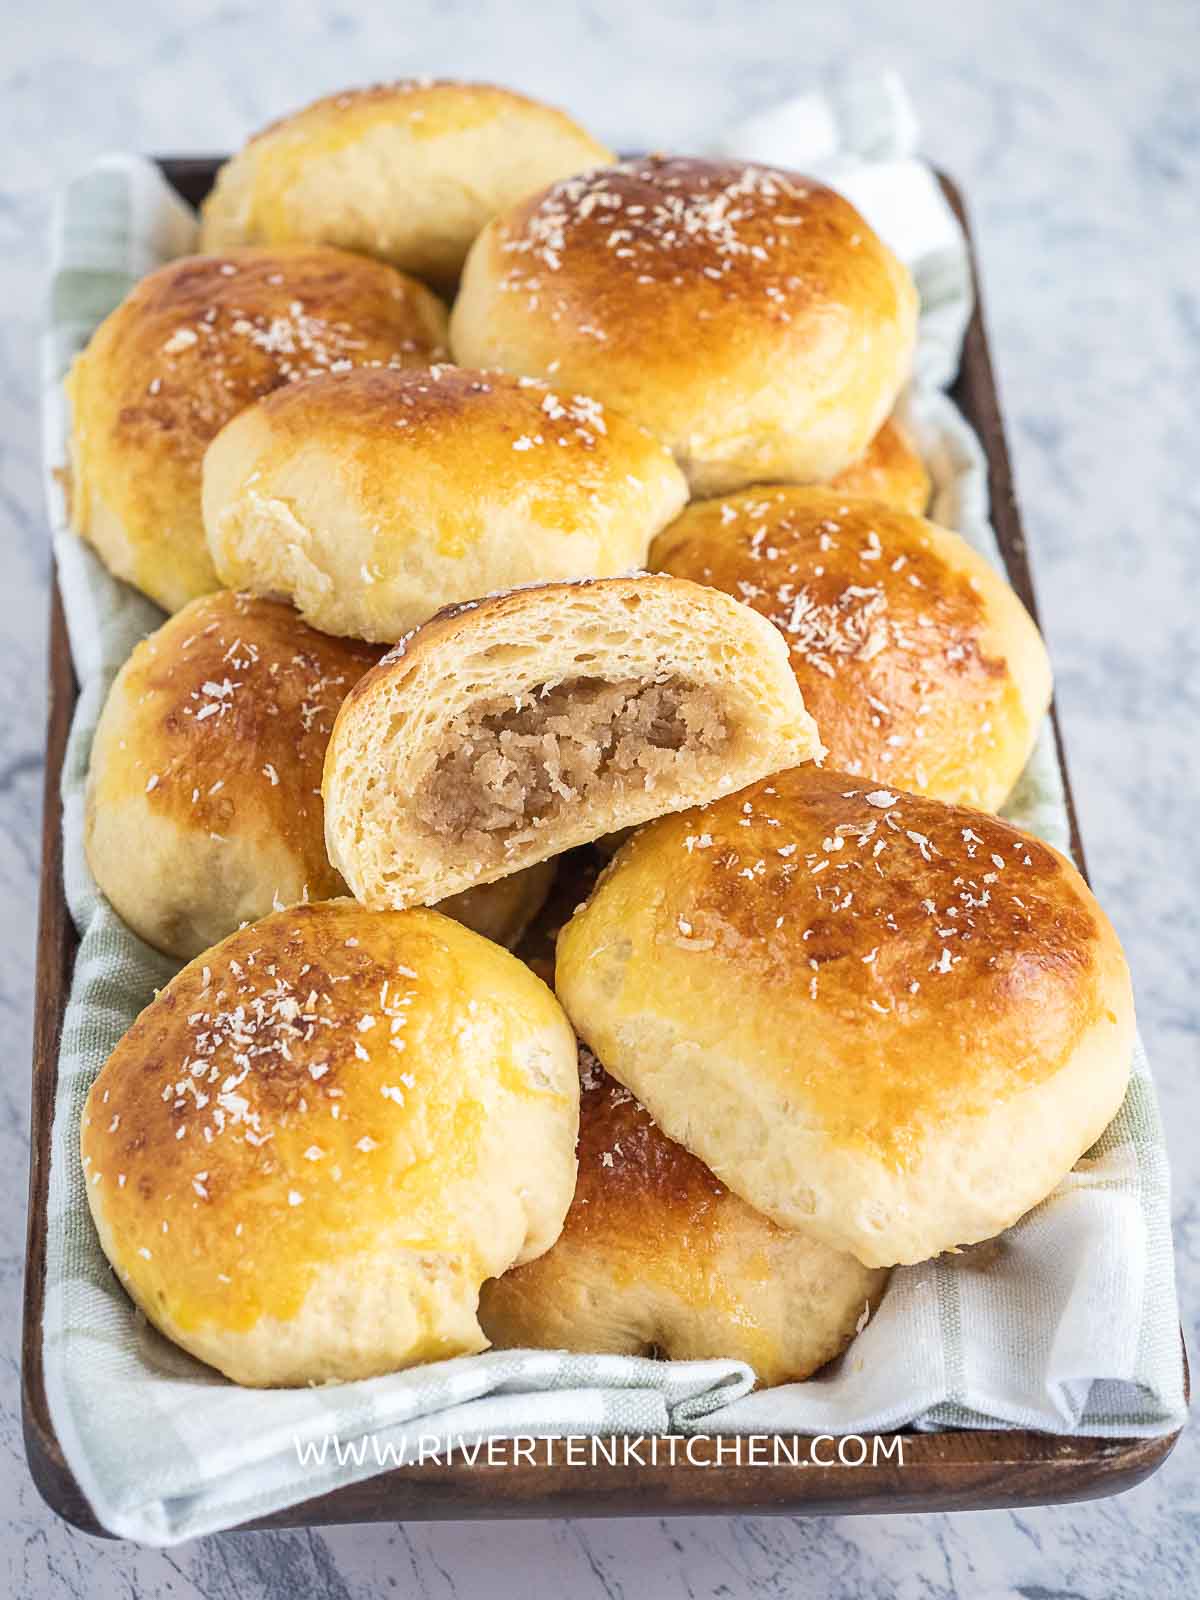
Filipino Pan de Coco
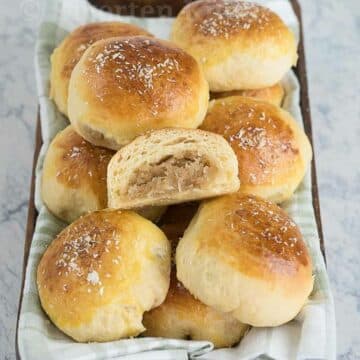
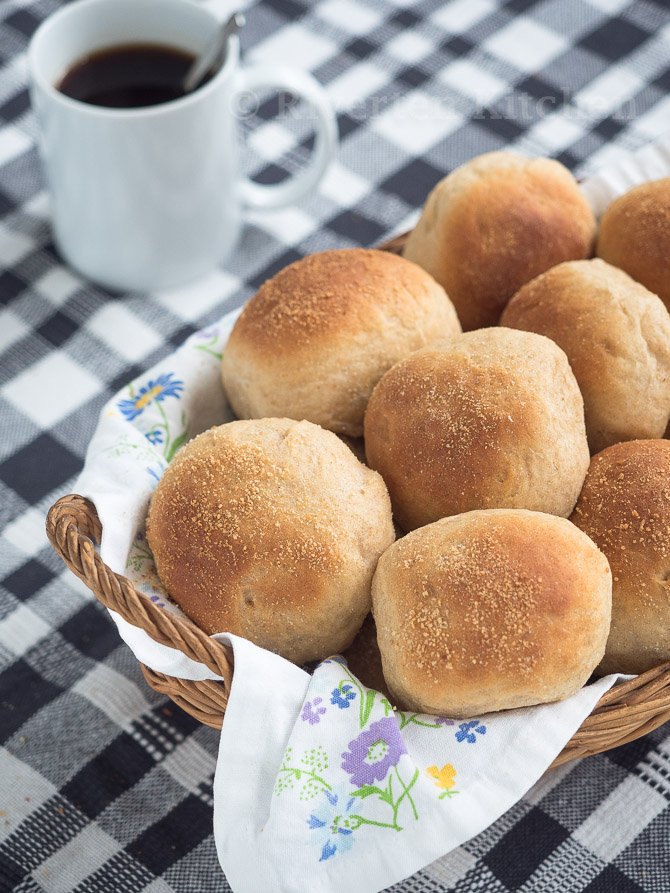
Pan de coco is a sweet, coconut-filled bread that is a popular snack or breakfast item in my home, the Philippines. It is made with a soft, slightly sweet bread dough that is rolled out and filled with a mixture of sweetened coconut and brown sugar.
It is often served warm, straight out of the oven, and can be enjoyed on its own or with a cup of coffee or tea. Pan de coco is believed to have originated in the province of Bulacan in the Philippines, but it is now widely available throughout the country and is a popular snack or breakfast item sold by street vendors, bakeries, and food stalls.
Ingredients
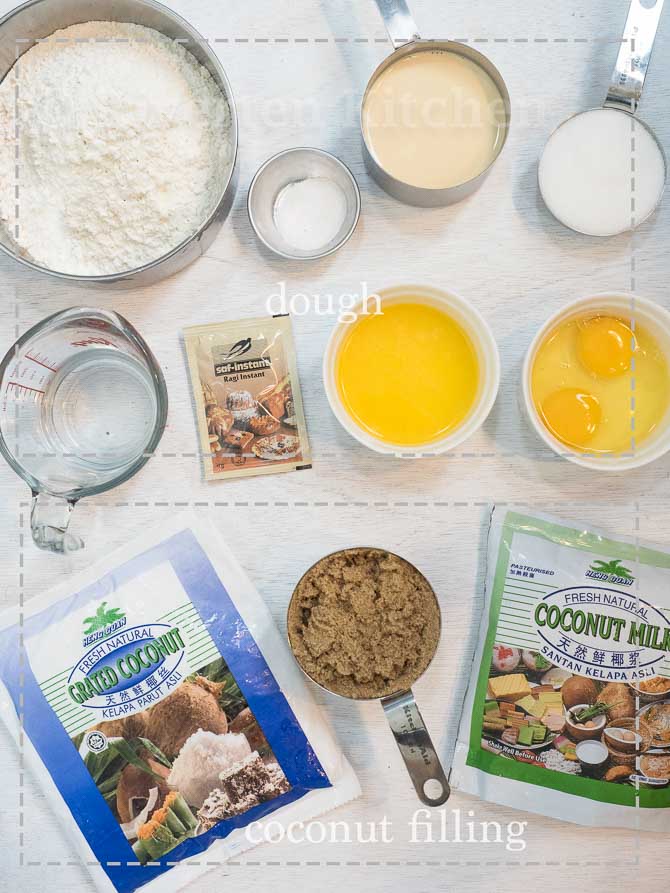
Pan De Coco Dough
- Bread flour – yeast bread made with bread flour tends to be soft and chewy at the same time. You can substitute with all-purpose flour if not available.
- Egg yolks plus 1 whole egg – The fat and protein in egg yolks make a tender crumb and soft crust. It also makes the bread more yellowish in color which means it will look and taste more delicious!
- Pure unsalted butter – I love using butter when making bread. It makes my kitchen smell so good!
- Sugar – A little less than half a cup of sugar is enough to sweeten the dough. A perfect complement to the sweetened coconut.
- Whole Milk and Water – These will serve as the base liquid for the dough. Using whole milk makes softer bread compared to low-fat milk or evaporated milk.
- Active Dry Yeast or Instant Dry Yeast – Both can be used interchangeably.
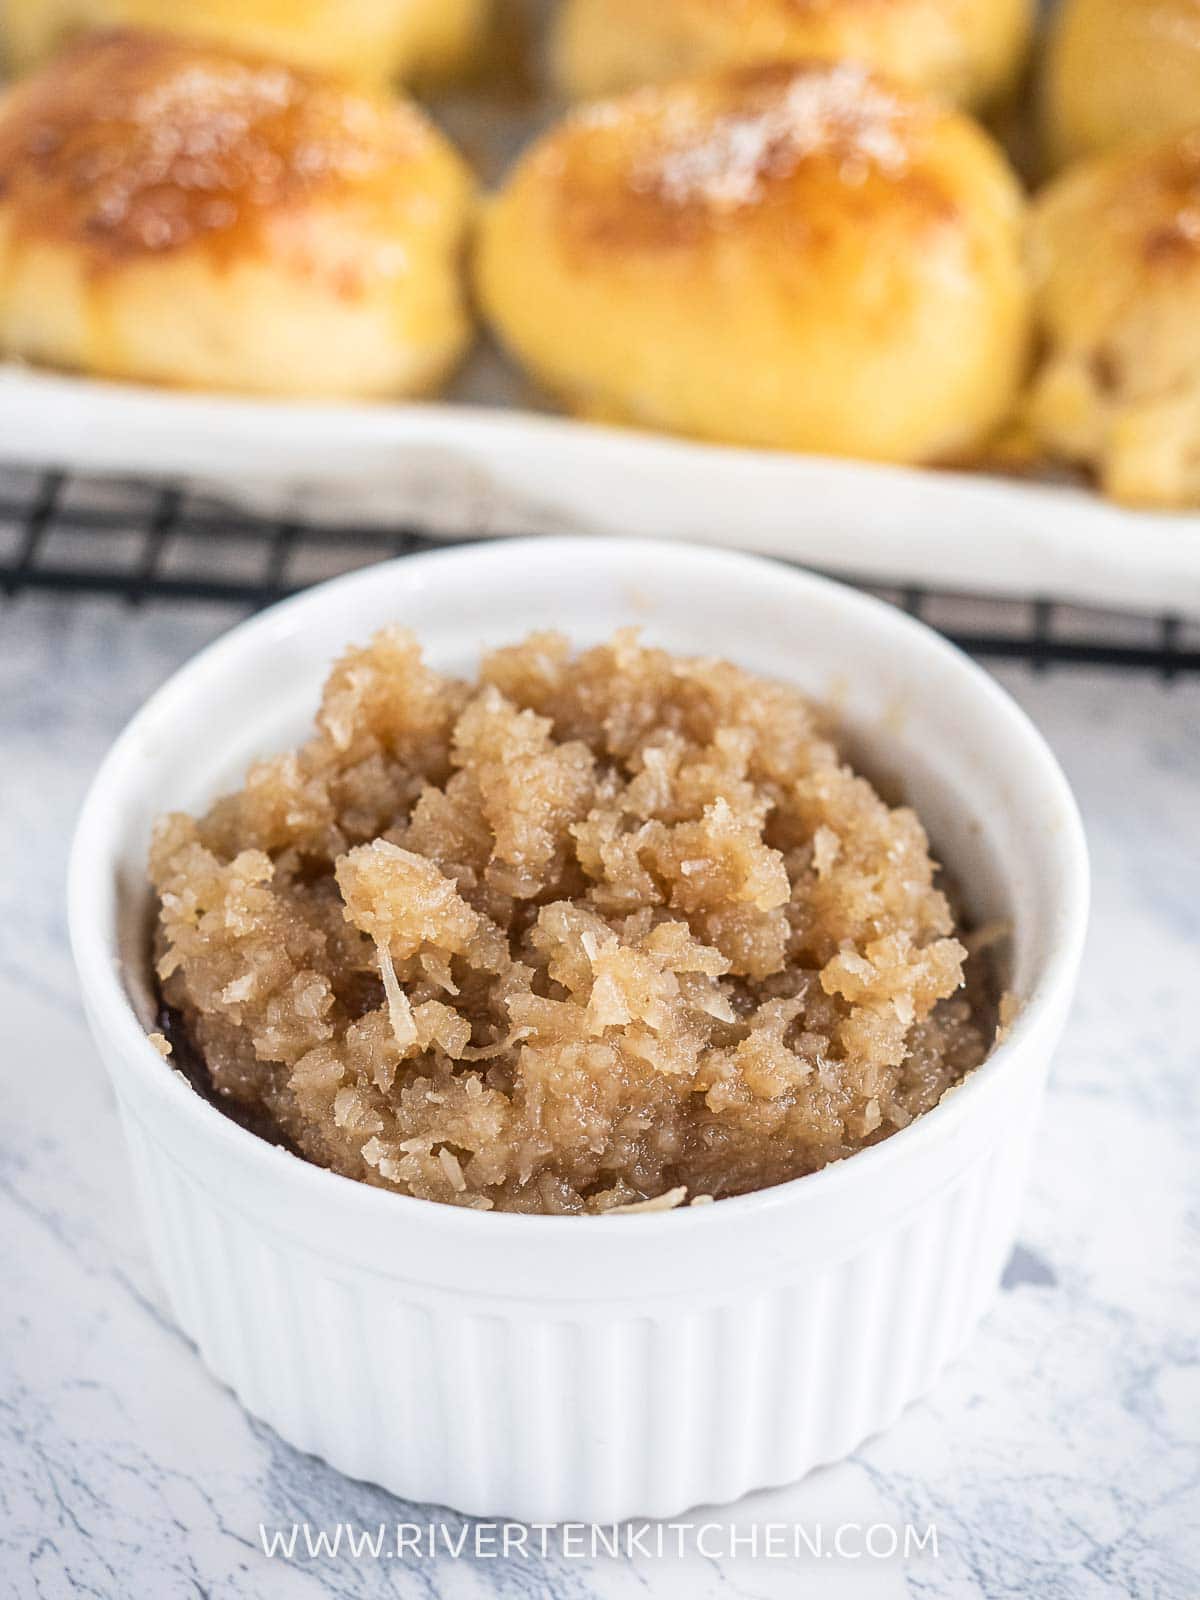
Coconut Filling Ingredients
- Coconut flakes – use unsweetened coconut flakes instead of desiccated coconut. Coconut flakes are typically moister than desiccated coconut; have way better flavor and texture.
- Coconut milk – for the best flavor, use the purest you can find. At most, it should only have water as an added ingredient. Avoid using those that contain thickeners like xanthan gum, guar gum, or carrageenan.
- Brown Sugar – to sweeten the coconut milk and coconut flakes. It gives the pan de coco bread a distinct rich caramel-like flavor.
How to Make Pan De Coco: Overview
Here’s how to make Filipino pan de coco in four parts:
- Make the bread dough and do the first rise.
- Cook the pan de coco filling.
- Shape the dough into balls and fill with the coconut flakes mixture.
- Brush with egg wash and bake until golden brown.
Part 1: Make the dough
Here’s how to make the softest bread dough:
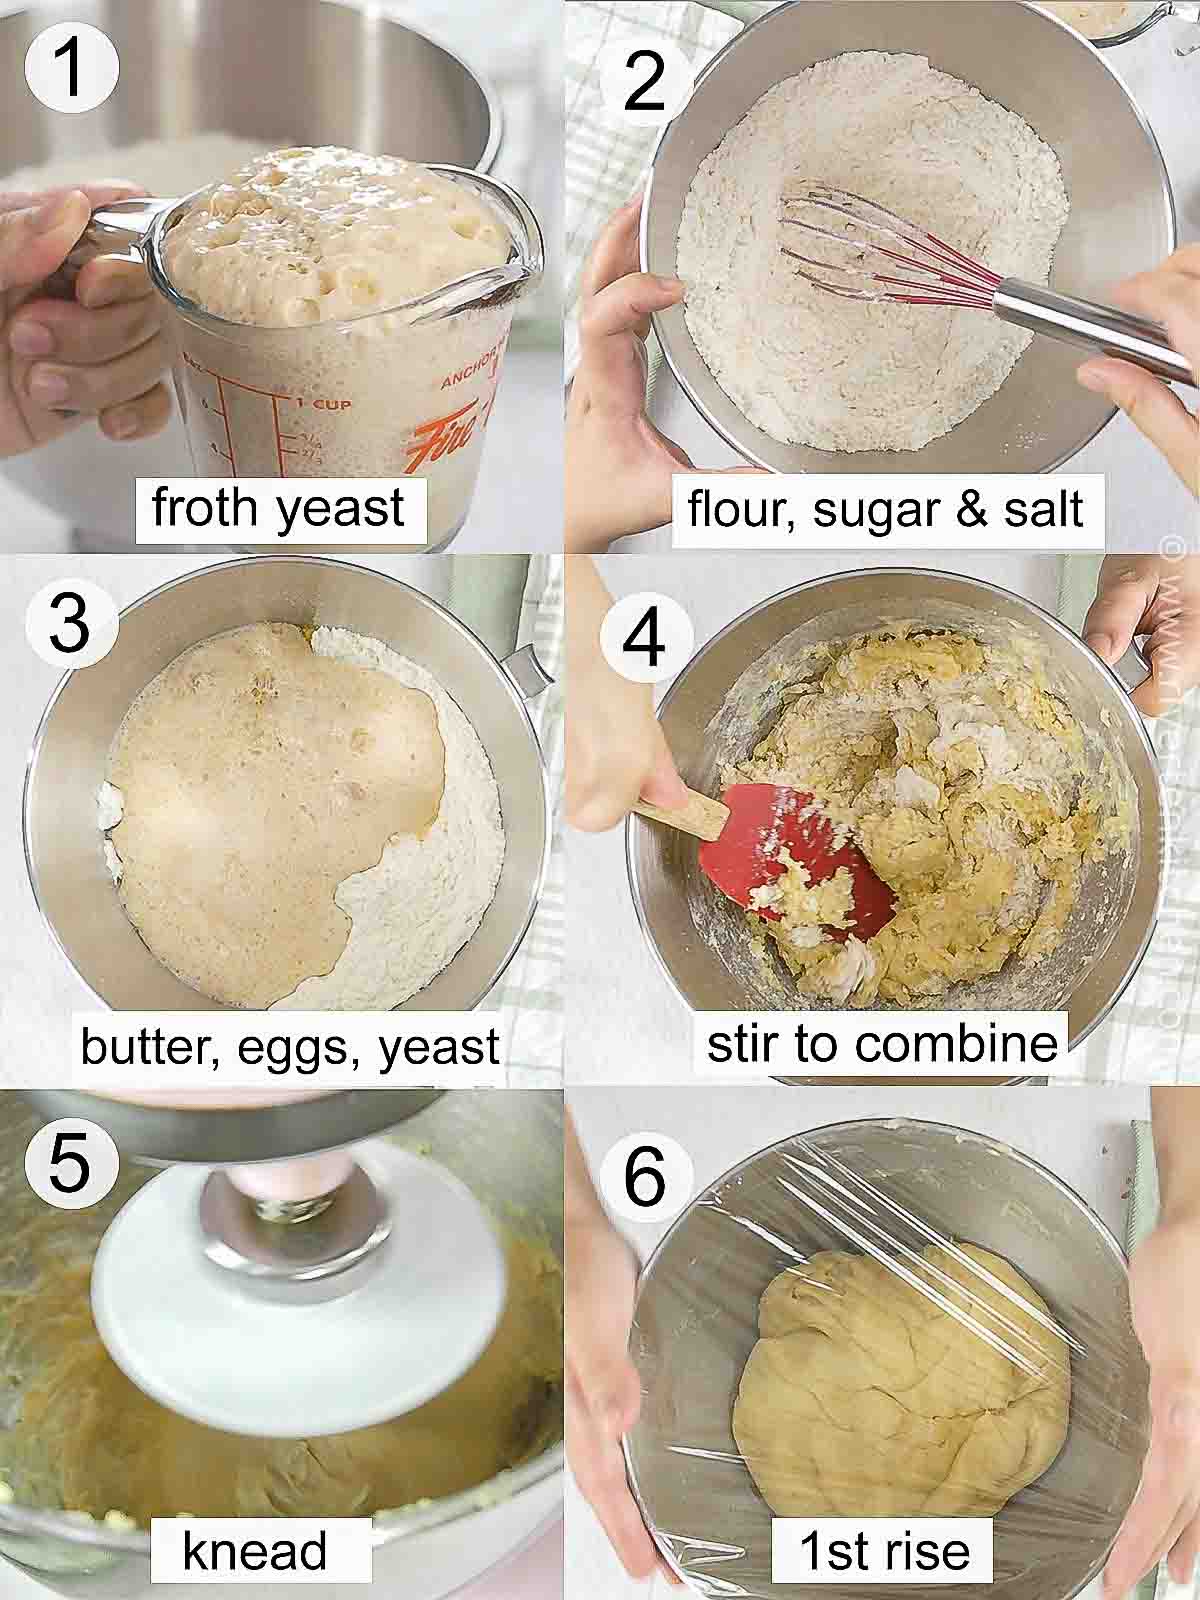
A few notes:
- Proof the yeast – This will help the dough rise faster. This has always worked for me and always had a perfectly proofed dough. you can use instant or active dry. Personally, I always proof my yeast no matter the type to make sure they’re active before adding it to the rest of the ingredients.
- Stir the dry ingredients and wet ingredients with a spatula. This initial mixing of the ingredients helps to ensure that the flour, water, yeast, salt, and any other ingredients are evenly distributed throughout the dough, which is essential for producing consistent and well-formed bread.
- Knead the dough until smooth and elastic. If kneading by hand, 10 to 12 minutes may be enough, and if using a stand mixer 8 minutes at medium speed should be enough.
- Let the dough rise in a greased bowl until double in size. Cover with plastic wrap to prevent it from drying.
Part 2: Make the Coconut Filling
It’s as easy as combing all the ingredients together in a pan:
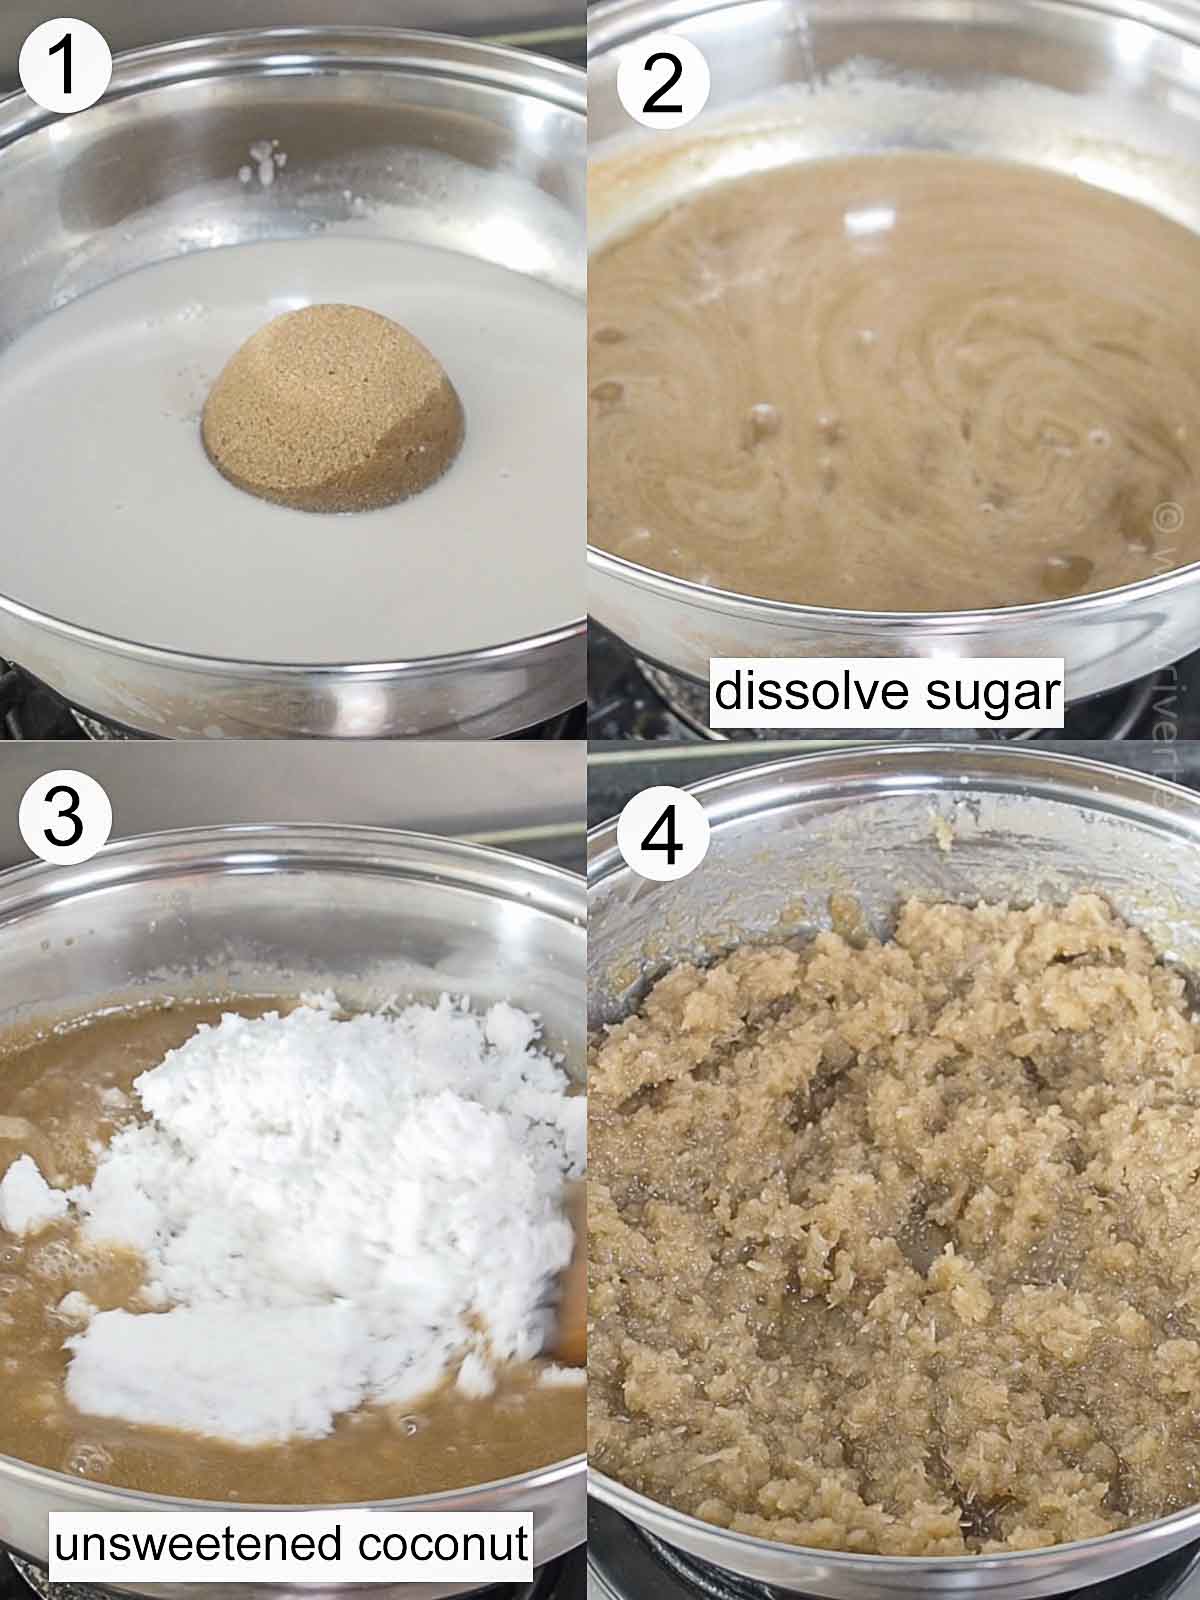
Bring the coconut milk to a simmer then add the brown sugar. Dissolve the sugar completely before adding the coconut flakes.
Cook until the mixture has thickened and until most of the liquid has evaporated. Keep stirring to prevent the coconut from sticking to the bottom of the pan.
Let the coconut mixture cool completely, before using.
Part 3: Assembly
The third part is the most interesting of all the steps. You need a little bit of patience but I promise, it’s all worth it!
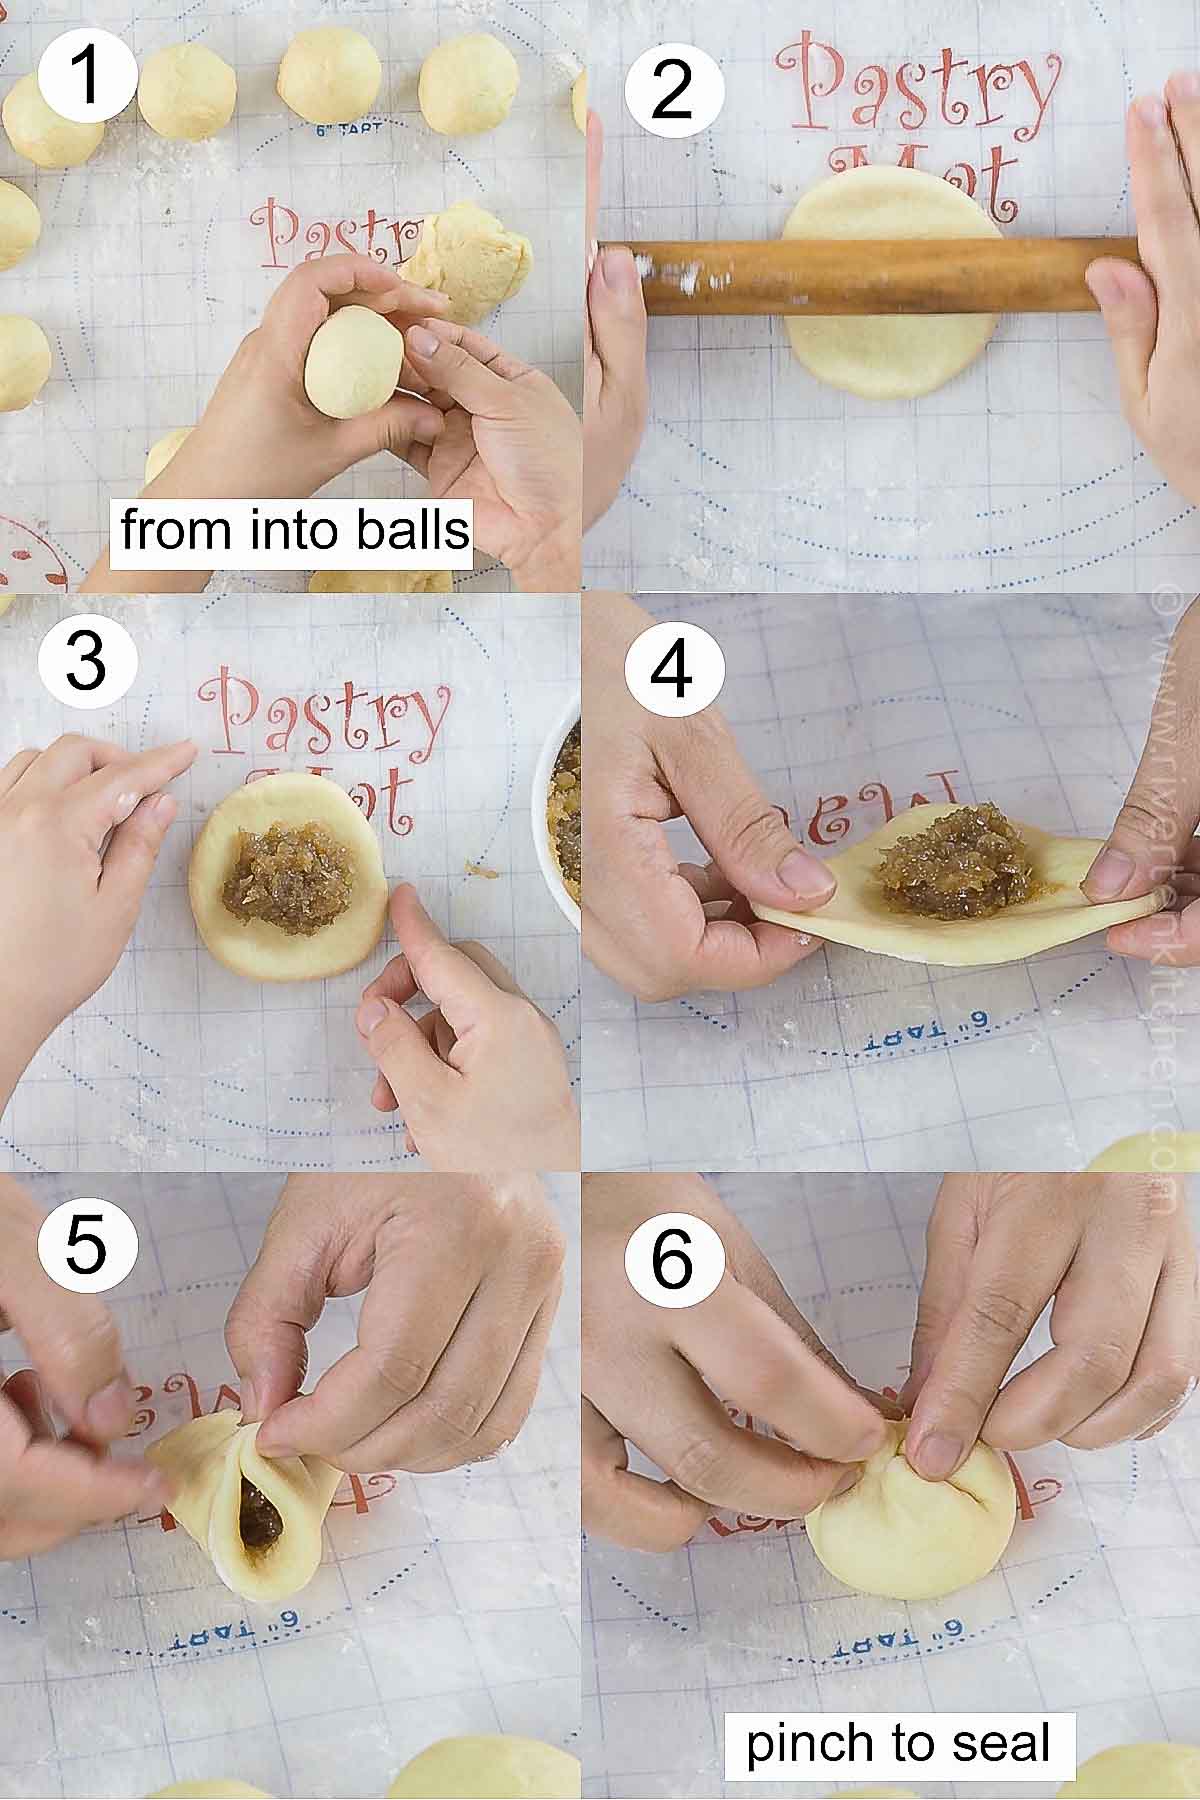
- Start by dividing the dough into 18-20 balls. Form into a smooth ball and place on a tray. Cover with a towel to prevent the dough from drying.
- Using a small rolling pin, lightly flatten it into a disc making sure that the center is thicker than the edges. Roll around the edges so it’s thinner (NOT FLAT!) than the center.
- Place about a heaping tablespoon of the sweet coconut filling in the center of the dough.
- Gather the edges and seal the bun tightly.
Part 4: Second Rise and Baking
Place the bread rolls in a baking tray lined with parchment paper with a small gap in between. Cover with a damp towel and let it rise again until it doubles in size.
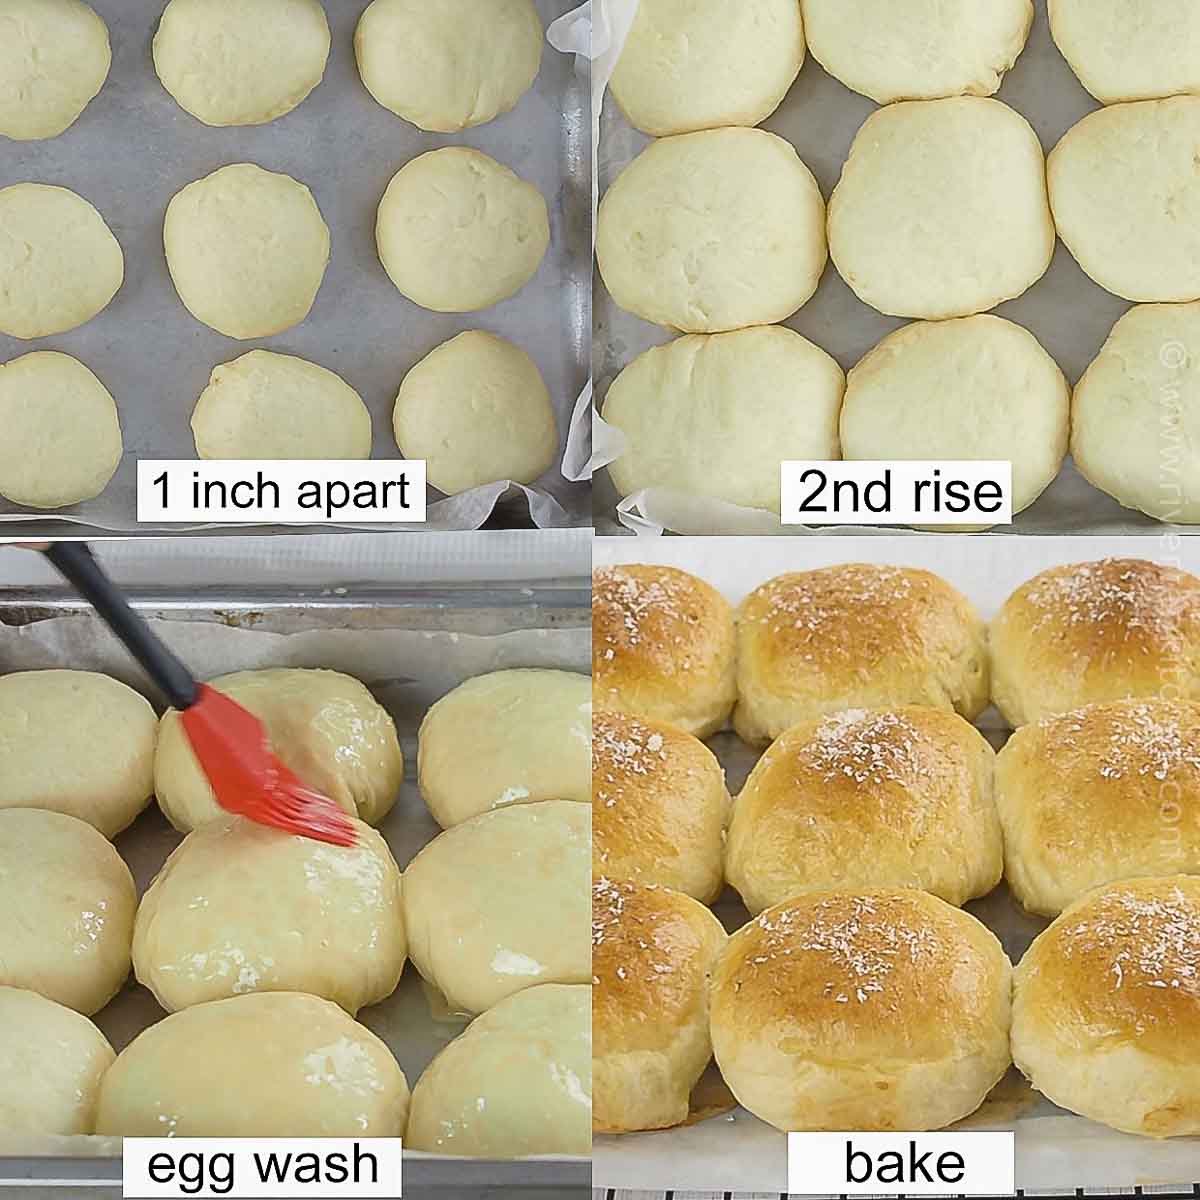
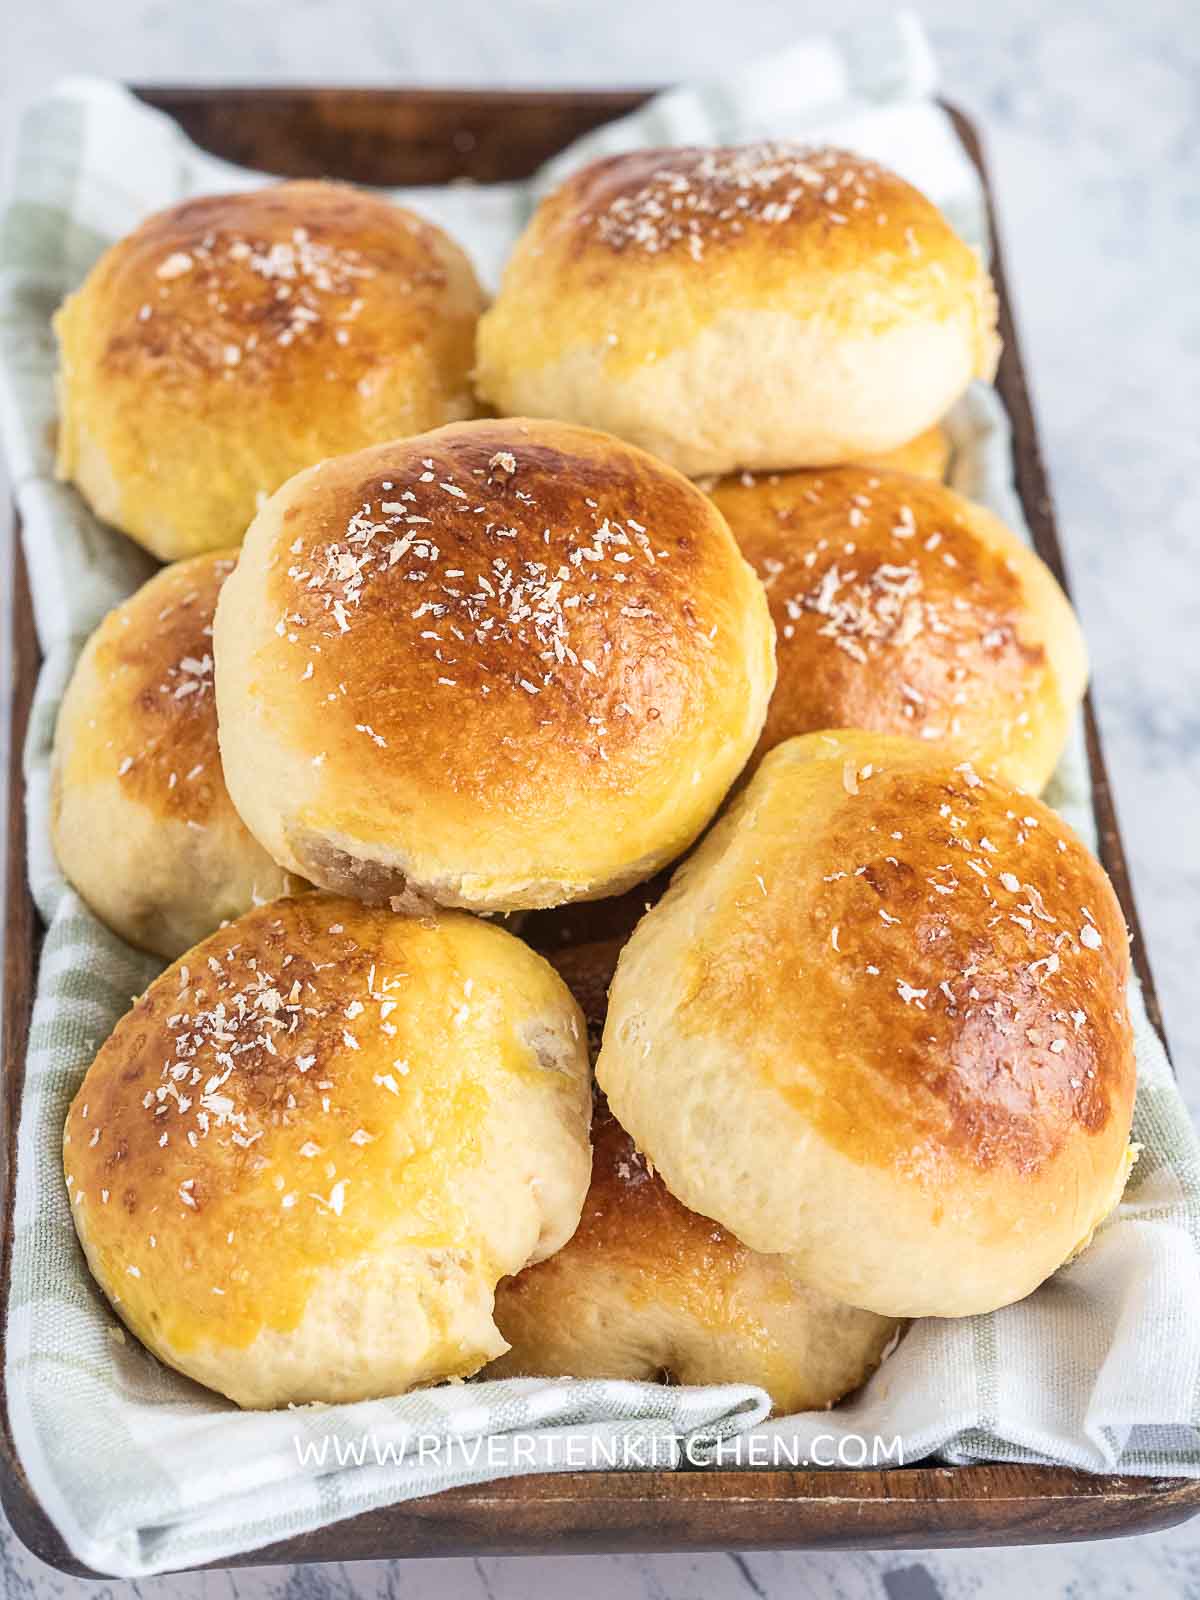
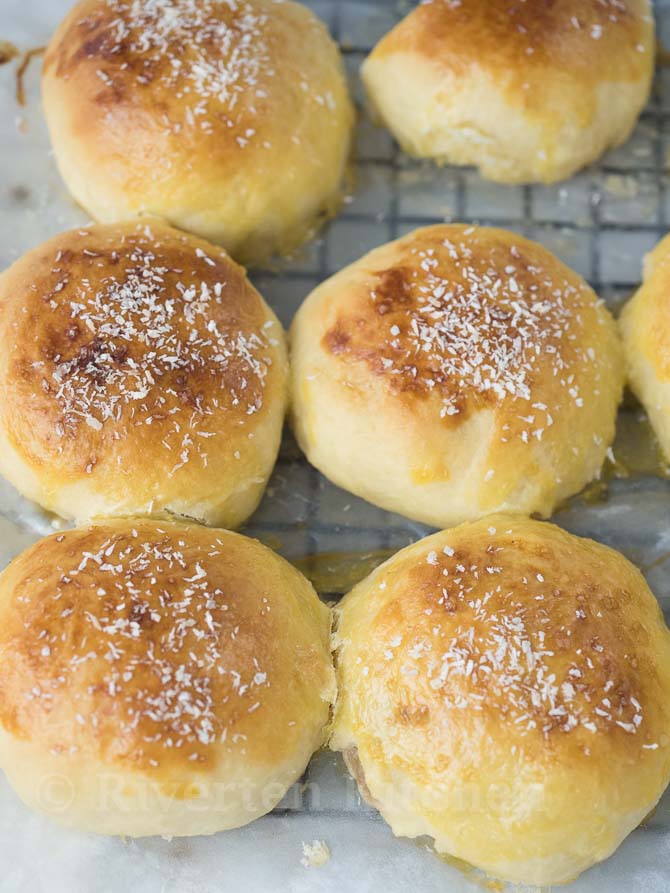
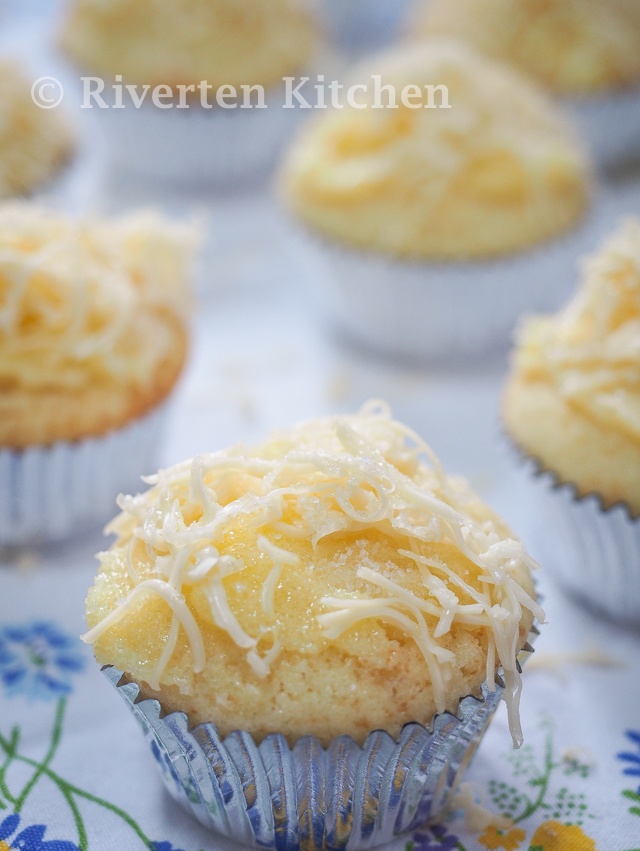
Once the rolls have risen, brush with egg wash mixture to make the bread look shiny, brown, and pretty!
Bake in a preheated oven at 190c/375f, for 18 to 20 minutes until the top turns light brown.
That’s it! And we’re done!
A few tips when making Pan de Coco
It took me three tries to get that perfect bun for Pan de Coco. On my first try, the bun turned out way too big and the filling was way too small that you couldn’t taste it. If it’s Pan de Coco, both the bread and the coco have to STAND OUT! So here are a few things I learned after 2 failed attempts plus 1 success at making Pan de Coco
- Size matter. The bun should be at least 45 to 50 grams. The buns I’ve made are approx 45g. This may sound big but this size leaves enough room for the filling making sure the bread doesn’t thin out after baking. We want our bread to be soft and fluffy. Use a kitchen scale if available or divide the dough into big portions (see video).
- Shape it into a ball. Before flattening the dough, shape the dough into a ball. This is one way of making sure that there will be no uneven parts in the bread.
- Use a rolling pin. After shaping the dough into a ball, lightly flatten it into a disc using a rolling pin. This will make the dough evenly flat. If you don’t have a rolling pin, use a rectangular bottle or glass. Remember to lightly flatten, don’t press too hard otherwise the dough will be too thin.
- Don’t overfill! For a 45g dough, you just need about 2 teaspoons full of the coconut filling. Beyond that, it will be hard to close the dough and the filling might ooze out of the bread during baking.
Now let’s talk about the COCOnut in the Pan de Coco.
Fresh is best. This turned out to be true after trying out the two types of grated coconut. Using freshly grated coconut makes a moist and flavorful Pan de Coco filling. It has a pleasant texture (not grainy) and is rich in coconut flavor.
Freshly grated coconut/ Coconut Flakes vs Desiccated Coconut
But what if you don’t have access to fresh which is the case for most outside of Asia or a tropical country?
The second best option is coconut flakes.
Coconut flakes and desiccated coconut are both made from the flesh of coconuts and are commonly used in a variety of culinary applications. However, there are some differences between the two:
Texture: Coconut flakes are larger and thicker than desiccated coconut, with a chewy texture. Desiccated coconut is finer and has a softer, almost powdery texture.
Moisture content: Coconut flakes are typically moister than desiccated coconut, which has had more of its moisture removed during processing.
Flavor: Coconut flakes have a stronger and more distinct coconut flavor than desiccated coconut, which has a more subtle taste.
How to Re-hydrate Desiccated Coconut for Pan de Coco
The best liquid to rehydrate desiccated coconut is (drum roll please….), COCONUT MILK! Two good things will happen if you use coconut milk instead of water or cow’s milk: 1) reconstitute the moisture and 2) boost the rich coconut flavor.
I recommend using the unsweetened desiccated coconut to easily control the sweetness by adjusting the amount of brown sugar that will be mixed in with the coconut milk.
For a deeper color and nutty flavor, use dark brown sugar instead of regular brown sugar.
TIP! When measuring the brown sugar, make sure it’s tightly packed in the measuring cup. Follow the link for more information.
That is it! I think everything you need to know about Pan de Coco is here. Well, at least the things I’ve learned.
I really do hope you enjoy making this at home.
Please let me know how it goes in the comment section below. Happy baking!
Recipe Video
HUNGRY FOR MORE? Subscribe to my newsletter and follow along on Facebook, Pinterest, and Instagram for all of the latest updates.
Filipino Pan de Coco (Extra Soft Bread)
Equipment
Ingredients
- ½ cup lukewarm water (mixed with 1 teaspoon white sugar)
- 2 ¼ teaspoons instant dry yeast (or one standard packet yeast)
- 3 ¾ cups bread flour (add more if needed)
- ⅓ cup sugar
- 1 teaspoon salt
- ⅓ cup unsalted butter (melted, slightly cooled)
- ¾ cup whole milk (lukewarm or room temp)
- 1 egg
- 1 egg yolk (use egg white for the wash)
- ¼ cup desiccated coconut (for topping, optional)
Pan de Coco Filing: Option 1 (freshly grated coconut)
- 1 cup coconut milk
- 2 cups freshly grated coconut or unsweetend coconut flakes
- ¾ cup brown sugar (packed)
- pinch of salt
Pan de Coco Filing: Option 2 (Desiccated coconut)
- 2 cups coconut milk
- 2 cups desiccated coconut (unsweetened)
- ¾ cup dark brown sugar (packed)
- pinch of salt
Egg Wash
- 1 egg
- 3 ½ teaspoons milk (or water)
Instructions
For the Dough
- In a medium-size bowl, combine lukewarm water (40c/105f), 1 teaspoon of sugar, and yeast. Stir until completely dissolved. Let it stand for 5 to 10mins until yeast begins to foam.
- Meanwhile, in the bowl of your stand mixer, combine flour, sugar, and salt. Mix thoroughly.
- Add milk, yeast mixture, eggs, and butter. Stir until just combined. Attach the dough hook and turn the mixer on to the lowest speed and mix until flour is incorporated, scraping down the sides of the bowl as necessary.
- Increase the speed to medium and beat for 1 minute. Add additional flour as necessary, adding 2 tbsp at a time. Continue beating for 5 to 6 minutes until the dough is slightly sticky, soft and pulling away from the edge of the bowl. Be careful not to add too much flour.
Rise # 1
- Cover the bowl with a plastic wrap and seal the edges. Let it rise for 1 hour to 1 1/2 hour at room temperature until double in size. See notes for the make-ahead tip (cold rise). Meanwhile, make the filling.
How to Make Pan de Coco filling or Palaman (use either of the 2 options)
- Pour coconut milk in a pan over medium heat. Add the brown sugar once it starts simmering. Stir until completely dissolved.
- Add grated coconut and pinch of salt. Cook until liquid is mostly reduced. Stir, occasionally. Remove from heat and let it cool completely.
Rise #2
- Punch the dough down. Transfer onto a lightly floured surface. Divide the dough into approx 45g portions and form into balls. For an evenly sized dough, use a kitchen scale.
- Using a light rolling pin flatten each ball into a thick disc shape. Place about 2 full teaspoons of filling. Fold dough over filling to meet in the center; pinch edges to seal (see video). Repeat with all the other portions.
- Place seam side down on a baking sheet lined with a greased parchment paper about 1 inch apart. Cover with a kitchen towel and let it rise for 45mins to 1 hour at room temperature.
Baking
- Preheat oven at 190c/375f, 20 minutes before the dough rolls finish rising. Meanwhile, combine all the ingredients of the egg wash in a small bowl; mix thoroughly.
- Carefully brush the rolls lightly with the egg wash. If desired, sprinkle with desiccated coconut.
- Bake for 18 to 20 minutes until the top turns light brown.
- Let the bread cool completely before removing from the pan. Serve with coffee, tea or hot chocolate. Enjoy!
Recipe Notes & Tips:
- Shape into a ball. Before flattening the dough, shape the dough into a ball. This is one way of making sure that there will be no uneven parts in the bread.
- Use a rolling pin. After shaping the dough into a ball, lightly flatten it into a disc using a rolling pin. This will make the dough evenly flat. If you don’t have a rolling pin, use a rectangular bottle or glass. Remember to lightly flatten, don’t press too hard otherwise the dough will be too thin.
- Don’t overfill! For a 45g dough, you just need about 2 full teaspoons of the coconut filling. Beyond that, it will be hard to close the dough and filling might ooze out of the bread during baking.
- Make-ahead Tip: Make the dough ahead of time then place in the fridge. The dough will slowly rise and double in size overnight. On the day of baking, remove from the refrigerator 30 mins before you’re going to shape them into rolls.
- When measuring the brown sugar for the filling, make sure it’s tightly packed in the measuring cup. Follow the link for more information.
- Storage: Store in an air-tight container and place in the fridge.
- Re-heat in a microwave for 30 to 40 seconds and it’s like freshly baked!
God bless you for sharing this recipe. Everyone loved it and asked for the recipe.
The only thing I changed was the amount of milk. I used just what the dough needs to stick together. No need to add extra flour. Filling was very tasty and the bread was very soft. Thank you.
Hi! I made these into rose shapes to gift at a surprise party. My friend’s Filipino family absolutely ADORED them and asked for a round two which I will deliver next weekend. I’m about as white as they come, and I wanted to bring something to respectfully put effort into learning a bit about my friend’s family’s culture. Your post and recipe made me feel confident that I was doing just that. And on top of it all they turned out beautiful and delicious! I work as a blog manager for a recipe blog, and it was important to me that I come back here and let you know the work you are doing meant a lot to a big Filipino family out on Long Island during a lovely human’s 80th birthday party. Sometimes I know it can feel unseen, but you’re helping people with what you do. If you like, you can email me and I’ll send you some of the pictures!
Hi Lauren, Your message warms my heart. It means a lot that you took the time to learn about our culture. I’m genuinely touched that my recipe played a part in making the celebration special. Your kind words and thoughtfulness remind me why I love what I do. I’d love to see the pictures – please feel free to email them to me at rivertenkitchen at gmail dot com anytime. 🌹😊
– Mella
Love this recipe! The bread is so soft and the filling was so good! The whole family enjoyed it.
Thank you for your recipe! I have enjoyed making it 🥰
Dough is perfect – congratulations.
Glad you enjoyed this!
– Mella
Thank you very much for this recipe! My kids ( half greek half filipino ) loved it!!!
That’s awesome, Pieper! Kids are tough critics. So happy to hear they loved this Pan de Coco.
– Mella
These buns were truly amazing! I shared with our neighbors, who then shared with extended family, and of the comments that came back, two requested the recipe and all wanted more. Your instructions and video were spot on, and I had such a positive experience making these that I am eager to do so again. Thank you so much and I look forward to trying more of your recipes.
Awww…You’re most welcome, Sherrie! Glad you and your neighbors enjoyed this.
– Mella
Mella, thank you for sharing the recipe for this wonderful dessert.
I am a novice with yeast breads, but this recipe was very easy to follow. The “pan de coco” came out delicious and was a hit at our house. I used cupcake liners for each serving. The recipe yielded 24 individual servings and enough for us to share with coworkers and friends. I plan to make these again soon. Thanks, again!
You’re most welcome, Rosie! Thanks for the wonderful feedback. What lucky friends you have 🙂
– Mella